Rubix cube
pinshape
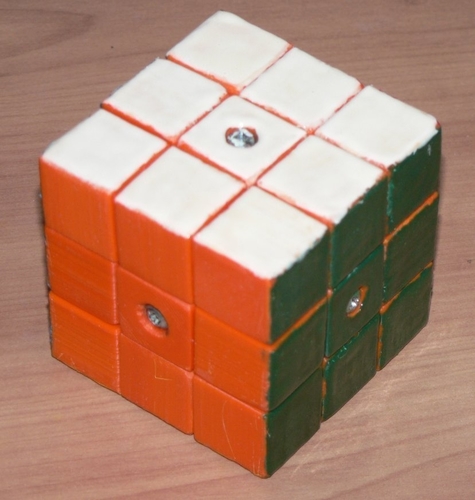
This is my attempt to design and make a 3D-printed Rubix cube. It's not perfect by any means, and will almost certainly require a little tweaking with a file to make the parts fit properly. I have tried to make it about the same size as a normal cube, however I might be a little out as I only had two bits from a proper one that I could measure. You will also need six M3 x 20 (22mm max) screws, six suitable springs and six M3 washers. The centre spider will need to be drilled through with a 2.5mm drill then tapped to M3. Be careful when doing this. It's easy to strip the threads. If using PLA, remember that the drill can get stuck easily due to the low melting point of PLA. It's best not to use supports in the printed holes in the centre spider, as they can cause the drill to wander off-centre. I've been using home-made ABS or ASA filament. When printing the 12 mid edge parts I have found that printing them so that the long bit is horizontal is best. The width (height when printing) is important. If it's too little, the corner bits will be loose. I used CURA for most parts, and switched to Simplify 3D for the mid corner parts due to height issues. The six centre blocks will need to be drilled through with a 3mm drill. Before first assembly, the parts might need to be tidied up. Each of the 12 mid centre (edge) blocks will need to be tidied where the support material is broken off, so that both sides of the long bit are the same distance from it's nearest edge. Using the 'unsupported ' (good) side of one of these blocks, each of the three faces of the triangular bit of each corner block will need to be checked that it fits as exactly as possible against a mid centre block. I had to do a bit of filing. Another approach that I tried with my first successful cube was to assemble the cube, give it plenty of exercise, then dismantle it and find the 'shiny' bits where the parts have been rubbing. I filed a little off the shiny bits then reassembled the cube and tried again, until it worked well. I have included photos to show my preferred order of assembling the blocks. Fit five of the six centre blocks first, then fit most of the other blocks, before fitting the last centre block. When you're satisfied that the cube is working as well as you can get it, use a SMALL amount of super-glue to lock the screw threads in place. If you use too much glue you won't be able to get the screws out again if you need to. Before fitting the last screw, a little spray silicone grease on the innards (of the cube) might help the cube operate more smoothly. I find that ABS or ASA is easier to sand or file than PLA. I've painted the coloured spots on using 'ABS glue', which is made from scrap ABS mixed with acetone. I scratched the first letter of each colour onto each block before dismantling and painting the colours on. The one made from black plastic has had the edges of the blocks carefully filed at 45 degrees to tidy up the painted-on colours. Please remember that this design is being provided for free, so please don't expect it to be perfect. Good luck!
With this file you will be able to print Rubix cube with your 3D printer. Click on the button and save the file on your computer to work, edit or customize your design. You can also find more 3D designs for printers on Rubix cube.