Rudder for Inflatable Kayak
thingiverse
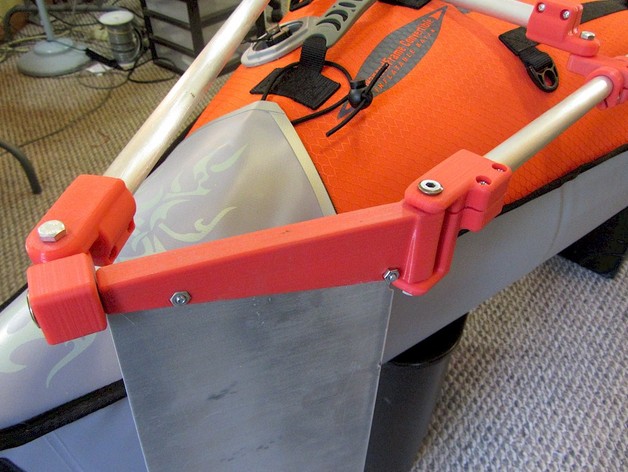
Unless your inflatable kayak is designed for attaching a rudder, it's pretty hard to rig your own because there is nothing solid to mount one to. This rudder, designed for an Advanced Elements Convertable, consists of rigid aluminum tubes anchored to 3 tiedown points. Pushing the rod fore and aft sets the rudder angle. Rotating the handle upward tilts the rudder up out of the water. It easily detaches from your kayak and breaks down quickly for storage. (Note that this rudder is mostly for trimming your tracking, because you can't really paddle and steer at the same time.) All parts can be printed on a 6x6" print bed. You might also want out check out this Better Rudder: http://www.thingiverse.com/thing:820015 Instructions You'll need the following 3D printed parts, all printed with 0.2mm layer thickness, 4 permieters and 25% infill: 1 anchorpoint.stl 1 coupler.stl 1 handle.stl 1 midlink.stl 2 ringclamp.stl 1 rudder.stl 1 rudderpivot.stl 1 ruddertail.stl 2 tiedown.stl 3 tube_end.stl You'll also need: 2 36" long, 3/4" dia aluminum tube 1 12.5" long, 3/4" dia aluminum tube 1 17.5" long, 3/4" dia aluminum tube 19 8-32 x 1" stainless screws 2 8-32 x 0.5" stainless screws 21 stainless nuts 3 1/4-20 x 1" stainless hex bolt 1 1/4-20 x 3" stainless hex bolt 1 1/4-20 x 2" stainless hex bolt 2 1/4-20 stainless nut 1 Rudder blade fabricated as per rudderblade.pdf Insert the rudder blade into the rudder and secure with the 2 short 8-32 screws and nuts. In the anchorpoint, midlink, rudder and ruddertail parts, tap the holes using a 1/4-20 tap. Don't tap the holes quite all the way through so that there will be a lot of friction on the last few threads to hold the bolts in place. Loosely assembly the 8-32 screws and nuts in all of the printed parts. Assemble as shown in the photos. Most of the printed parts get clamped tight on the aluminum tubes. However, the mid-link part only gets tightened enough to provide some friction to keep the blade vertical during use. On the longest bolt used for the rudder pivot, secure the end with 2 nuts locked together. It may also be necessary to put a strip of velcro along the side of the kayak underneath the handle (and with the mating velcro on the underside of the handle) to hold the pushbar in place after adjustng the steering angle. Note that this was designed for the Advance Elements Convertable kayak, but it can probably be made to work with other inflatables by adjusting the tube lengths, location of the midlink, and the orientation of the various link parts.
With this file you will be able to print Rudder for Inflatable Kayak with your 3D printer. Click on the button and save the file on your computer to work, edit or customize your design. You can also find more 3D designs for printers on Rudder for Inflatable Kayak.