Rx7 FC Single Din Radio Plate, with optional Gauges
thingiverse
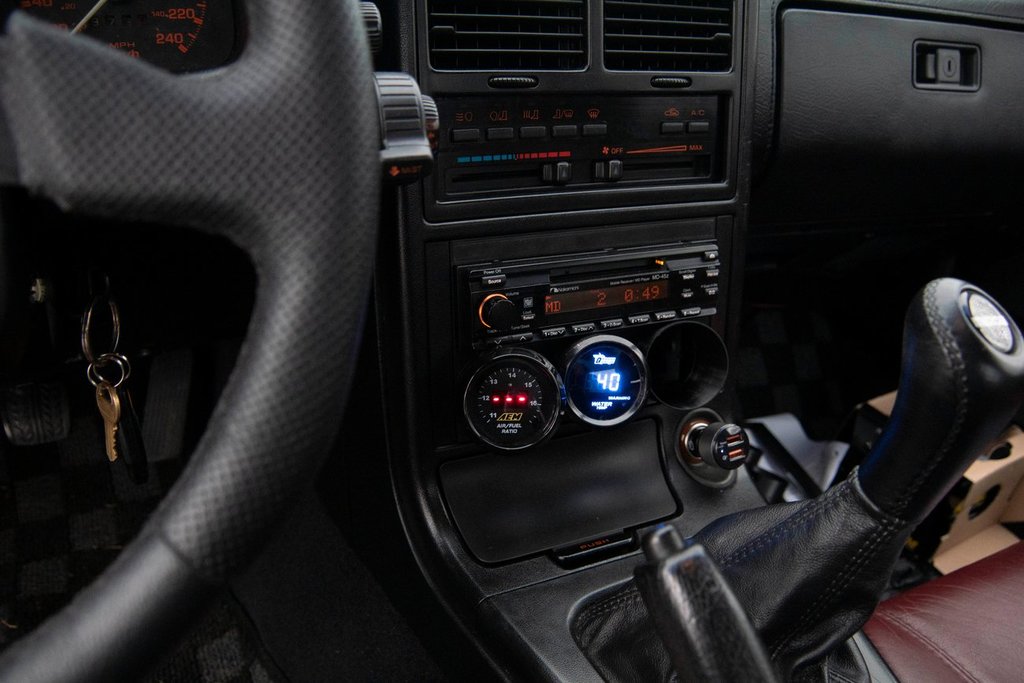
Thank you for downloading! The following files are included: rx7RadioPlate.stl rx7RadioPlateGauges Type 1.stl rx7RadioPlateGauges Type 2.stl The following applies to S4 models that originally came with the tape deck & equalizer. If you had a Series 5 model or a model with a CD player, I believe they will still work but have not tested. If you test and find it works, please let me know at chris.barbati@gmail.com and I will update this document accordingly. rx7RadioPlate.stl is a plate that fills the stock radio location, leaving space for a single DIN radio. The opening in the plate starts 14mm below the top of the stock radio opening, so you will need to mount the radio there or modify the STL accordingly. The flat area below the radio could be left blank, used to mount switches, lights, etc. There is a flange at the back which can be used to mount it to the stock plate, using six computer screws. The screw holes are present already on the back of the stock Mazda radio surround piece. You will need to drill the mounting holes in the finished print, so measure carefully before doing so. rx7RadioPlateGauges Type 1.stl has provisions for three standard 52mm gauges below the single DIN opening. They are angled over and up 15 degrees to point at the driver's eyes while seated. Type 1 has the barrels extend past the rear of the plate, allowing you to retain the original gauge mounts or use a simple flat piece with holes drilled in it. This does, however, limit the amount that the front of the barrels can protrude from the front without the mounting screws being too deep in the barrel to reach. Depending on your single DIN radio, the gauges may not clear or may block buttons. If measuring suggests this will be the case, see type 2. rx7RadioPlateGauges Type 2.stl is the type currently on my car (photographed). It extends the gauges further out to clear the stereo and the buttons (Nakamichi MD-45Z photographed). It also clears the ashtray, and still allows the ashtray to be installed and removed with the gauges installed. However, it loses the ability to retain the stock gauge mounting setup on the rear, since the rear is flat. The gauge mounting studs are not nearly long enough to be used in this model. I mounted my gauges by putting a pea -sized drop of RTV at the back of the barrel (on the inside) and dropping the gauge in, then letting it dry for 24 hours. It's solid and can be removed easily without damaging the gauge or mounting plate, and of course the RTV is inside the barrel so you don't see it. If you prefer to mount mounting them mechanically, you will need to use Type 1 or design your own mounting system. If you're looking for a simple blanking plate, please see my other models. Printing instructions: Material: ABS (PETG should be fine, have not tested) Enclosure: Required for ABS, recommended for PETG. Nozzle Temp (ABS): 240C Bed Temp (ABS): 110C Support: Not required, except for Gauges Type 1 Adhesion: Brim recommended for ABS, not tested with PETG. Infill: 20% These files are provided free to use. You can print as many as you want, share with your friends, etc. Please do not redistribute the file publicly. You are not free to charge for the file or to print units for resale.
With this file you will be able to print Rx7 FC Single Din Radio Plate, with optional Gauges with your 3D printer. Click on the button and save the file on your computer to work, edit or customize your design. You can also find more 3D designs for printers on Rx7 FC Single Din Radio Plate, with optional Gauges.