Ryobi 18V to 40V adapter
thingiverse
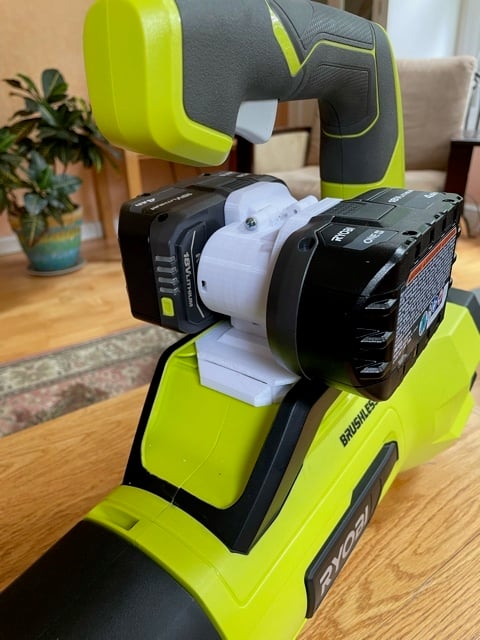
An adapter for two Ryobi 18V ONE+ batteries to a Ryobi 40V. The 40V battery base slides and snaps into position. A release lever unlocks it. The 18V battery holder was remixed from https://www.thingiverse.com/thing:2664154. I had used this design for my ebike batteries, but the clips broke from stress. I reinforced the sides to strengthen it. Also, the use of solid copper wires for the battery contacts was not ideal. They worked initially but were tight. After some time, they wore out and the contacts failed. What's needed are spring contacts. The battery stems were also remixed to accept spring contacts. These were made from sheet metal from a tin can. (A stiffer and more springy metal would be preferred.) The contacts were then soldered to 14 gauge solid copper wire. Printing: 18V Battery Holder and Stems: No supports needed. Use 100% infill for strength. 40V Battery Base: Use supports. 80% infill. See https://www.thingiverse.com/thing:4874161 for instructions on removing supports. Assembly: Fabricate the battery contact springs as pictured. Wrap it around the wire ends and solder. Install the stems and ensure the contacts are aligned. Wire the batteries in series and attach the two battery holders together. Be aware that the 4 screw holes that 40V Battery Base mount onto may not be square. The holes on the 40V Battery Base may need to be adjusted otherwise the batteries will not sit straight when attached to the tool.
With this file you will be able to print Ryobi 18V to 40V adapter with your 3D printer. Click on the button and save the file on your computer to work, edit or customize your design. You can also find more 3D designs for printers on Ryobi 18V to 40V adapter.