Ryobi One+ Double Battery Pack 18V
thingiverse
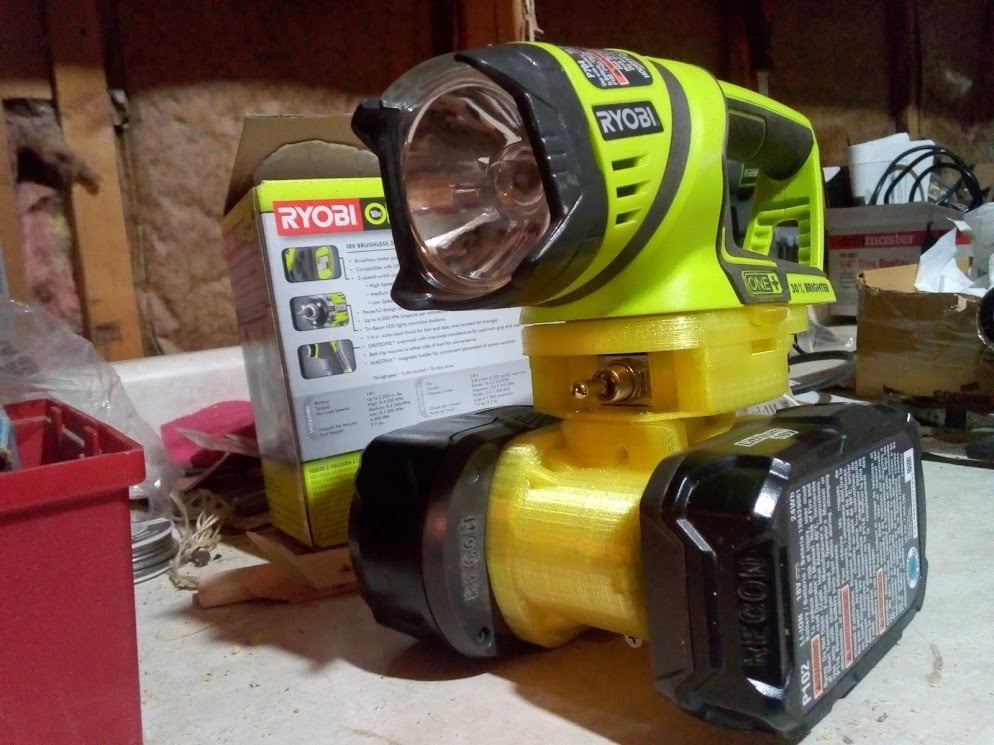
This is a battery pack to use two Ryobi One+ batteries with a tool (https://youtu.be/KomE9KIKsI4). It has mounting points for two batteries (any kind of Ryobi One+ battery is supported) and a switch to select which battery is powering the tool. This does not link the batteries in series and does not increase voltage to the tool. (You could wire it differently and run your tools at higher voltage but you wouldn't do that, would you?) (Don't. But if you do, record it and put it on YouTube!) *Note: this may not work with all tools -- think about the direction of the battery socket and how much space there is around it for the tool you want to use. (For example, this would not work with my Ryobi circular saw since one of the batteries would extend below the saw shoe.) This design borrows heavily from flyingaz's Milwaukee to Ryobi Battery Adapter design (https://www.thingiverse.com/thing:1677812) and simhopp's USB Power Bank for Ryobi 18v One+ Battery (https://www.thingiverse.com/thing:1897607/). I would not have been able to put this together without using their designs. I used PLA to print this. Be careful tightening the screws, the hole loops on the bottom are not very strong and easily break if overtightened. I was planning on using four screws to hold the two lower halves together but later realized that I didn't need the top two screws since the switch box has four mounting screws joining the two halves. Non-plastic pieces used: (1) DPDT switch (I used a Gardner Bender GSW-16 toggle switch) (6) pieces of 14-gauge solid wire (4) #8 3/4" screws (use 5 #8 1" or 1-1/4" screws if using SwitchBox_v4 & TopStem_v2) (4) #6 1/2" screws (2) #6 1" screws (2) 3/8" x 5/8" springs (2) 1/2" tube strap pipe hangers (2) small screws & nuts (or rivets) (6) loop terminals for 14ga wire Plastic Pieces: (2) Battery shells (1) Switch box (1) Top stem (2) Buttons (4) Wire posts Print & assembly instructions: 1. Print two 'battery shells'. I used 25% infill, .2mm layer height, high speed, normal shells. Approximately 4.5 hours and 17.8 meters of filament each. 2. Cut away support material from battery shells using utility knife or Dremel tool 3. Print one 'switch box'. I used 20% infill, .2mm layer height, high speed, normal shells. Approximately 1.75 hours and 8.3 meters of filament. 4. Print one 'top stem'. I used 25% infill, .2mm layer height, high speed, normal shells. Approximately 4 hours and 17.1 meters of filament. 5. Print one set of 'wire posts'. I printed these with 90% infill, .2mm layer height, medium speed, normal shells. Approximately 1.5 hours and 3.2 meters of filament. 6. Print two 'buttons'. I printed these with 90% infill, .4mm layer height, high speed, normal shells. Approximately 20 minutes, 1.9 meters of filament. 7. Attach the two battery shells using two or four #6 1" screws. Be careful not to overtighten them. 8. Drill holes for wires to pass through from switch box into the space between the battery shells. I would like to add a passage for wires but did not get to it so far. 9. Run four wires from switch box into the battery shells, two for each battery. Make sure you can identify which wire is which, I used different colors for each wire. 10. Cut away excess material from wire posts (I printed them together because they fell over when I tried to print them individually). 11. Insert wires into wire posts, push them into battery shells and push excess wire into the space between battery shells. (See simhopp's USB adapter post for a photo of how the wires fit into the wire posts.) 12. Attach switch box to top of the battery shells using four #6 1/2" screws. 13. Flatten and bend 1/2" strips of metal for battery contacts on the top stem. I soldered them to two short wires that connect to the switch, this could also be done with loop terminals. After attaching these two wires, drill holes in the top stem and fasten the metal contacts to the top stem using rivets or short screws. 14. Insert buttons into the top stem with 3/8"x5/8" springs. 15. Connect all six wires to your switch, I used loop terminals to do this. Make sure you can identify which wires are positive/negative and which connect to each battery before you do this. I had my wires like this: Load A1 (blue wire), Line A (black), Load A2 (brown), Load B1 (red), Line B (white), Load B2 (green). The switch box was a tight fit for my switch, I wished I had made it larger to allow more room for wires and terminals (but it does all fit). 16. Push switch into place and attach top stem to switch box using four #8 3/4" screws. Total estimated print time: 17 hours Total estimated filament used: ~66 meters Update: after about a day I'm seeing some delamination in the middle front wall of the switch box (opposite where the switch toggle is). I hope making the walls thicker (and making the switch box larger overall) and using longer screws from the top stem into the switch box may help. Printing with higher infill might also help. Update 2: I've added a new version of the switch box and top stem to make it stronger. I reassembled it today and so far it's holding up better. The updated version is 'SwitchBox_v4' and 'TopStem_v2'. (You can use SwitchBox_v4 with TopStem_v1 -- it just won't have the 5th screw hole on the front.) With the updated pieces, you can use #8 3/4", 1" or 1-1/4" screws.
With this file you will be able to print Ryobi One+ Double Battery Pack 18V with your 3D printer. Click on the button and save the file on your computer to work, edit or customize your design. You can also find more 3D designs for printers on Ryobi One+ Double Battery Pack 18V.