Safety Stop Switch Mushroom Button Cover for MiniLathe
prusaprinters
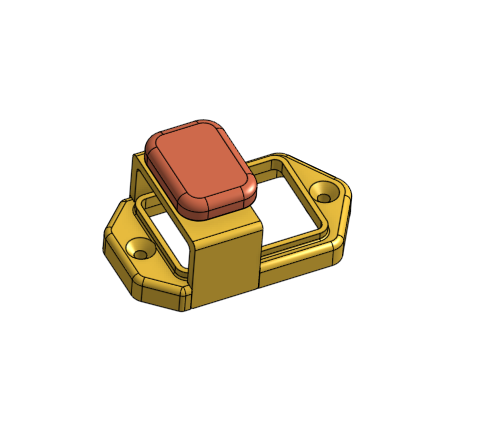
<p>Designed and printed this for a friend. I have indicated that this is a remix of a similar print I made for a mini-mill; however, I did need to extensively redesign the cover section to fit the slightly different switch dimensions on the lathe.</p><p><br>This print is for specific models of bench-top mini-lathes that have the type of switch shown in the included (slightly blurry) photo. That particular switch has a "flip up" cover which is aggravating to use (seems to have been replaced in recent models). As near as I have been able to determine, that particular switch and cover combination is a model Kedu KDJ17B-16.</p><p><br>This print adds a large easy-to-access button over the existing Off button. To mount the new button, simple remove the existing switch cover and replace it with the new “button cover” using the same mounting screws.</p><p><br>Note that the existing switch and cover are held on by machine screws and nuts. You will need to open the switch panel to access the nuts by removing the fours screws at the corners of the panel. After remove the screws and nuts holding on the switch cover (and removing the cover), use the same screws and nuts to fasten on the new cover.</p><p>The original cover uses counterbored holes for the mounting screws. As an alternative, I have also provided a version which uses countersunk mounting holes if you prefer to use flat head screws.</p><p>In addition, I have also included an additional style of button with “STOP” on it - this can be printed int two colors with filament switching.</p><p>Finally, not that the “sleeve” (the parts that holds the button assembly) is provided in two different heights - choose the height that works best for you.</p><h4><br>Assembly</h4><p><br>[See photos] Insert the Sleeve into the Cover - this is a tight fit so you will need to press it on firmly (I recommend using a small amount of glue). Insert the Stem piece into the Sleeve so that the flat part will contact the stop button, and the Stem collar is captured by the Sleeve. Place the Button onto the top of the Stem - I recommend applying a small amount of glue to the groove in the Button first.</p><p><br>Place the assembled cover over the existing switch so that the new “mushroom” button is over the existing stop button; use the screws from the old cover to fasten the new cover in place.</p><h4><br>Print Instructions</h4><p><br>Print in PETG using the 3mf or stl files provided. In general :</p><ul><li>perimeters = 4 (2 perimeters for the Button)</li><li>15% rectilinear infill</li></ul><h4><br>CAD</h4><p><br>The OnShape 3D CAD files for this are here :</p><p><br><a href="https://cad.onshape.com/documents/243a6d7e08d846364a9d4d0a/w/5c42bc433fbb2430b83445dd/e/d9076c8ac5819154ed12f38b">https://cad.onshape.com/documents/243a6d7e08d846364a9d4d0a/w/5c42bc433fbb2430b83445dd/e/d9076c8ac5819154ed12f38b</a></p><p>Bonus CAD - In making this print, I modeled the original switch here (note that the actual switch cover includes two screws and three springs not included in the model):</p><p><a href="https://cad.onshape.com/documents/59727890b0f1ed7ce64bfefd/w/8587de196ac7b4a58c0a8df2/e/b48c8b0a5d8ddf602746b1d9">https://cad.onshape.com/documents/59727890b0f1ed7ce64bfefd/w/8587de196ac7b4a58c0a8df2/e/b48c8b0a5d8ddf602746b1d9</a></p><p> </p><p> </p>
With this file you will be able to print Safety Stop Switch Mushroom Button Cover for MiniLathe with your 3D printer. Click on the button and save the file on your computer to work, edit or customize your design. You can also find more 3D designs for printers on Safety Stop Switch Mushroom Button Cover for MiniLathe.