Saitek/Logitech Pro Flight Yoke 180 degree mod
thingiverse
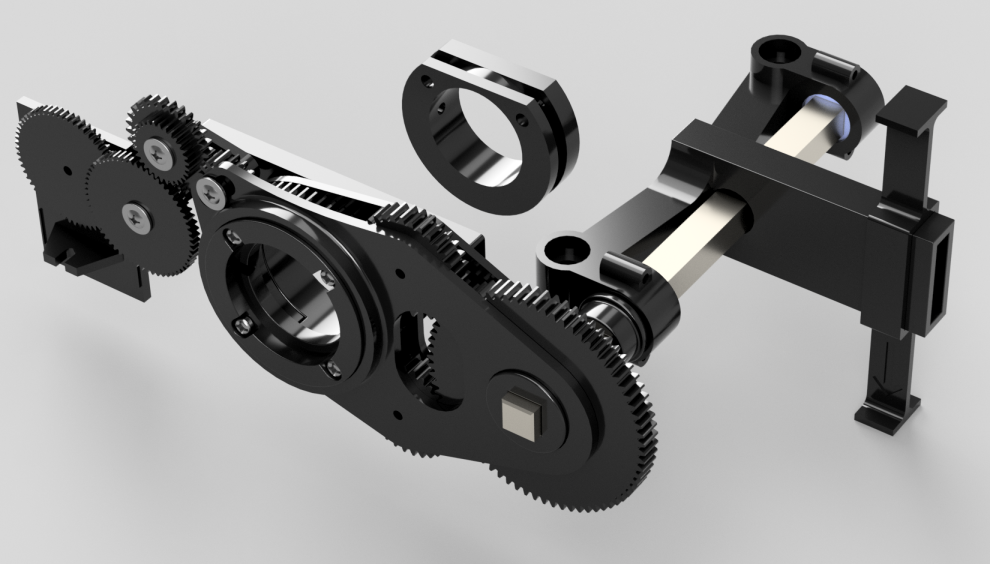
The Saitek Pro Flight Yoke shaft's rotation is limited to 90 degrees of rotation, this mod to increases that to 180 degree creating a more realistic interface. There is another 180 on thingyverse which is worth checking out, but I figured I could do better. To some degree I wish I had never tried, but I feel the result was worth it! I have tried to keep the parts list as simple as possible (not including the many printed parts of course), and those parts which you will need to purchase are easyto acquire. Disclaimer time: The project involves the full disassembly of the complex hardware, so before starting the upgrade, please make sure that you have the proper skills to complete it. I am not responsible for any damage resulting from this upgrade. Though the upgrade is fully reversible (original parts can be always put back), please make sure that you do not damage anything beyond repair. Throughout assembly be sure to do a quick dry fit to make sure all parts move freely. If not sand/file where necessary, and grease/lube up all plastic-on-plastic surfaces! All efforts are made to ensure tollerances are as tight as possible without binding. Some parts are made to be intentionally tight, like the gear and retention caps on the torque assembly. If you're struggling i suggest heating up the spindle to help first fit. Almost all screws can be found on parts removed. I needed 1 more which I found on lid of the box which secures a rail that is redundant following this mod. You'll also need 4 M2x8mm screws for the torque box, as well as a cartidge spring and spindle (details below). From my own testing after applying this modification I can report that the input of the modified yoke is perfectly linear except for deadzone at top center which is marginally wider now because of the extended range. The pitch range is perfectly mapped from 90 to 180 while still maintaining the same range on the potentiometer. Using the BU0836A mod is still an option here (https://www.thingiverse.com/thing:4680136) , and would be worth looking into to fix dead zone. I have tried to maintain compatibility with 'rubber band' mods where possible, but the torque box system gives me all the feedback I require and has a unique feature/bug that makes the torque tapper off at the limits. I did anticipate this by limiting the toque output range to about 170 degree, a smaller range would be better, but space is already limited. To upgrade the yoke you need to do the following: 1. Start by removing the steering yoke (keep the screws seperate, they are a different size to the main unit). Split the case, remove the securing pin on the end of the shaft, and carefully draw the cables out the back. Put the steering plastics to one side. 2. Open the Yoke's case and remove all screws that hold the shaft and the variable resistor for the roll as well as the roll mechanism's spring, disassemble the roll control mechanism, remove the gear from the roll's variable resistor. 3. Remove the old pitch tension mechanism together with its springs, leave only the lever going to the variable resistor that controls the pitch. I removed the top spring here on the pitch linkages and just put the screws back in as can be seen in the photos. This just make the pitch softer, but less snappy. 4. Remove all plastic parts from from the yoke's shaft, make sure not to lose the metal pin and the rollers that are located inside the roll driver mechanism, you will need them later. Don't remove the back shaft support. 5. I opted to draw the cable back along the whole shaft by about 2cm here to give some cable strain relief when going through the wider range later. 6. Install the new pitch collar as shown on the supplied pictures, insert the newly-made pin (I cut down my own pin that i'd removed earlier) into it. The pin must be flush with the inside faces. 7. Replace the mid shaft support, install the new main gear limiter. (make sure it moves freely). 8. Fully assemble the torque gears assembly and sandwiche it together with the front and rear mount plates. Don't worry about allignment of the gears just yet, the main gear is quite sloppy until it's seated on the limiter. 9. Slide the torque gear assembly on the shaft and reinstall the old pin. Secure the maingear with the original pin and plastic rollers and the new faceplate. 10. To allign, place everything so far back in the case. Set the shaft in the level position, and the final torque gears square spindle apeture should also be level (hold the assemble roughly in it's final possition when doing this). Re-use original screws to secure the maingears faceplate to lock this all down. 11. Slide on the final shaft support and spacer ring. At this point you can screw the shaft supports all back down again. 12. Build up the torque box assembly. You'll need a spring cartridge commonly found in UPVC doors 22mm x 62mm x 4mm. An 8mm door spindle at 140mm length. 4 x M2x8mm screws (I just used some old laptop screws, but self-tapping should also work). If the bushing cap bind at all when greased and screwed, try backing the screws out slightly. Make sure the bushing seats are printed cleanly. 13. Slide retention caps on the previous assemble spindle shaft and push into the final torque gear. The free movement of the torque gears assembly should help here. Push the torque box assembly down onto the case posts. The top face should be flush with the top of the posts. 14. Build up the Roll gear assembly and screw it down in the place of the original, re-using the original gears for the potentiometer. 15. Allign assemble to the pot. The yoke shaft should be level again, and you may need to pull the last roll gear back slightly from the maingear if you did not jump the gun and screw that down already! You want to be able to draw a virtual line through from the first gear on the mounting plate to the gear on the pot straght through a pair of small dots on the factory gears. Look very close and you should see what i'm talking about. After this install the screw securing the roll gear assembly to the torque gear assemble. 16. Re-build the steering yoke plastics back onto the shaft, put the covers back on (you might have to wiggle this a little to find the posts with the torque holding on to them) and if did everything right and nothing if sticking because you checked it and greased it, you should be just about done! Here is a video of an earlier prototype if you want to see the mechanism in action: https://www.youtube.com/watch?v=BrtZAfy2MIc
With this file you will be able to print Saitek/Logitech Pro Flight Yoke 180 degree mod with your 3D printer. Click on the button and save the file on your computer to work, edit or customize your design. You can also find more 3D designs for printers on Saitek/Logitech Pro Flight Yoke 180 degree mod.