Saitek Pro Flight Yoke 180 degree rotation mod
thingiverse
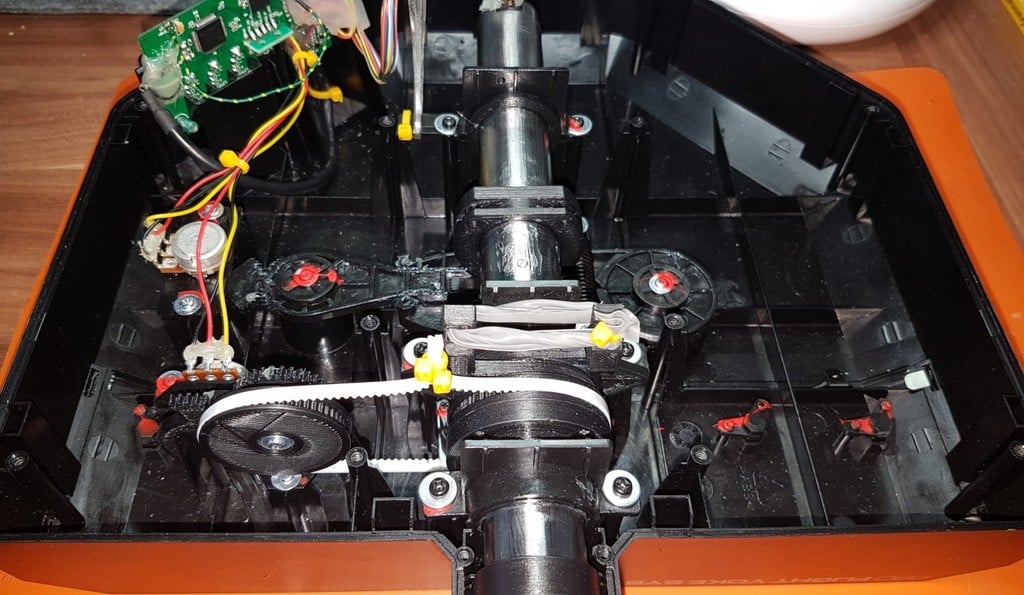
The Saitek Pro Flight Yoke shaft's rotation is limited to 90 degree angle while its more expensive "sister" - the Cessna Yoke has the 180 degree rotation capability. As most of the real aircrafts' yokes as well as the professional yokes for flight simulation support the 180 degree rotation, I've decided to give my Pro Flight yoke an upgrade. The project involves the full disassembly of the complex hardware, so before starting the upgrade, please make sure that you have proper skills to complete it. I am not responsible for any damages resulted from this upgrade. Though the upgrade is fully reversible (original parts can be always put back), please make sure that you don't damage anything beyond repair. WARNING! The tests performed by several people after applying this modification indicated that the input of the modified yoke became non-linear. The modification affected how the yoke behaved in the simulator and this behavior became different compared to the one before the modification. If you can't adjust the controls so that they became linear again and allow the smooth controlling of the aircraft at all rotation angles of the yoke, it's advised to reverse the modification. You can also replace the original controller board with Leo Bodnar's BU0836A controller board in case the original board is broken. This new custom board allows more linear input from the pitch and roll variable resistors and thus, smoother control of the aircraft. More information can be found here: https://www.thingiverse.com/thing:4680136 To upgrade the yoke you have to do the following: 1. Open the Yoke's case and remove all screws that hold the shaft and the variable resistor for the roll as well as the roll mechanism's spring, disassemble the roll control mechanism, remove the gear from the roll's variable resistor 2. Remove the old pitch tension mechanism together with its springs, leave only the lever going to the variable resistor that controls the pitch 3. Remove 2 screws from the rear shaft's holder back and glue the white sleeve into the holder with a strong glue 4. Remove all plastic parts from from the yoke's shaft, make sure not to lose the metal pin and the rollers that are located inside the roll driver mechanism (you will need them later) 5. Install the cable protector on the cable at the end of the shaft, secure it with hot glue as shown on the supplied picture and put the rear holder on the shaft 6. Install the new pitch driver's clutch as shown on the supplied pictures, insert the newly-made pin (the pin has to be cut from a 2.9mm diameter nail and filed from both ends) into it and then glue the pin from one side (the pin must not stick out from the groove's bottom) 7. Assemble and put back the original pitch tension mechanism (unless you want to use the "Rubber mod" from Youtube) and put the middle shaft holder on the shaft 8. Apply grease onto the 2 roll angle limiter parts, put them together as shown on the supplied picture and install them on the shaft 9. Assemble the roll driver mechanism (use the original pin and rollers, as well as 4 screws), grease it and install on the shaft as shown on the supplied pictures 10. Put the front shaft holder and its sleeve on the shaft 11. Install the front sleeve and connect the yoke's handle to the shaft 12. Cut the hole for the belt as shown on the supplied picture 13. Replace the nut holder under the roll gear with the new one as shown on the supplied picture 14. Put the new gear onto the roll's variable resistor, mind the key 15. Assemble the roll mechanism as shown on the supplied picture, don't forget to grease it, mind the key when connecting the gear and the pulley together, secure them with the screw from the original assembly 16. Install the sturdy rubber band as shown on the supplied picture; it should be rather stiff so that you could feel its resistance when you turn the shaft all the way to the right or to the left 17. Install the timing belt as shown on the supplied picture, tighten it (but not too much!) and adjust the mechanism so that when the shaft is in the neutral position, the gears of the roll control mechanism touch each other in the middle as well; measure the resistance on the variable resistor's pins - it should read 1.8-1.9 kOhm from both sides of the resistor 18. Remove the rotation angle limiting plank that is located on the inside of the top yoke's cover 19. Install the rubber band for the wires as shown on the supplied picture and secure it, this is needed to avoid damaging the wires when rotating or pulling the yoke's shaft 20. Make sure that the pitch control lever's pin is located inside the pitch driver clutch's groove, make sure that the driver's groove is well-greased 21. See the supplied videos and if your mechanism functions as shown in the video, grease the shaft a bit and assemble the yoke's case. Done! The below videos show how the Saitek's Pro Flight Yoke functions after installing the 180 degree rotation mod: https://youtu.be/08HHLVGa9TE https://youtu.be/g-3My-s4lxg The timing belt must be GT2 type, 3mm wide, 2mm gap between teeth, preferably with steel wires inside, for example: https://www.amazon.de/gp/product/B083F4BFJ9 NOTE: This mod is compatible with the "Rubber band" mods for the Saitek's Pro Flight Yoke that you can find on Youtube. There are holes for the rubber bands in the pitch driver's clutch. With the rubber band mod you don't need the pitch driver tension mechanism as well as the rubber band on the top of the rotation limiters. If you don't plan to install the "Rubber band" mod, you don't need to remove the pitch tensioner at pp.2. And finally, just to give you an example how many tries it took to make things right, check the "failures.jpg" image... If you want to make a small donation in appreciation of my humble efforts, please use the "Tip designer" button on this page: https://www.thingiverse.com/Wierzbowsky/designs
With this file you will be able to print Saitek Pro Flight Yoke 180 degree rotation mod with your 3D printer. Click on the button and save the file on your computer to work, edit or customize your design. You can also find more 3D designs for printers on Saitek Pro Flight Yoke 180 degree rotation mod.