Salud CO2 Monitor
prusaprinters
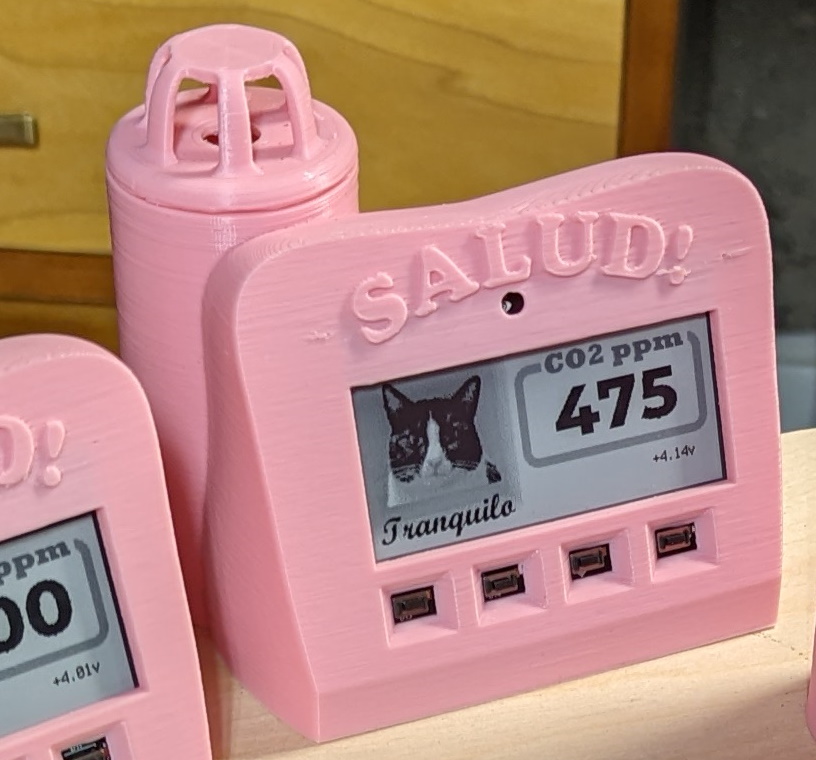
<h3>Salud! To your health!</h3><p>The Salud CO2 Monitor was designed to inform you of your local air quality in terms of CO2, while also featuring a long battery life and simple no-solder assembly.</p><p>In addition to the three 3d-printed enclosure parts, you will need:</p><ul><li>4 M3 hex socket head screws. Anything 5 to 10mm is fine for length</li><li>Adafruit Magtag <a href="https://www.adafruit.com/product/4800">https://www.adafruit.com/product/4800</a></li><li>Adafruit SCD-41 True CO2 Sensor <a href="https://www.adafruit.com/product/5190">https://www.adafruit.com/product/5190</a></li><li>Battery. Case is designed for Adafruit 2000mAh 3.7v LiIon. Beware reverse polarity on most non-Adafruit LiIon batteries! <a href="https://www.adafruit.com/product/2011">https://www.adafruit.com/product/2011</a></li><li>100mm STEMMA QT cable <a href="https://www.adafruit.com/product/4210">https://www.adafruit.com/product/4210</a></li></ul><p>All told that's just under $110 for the gubbins. Not pocket change, but these are quality parts that won't disappoint. The MagTag packs a ton of capability into one part. Hit a sale or promo and it will be cheaper. You could pinch pennies on a different CO2 sensor. Digikey also sells Adafruit parts.</p><p>The sensor is a Sensiron SCD41. It goes to 5,000 and will take a manual fresh-air calibration. There are many documents available here: https://sensirion.com/products/catalog/SEK-SCD41/ and the design-in guide here is also relevant: https://sensirion.com/resource/user_guide/scd4x/design-in</p><p>I tried to adhere as best I could to the design-in guidelines regarding sensor access to fresh air and protection from the elements. It isn't perfect as it is hard to truly isolate the sensor portion of the module from the other components on the PCB.</p><h4>Features</h4><ul><li>No solder assembly. No coding required. A few options and environmental settings should be edited in a short config file.</li><li>With default settings, it goes over a week on a full battery charge.</li><li>Support for a manual "fresh air" calibration of the CO2 sensor</li><li>Optionally upload data via wifi to Adafruit IO for charting, trend analysis, etc.</li><li>Three status levels. They could be smiley faces, but that's boring so I did cats instead. If you see a tuxedo cat, be calm. Be tranquilo. If you see the tabby cat, be alarmed, alerta! And there is another alarm level with a biohazard symbol. Substitute your own bmp image files as you wish.</li></ul><h4>Printing</h4><p>This needs supports. A lot of supports. Sorry. They are all in interior spaces.</p><p>I think it is worth adding small support blockers on the threads for the cap, and around the holes for the button and hole for the light sensor.</p><p>To ease removal, set your supports loose. We don't care if the interior is a little rough. Top contact Z distance 0.30, Pattern spacing 4 or 5, XY separation 95%</p><h4>Assembly</h4><p>Take care handling the sensor module. Touch only the edges of the PCB. Handle only with tools (tweezers, needle nose pliers, etc.) when positioning for installation.</p><p>Connect the STEMMA cable to the sensor, either side, and install with two screws. No need to fill all four holes. Screw the cap over the sensor.</p><p>Install the MagTag. The top edge fits under a lip on the interior of the case. The MagTag is secured from below by pressure from the two protrusions on the cover.</p><p>Connect the STEMMA and battery cables. Make sure the MagTag power switch is on before installing. There is no access to it once installed. It is mechanically weak, so I thought it better to cover it up. There is no off switch! You could add one on the battery + cable, but that would violate the “no solder” design goal. Plus also, YAGNI.</p><p>Use two screws to secure the cover. Take care to ensure the MagTag is in its final position so the cover can firmly secure it in place.</p><h4>Software Installation</h4><p>Consult Adafruit documentation regarding setting the MagTag up with CircuitPython. Go here: <a href="https://learn.adafruit.com/adafruit-magtag">https://learn.adafruit.com/adafruit-magtag</a> and get it all setup. Make sure to get CircuitPython of at least version 7.1.1 It is just dragging files. No coding.</p><p>This issue is cause for some concern. I need to do my own testing to validate it: <a href="https://github.com/adafruit/circuitpython/issues/5839">https://github.com/adafruit/circuitpython/issues/5839</a> I have a sensitive clamp meter I'm going to put on the battery cable. I wouldn't be surprised if this is the case. Sleep, alarms, and wake context are all things that don't seem to "just work" all the time with CircuitPython. It is a good reminder that CircuitPython is Beta software.</p><p>Get the code, images, and font here: <a href="https://github.com/patja/salud-co2-monitor/releases/tag/v1.0.0">https://github.com/patja/salud-co2-monitor/releases/tag/v1.0.0</a> </p><p>Once CircuitPython is all setup, copy the files from the project's CIRCUITPY folder to the MagTag using a USB-C cable. Edit secrets.py and config.py to your needs and local environment. Setting the atmospheric pressure and altitude for your location will make the calibration more accurate. To disable wifi and any logging, just leave the wifi and Adafruit IO settings as default ""</p><p>You can also customize the URL used to generate the QR code for your user support guide's web page.</p><p>Copy the following to the lib folder on the MagTag: adafruit_bitmap_font, adafruit_bus_device, adafruit_display_text, adafruit_esp32spi, adafruit_io, adafruit_logging, adafruit_magtag, adafruit_portalbase (those are all folders) and the following individual files: adafruit_fakerequests.mpy, adafruit_lis3dh.mpy, adafruit_miniqr.mpy, adafruit_request.mpy, neopixel.mpy, simpleio.mpy . See the Adafruit CircuitPython documentation regarding libraries if you need to know more about that.</p><h4>Use</h4><p>First, make sure the thing works. It should come up with a measurement showing CO2 ppm and the battery voltage.</p><p>After editing the config.py file with your local barometric pressure, elevation, and fresh air CO2 ppm level, you need to perform a manual fresh air calibration. Press either of the left two buttons to wake it from sleep and display the calibration and QR code page. </p><p>Place the unit in fresh air out of direct sunlight. Press button B, the second one from the left, to start the fresh air calibration. It takes about 6 minutes.</p><p>Charge it when it complains.</p><p>If in doubt or you want to show someone a demo, force a refresh by waking it from sleep and then exiting the page with the QR code. This forces an immediate refresh. If you want, breathe gently in the vicinity of the sensor and you will see a high reading.</p><p>I hope that you will make some as gifts and give it in the spirit with which it was designed:<br><i><strong>Salud! To your health!</strong></i></p>
With this file you will be able to print Salud CO2 Monitor with your 3D printer. Click on the button and save the file on your computer to work, edit or customize your design. You can also find more 3D designs for printers on Salud CO2 Monitor.