Samson SR850 detatchable cable mod
thingiverse
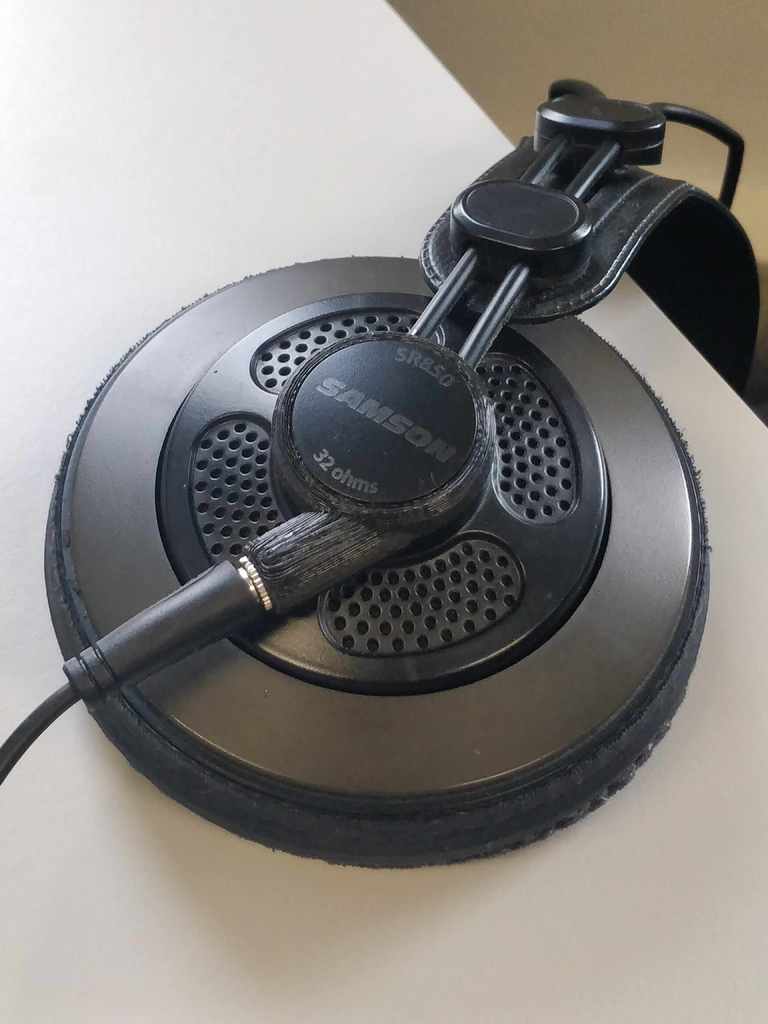
I like these headphones a lot. They are comfortable all day and have great sound for the price they are at. The issue I had with it was that my cable was broken at the source. My cable was at the end of its life and so the headphones were thrown in the cabinet to be forgotten about, until I created a fix for them. Since I am learning 3d design and cad I decided to make my own part. There is one other part on here that I tried making (https://www.thingiverse.com/thing:4927763) but I didn't like how it protruded too much. I tried to copy the original cover and added an extension where the audio jack fits in. The audio jack I used is a PJ-392 (The round ring version). !!!This mod will require you to take away material off the headphone housing!!! Instructions: Use a knife to take off the cap. Desolder the wire if it is still connected. First test fit everything and fit it. Use a white marker to mark the outline of the jack. Dremel or grind a hole for the audio jack to pass through. Stay within the clearance of your marked line. Test fit the jack and drill the screw holes so they will fit! You can solder The wires to the jack first to make it easier to solder later on. I recommend putting shrink socks around it but its not necessary and I didn't. Use copper wires of about an inch or 2 cm long to make sure you wont have too much wire to mess around with. Do keep in mind ground has to be about a cm longer than the other one. There are great tutorials online teaching it. Use soldering fat or add tin, desolder and re solder with your own solder if you don't have it. Once its soldered, slide on the 3D printed part and hold the jack in place. Twist in the ring in place with your self made tool or screwdriver and test fit it again. Screw in the original screw and test the headphone audio to see if it works and the right side is right. You can put on the cap and if it doesn't stick tight enough. Use some nail polish that hardens out to keep it in place. - Small tip. If your elastic is getting worn out, the best time to replace it is now. The tools I used to make this project: A 3d printer A dremel with a domed grinding bit. A soldering iron. Screwdrivers for unscrewing. A knife for cleaning up printing burrs and taking off the cap off the original part. Additional materials Required and Additional R- Soldering fat with solder or solder which doesn't need soldering fat. R- copper wire R- 1 mm drill bit to drill out the holes for the cap. 2mm drill bit for the bolt holes holding the cap in place. A- black nail polish to create a smooth finish on the part. (this will react with abs, may make it smoother or ruin it.) A- you can use an angle grinder on a piece of metal to create a tool to screw in the end. I didn't bother with this and messed around with a screwdriver. - This is my first part. Please give feedback or tell me if there is an issue with the part on your end.
With this file you will be able to print Samson SR850 detatchable cable mod with your 3D printer. Click on the button and save the file on your computer to work, edit or customize your design. You can also find more 3D designs for printers on Samson SR850 detatchable cable mod.