Samsung Galaxy Note 3 Case w/ Cover, Magnetized
thingiverse
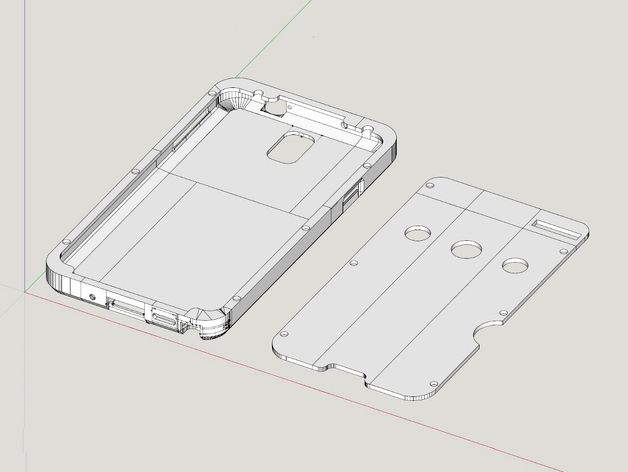
UPDATE 10-15-2014 . I uploaded a new version of the cover that gets rid of a small gap in the bottom corners, as brought to my attention by user Kareesmoon. . This is a variation of my Ultimate Samsung Galaxy Note 3 case. The difference is this one does not have the Sugru bumpers. . Here are the other variations: Ultimate (Magnets, Cover, Bumpers) :http://www.thingiverse.com/thing:407517 No Cover (Sugru Bumpers, No Magnets):http://www.thingiverse.com/thing:424089 No-Frills (No bumpers, no cover, no magnets):http://www.thingiverse.com/thing:415418 . I designed the case in three parts so that printers with small build areas (6"x6") such as the Printrbot Simple Metal could still print it. . The case features a protective cover with holes cut out to show the time and the music/audiobook/podcast navigation buttons. Now you can check the time in a theatre without distracting your fellow movie-goers! . The cover is held on by tiny magnets. You can purchase them for under 3 bucks here: http://amzn.to/1oqjeMp I also added magnets to the back of the case so you can place the cover on the back when you're using the phone. The back magnets also allow you to use the cover as a stand. (See pictures.) . This case is designed to fit the Note 3 WITHOUT the original back piece. You can still access the battery by sliding off the two sections. . I initially printed a hole in the cover that allowed you to take pictures with the cover attached to the back, but I took this off because I realized I am always going to take the cover off when taking pictures. Instructions Parts list: 1/8" x 1/16" magnets, quantity 18.. http://amzn.to/1oqjeMp Epoxy Adhesive, such as Loctite 5 Minute Instant Mix: http://amzn.to/1tqn1MR . Print the Top, Bottom, and Cover using support structures for the Top and Bottom. I highly recommend InTheGarage's Slic3r settings here: http://www.camwatt.com/printrbot-simple-metal-slic3r-settings.html . Clean out the support structures using pliers. Fine tune with a Dremel and sandpaper. Be very careful around the openings. Keep testing until you achieve a snug fit. (Remove Note 3 back before sliding on case. This case doesn't use the original back.) I added a half millimeter extra of length to the edges where the Top and Bottom meet in order to get a gapless fit. You may need to sand these areas to achieve a perfect fit. . Lightly Dremel the magnet holes. There are 6 holes on the front of the case, 6 holes on the cover, and 6 holes on the back of the case. You want a tight fit. For some reason, even though the back case holes are sized the same as the other holes, they may print a little large. Just use a little extra glue for these in step 5. . Insert the magnets ( http://amzn.to/1oqjeMp ), securing with the adhesive of your choice. I recommend Epoxy Adhesive, such as Loctite 5 Minute Instant Mix available at Home Depot or here: http://amzn.to/1tqn1MR. The polarity is EXTREMELY important. The front case magnets should all go in one direction. The back and cover case magnets need to go in the opposite direction of the front case magnets. . If the cover is warped, pour hot water over it and bend to fix the warp. If this doesn't work, put it inside the oven at 200 degrees for a minute, then remove and bend out the warp. . Remove the Note 3's original back piece and slide the case right over the exposed back. This case does not use the original back. You can easily access the battery and sd card by sliding off your new case's top and bottom. . Enjoy the case! Let me know if you have any suggestions for improvement.
With this file you will be able to print Samsung Galaxy Note 3 Case w/ Cover, Magnetized with your 3D printer. Click on the button and save the file on your computer to work, edit or customize your design. You can also find more 3D designs for printers on Samsung Galaxy Note 3 Case w/ Cover, Magnetized.