Samsung Galaxy Note 3 Case w/ Sugru Bumpers
thingiverse
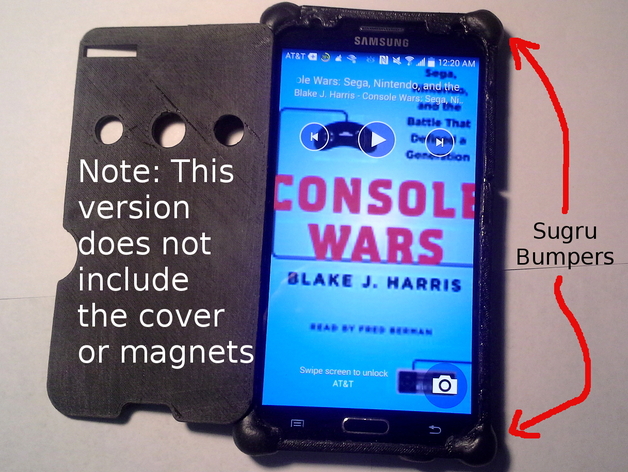
Here's a variation of my Ultimate Note 3 case. (Original is here: http://www.thingiverse.com/thing:407517 ) This version ditches the cover and magnets but retains the Sugru bumpers. . Here's a video showing the magnetized version: http://youtu.be/rTBjehUN_zA . Here are the variations: Ultimate (Magnets, Cover, Bumpers) : http://www.thingiverse.com/thing:407517 No Bumpers (Magnets, Cover): http://www.thingiverse.com/thing:414865 No-frills (No Bumpers, No Magnets, No Cover):http://www.thingiverse.com/thing:415418 . I designed the case in two parts so that printers with small build areas (6"x6") such as the Printrbot Simple Metal could still print it. . This case is designed to fit the Note 3 WITHOUT the original back piece. You can still access the battery by sliding off the two sections. . The four corners have Sugru grips for added protection. I designed the corners so that the Sugru sticks securely. Buy Sugru at http://sugru.com or on Amazon here: http://amzn.to/1upL7Zw. Requires 2 small packs. Instructions Parts list: Sugru, 2 packs. http://amzn.to/1upL7Zw . Print the Top, Bottom, using support structures for the Top and Bottom. I highly recommend InTheGarage's Slic3r settings here: http://www.camwatt.com/printrbot-simple-metal-slic3r-settings.html . Clean out the support structures using pliers. Fine tune with a Dremel and sandpaper. Be very careful around the openings. Keep testing until you achieve a snug fit. (Remove Note 3 back before sliding on case. This case doesn't use the original back.) I added a half millimeter extra of length to the edges where the Top and Bottom meet in order to get a gapless fit. You may need to sand these areas to achieve a perfect fit. . You'll notice holes in the corners where the Sugru will eventually go. I added these so the Sugru will grip tightly and not come off. If you accidentally drill through the corners a little bit, don't worry. Sugru will eventually cover these areas. . Open a pack of Sugru ( http://amzn.to/1upL7Zw ) and divide into 3 equal sections. Take one of these sections and sculpt around any corner except the one near the stylus. Repeat with two other corners (but not the stylus corner yet.) . Open another pack of Sugru and divide into 3 equal sections. Take a section and sculpt around the stylus corner. Take note of the microphone hole. Use a pin to form a hole in the Sugru above the microphone hole so that the sound will come through. Make sure you are able to pull the Stylus in and out. . Take another section of Sugru and sculpt around the speaker hole. Sculpt an opening so the sound will come out. . Use the remaining Sugru to add where needed. I added a bit to the headphone jack area to get a nice seal. . Clean out excess Sugru. Slide the case over the phone to mold any inside Sugru to the phone's dimensions. Remove the phone and let the Sugru dry. . If the cover is warped, pour hot water over it and bend to fix the warp. If this doesn't work, put it inside the oven at 200 degrees for a minute, then remove and bend out the warp. . Remove the Note 3's original back piece and slide the case right over the exposed back. This case does not use the original back. You can easily access the battery and sd card by sliding off your new case's top and bottom. . Enjoy the case! Let me know if you have any suggestions for improvement.
With this file you will be able to print Samsung Galaxy Note 3 Case w/ Sugru Bumpers with your 3D printer. Click on the button and save the file on your computer to work, edit or customize your design. You can also find more 3D designs for printers on Samsung Galaxy Note 3 Case w/ Sugru Bumpers.