Makerfarm i3v/Pegasus X-Carriage for Bondtech BMG and e3dv6
thingiverse
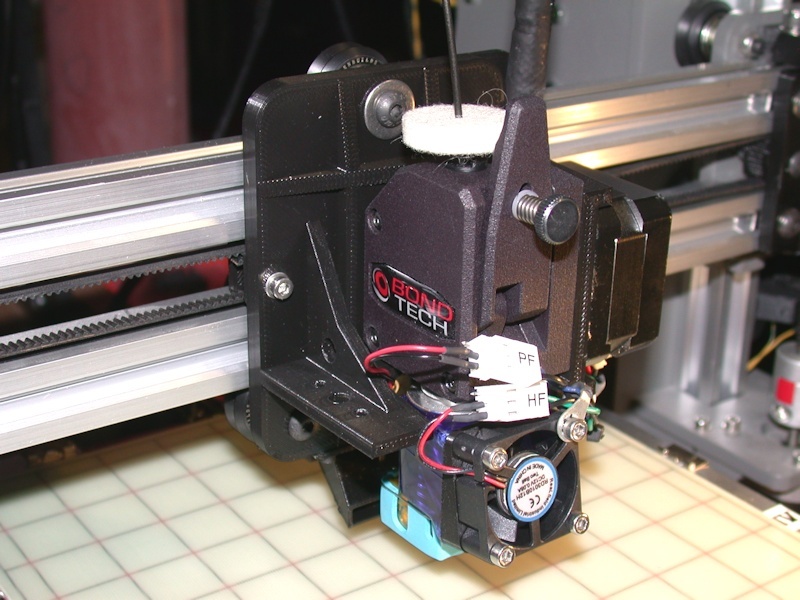
This provides a replacement x-carriage plate for the MakerFarm i3v and Pegasus 3D printers that utilize two 20mm v-rails separated by a 20mm gap for the printer x-axis. It leverages the same 3-wheel concept for attaching the x-carriage plate to the x-axis rails as the original MakerFarm carriage plates. The x-carriage plate is designed for use with an e3dv6 hot end and a Bondtech BMG geared direct drive extruder paired with a NEMA17 stepper motor. Use of the e3dv6 OEM duct and fan is assumed, although the carriage plate should support many other 3rd party ducts that attach onto the e3dv6 heatsink. Key configuration options provided by the openSCAD script include * Internal structural reinforcement at wheel mounting holes * Location of eccentric spacer for wheel adjustment at either top or bottom of carriage * Mount for a 5015-type blower on the REAR of the carriage * Blower duct that passes to the hot end area between two lower carriage wheels * Additional mount for use with BLTouch * Cable tie extension on the right side for cable routing/bundling The gallery picture shows a carriage plate with all options enabled and installed on an 8-inch MakerFarm i3v. The BLTouch bed sensor has not been purchased or installed as of the initial release. The openSCAD script is parameter based. Most tailoring would be able to be accomplished through modification of parameter values - not editing openSCAD equations. Printable outputs from the openSCAD script include the X-Carriage Plate (XCP), the blower fan mount, a straight duct for a Mechatronics B5015E12B-BSR blower, and an optional test plate that can be printed first to check hardware fitment. An additional photo shows the test plate temporarily installed on the dual v-rails for checking of the Z-axis wheel spacing and the eccentric spacer adjustment range. Numbers printed on the test plate correlate to numbered comments in the openSCAD script that describe what to look for in fit checks and that clarify what parameters are involved in each check. An array of top-level geometry options enables viewing subcomponent designs, printable outputs, and non-printable views that show components installed on an assembled x-carriage. Component models from various other Thingiverse items are used for these non-printable views. The models.zip file contains a snapshot of those models as used in the initial release here. Expand the zip file so that the "models" folder is located at the same directory/folder level as the openSCAD file. The initial part of the openSCAD file is loaded with comments regarding tailoring, slicing, printing, hardware needs, assembly, etc. Users are encouraged to read through the comments section for additional detail not provided here. openSCAD files are text files and can be opened in any text editor like notepad++. The XCP requires a custom mount for attaching the x-axis belt to the rear of the carriage plate. As released, the XCP requires a belt mount with 64mm spacing between mounting holes and the mounting holes vertically centered in the gap between the horizontal v-rails. Revision A of my earlier x-axis belt mount now includes a 64mm version that fits this carriage plate. That belt mount is available at https://www.thingiverse.com/thing:790207 Should I want to minimize airflow turbulence on the print surface, I configure the e3dv6 hot end with the OEM duct fan flipped so that airflow exhausts out the fan. To then help keep fan exhaust off the print surface, I angle the fan upwards a bit using a wedge. The 10-degree wedge shown in the gallery picture is available at https://www.thingiverse.com/thing:3439274. Although this fan orientation is counter to the e3d installation instructions, I've had no problem in operating my e3dv6 in this configuration for a couple of years. Again, be sure to review the comments at the beginning of the openSCAD file before slicing and printing any of the STL files provided. After installation of the new carriage plate, you'll likely have to check/adjust the positioning of all endstop switches and check the amount of travel available in all three axes. EDIT: If you're using a 5015 blower, make sure there is adequate clearance between it and any wires leaving your heated bed. As the bed is moved forward in the Y-axis.
With this file you will be able to print Makerfarm i3v/Pegasus X-Carriage for Bondtech BMG and e3dv6 with your 3D printer. Click on the button and save the file on your computer to work, edit or customize your design. You can also find more 3D designs for printers on Makerfarm i3v/Pegasus X-Carriage for Bondtech BMG and e3dv6.