Samurai Swords (Laser Marked)
thingiverse
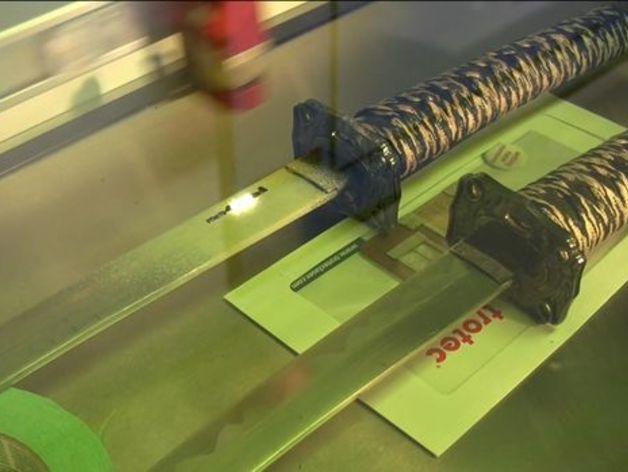
We've laser engraved 2 Samurai Swords with the Hattori Hanzo logo from the film "Kill Bill"! Using our Speedy 300 flexx, we were able to use a CO2 laser on one sword and a Fiber Laser on the other. How I Designed This Step 1: Black and White logo Search the Hattori Hanzo logo (or any logo for the matter and copy and paste it onto a Vector based software (we used CorelDraw) To convert to black and white press Bitmaps → Mode → Black and White → Line Art Left click on the left window which will let you preview the conversion. Adjust as you choose, then press OK. Step 1: Black and White logo Step 1: Black and White logo Step 1: Black and White logo Step 2: Vector Image From a raster to a vector, follow these steps Trace Bitmap → Outline Trace → Line Art. Double lining might occur. To get rid of this by sliding Detail downwards. To view the original, click and drag the image to the right and you will see the new form and the orignal (on the left). Step 2: Vector Image Step 2: Vector Image Step 3: Keep the image Measure the area that the image should be on. We used the LMM-6000 Black for Metal to coat one samurai sword which will let our CO2 laser engrave. Shake the can and coat the area. Step 3: Keep the image Step 4: Organize laser (CO2) 2 different lasers means that there will be 2 laser sources, therefore we need to distinguish them by colour coating them. Complete the CO2 laser first. Send the CO2 laser image to the Job Control software. Make sure the image is sized to the sword. Select the logo and go to File → Print → select Trotec Engraver for printer. Go to preferences and adjust the lent hand width accordingly. Then go to My settings → Engrave for Black. Set the power to 100 and speed to 30, press OK. Then press Layout → Re position to Center of Page → OK Step 4: Organize laser (CO2) Step 4: Organize laser (CO2) Step 4: Organize laser (CO2) Step 4: Organize laser (CO2) Step 5: Organize laser (Fiber laser) Make sure to colour code the this laser a different colour for no confusion. Change the colour code from black to red by clicking Edit → Find and Replace → Replace Objects → Replace a Color. Set Find to Black and R to 0, G to 0 and B to 0 Set Replace to Red and R to 255, G to 0 and B to 0 Press OK → Finish → Replace All. Select ghd logo, press File → Print. Do the same to the the CO2 laser. This time we change Black to Skip and for Red choose Engrave FLP. Power should be set to 100 and speed should be set to 10. Make sure the Hertz is up to 20000 now press OK. Step 5: Organize laser (Fiber laser) Step 5: Organize laser (Fiber laser) Step 5: Organize laser (Fiber laser) Step 5: Organize laser (Fiber laser) Step 6: Position the swords and setting up the machine We're using the Speedy 300 flexx laser machine. Since this is a flexx machine, we can complete one with CO2 and one with fiber all in the same job. *Note: Both swords have be leveled. Step 7: Locating the sword For the first sword set the physical laser over the center of the sword. (We did 1 and 1/4" from all sides). For the Second sword complete the same steps. Set the corresponding images to the markers, set up the lens and close the lid and press start. Step 7: Locating the sword Step 7: Locating the sword Step 7: Locating the sword Step 7: Locating the sword Step 8: Wash up Now all you have to do is wipe the sword down and now you have two samurai swords that are laser engraved! Enjoy! Step 8: Wash up Step 8: Wash up Step 8: Wash up Step 8: Wash up
With this file you will be able to print Samurai Swords (Laser Marked) with your 3D printer. Click on the button and save the file on your computer to work, edit or customize your design. You can also find more 3D designs for printers on Samurai Swords (Laser Marked).