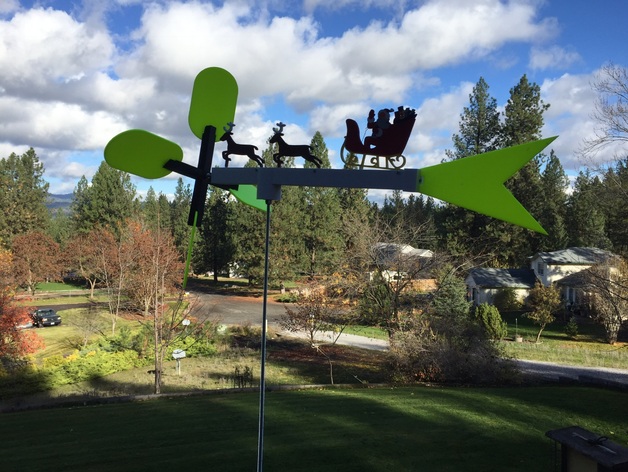
Santa Whirligig
thingiverse
Edit 11/11/2016: Made slight change to sleigh that strengthens the peg on the runner. Thanks ctgreybeard for finding this error. Ho! Ho! Ho! Merry Christmas! You will need to print: 4 ea Whirligig blades 3 ea Eccentric cams 2 ea Crossbars 2 Reindeer 2 ea Base Couplers 1 ea all other parts There is a cutaway view in the thing files called cutaway view.pdf showing how the model goes together. I printed the base sections vertically to minimize support and print time. The tallest one is 148mm. This is the maximum height I can print with my FlashForge Creator Pro with glass bed. There are 3 cams that have to be placed on the quarter inch rod drive shaft such that they rest directly under the push rods from the reindeer and sleigh. Each cam needs to have a nut on either side to hold it in place and keep it locked to the drive shaft. When assembling, I recommend putting a drop of super glue on the nuts that hold the cams in place once they are positioned. Also, it is probably a nicer effect if the cams are offset from each other so the deer and sleigh are bobbing up and down slightly out of sych with each other. Because Santa and the bag of toys have details in relief to make painting easier, I have made them with mirror images that will need to be glued together. This way they can lay flat on the print bed. Just glue them together after printing and painting. I didn't glue the three base sections together because I wanted to be able to disassemble the base if I needed to fix any of the internal parts. The threaded rod and nuts hold it together fine. For the same reason, I made the vane base a tight fit and didn't glue it to the base. The vane should be glued to the vane base, and the whirligig blades should be glued to the crossbars. I used 6-32 X 1.5" round head screws and nylock nuts for the pivot hinges of the sleigh and reindeer. For Santa's waving arm, I used an m3 X 10mm screw with internal hex key drive (allen screw) that I had in my printer spare parts box. I don't have a nylock nut for it, but recommend one if possible. I put a drop of super glue on the nut to keep it from unscrewing. I think maybe a 4-40 screw and nylock nut would work for this, but I used what I had on hand. Whatever you use, it needs to have a small diameter head and nut in order to fit into the space available for it. Feel free to substitute whatever you can find that will work for any of the hardware listed. To make the arm wave, connect a short length of wire (about 20 gauge) from the hole in Santa's elbow, through the holes in the sleigh and base, and then back out of the base through the second hole. Adjust it for tension and to keep it from rubbing on anything. Here is a video of Santa in action: https://www.youtube.com/watch?v=_GBQXN-hKXQ Print Settings Printer: Flashforge Creator Pro Rafts: No Supports: Yes Resolution: .2mm Infill: 20% Notes: I tried to minimize supports as much as possible, but there are some pieces that require it. If you print the 3 base pieces oriented the way I uploaded them (vertical) they will only need support in the bearing recesses. Santa may need support in the hollows where the waving arm will go, and the sleigh will need support where Santa and the bag of toys go. The crossbars can likely be printed with or without support. The slots are at 45 degrees, so it kind of depends on your printer. Everything else should print without supports. Custom Section Materials Needed 7 ea 1/4 - 20 nuts 3 ea 1/4 - 20 nylock nuts 3 ea 6-32 X 1.5" round head screws 3 ea 6-32 nylock nuts 2 ea R4-ZZ skateboard bearings 2 ea 608ZZ skateboard bearings 2 ea 5/16 nylock nuts 1 ea 1/4 - 20 threaded rod about 20" long 1 ea 5/16 threaded rod to mount whirligig on (size to preference) 1 ea m3 X 10mm screw 1 ea m3 nut or nylock nut 1 ea short length (about 5") of wire about 20 gauge (.8mm dia) or so 1 tube of super glue
With this file you will be able to print Santa Whirligig with your 3D printer. Click on the button and save the file on your computer to work, edit or customize your design. You can also find more 3D designs for printers on Santa Whirligig.