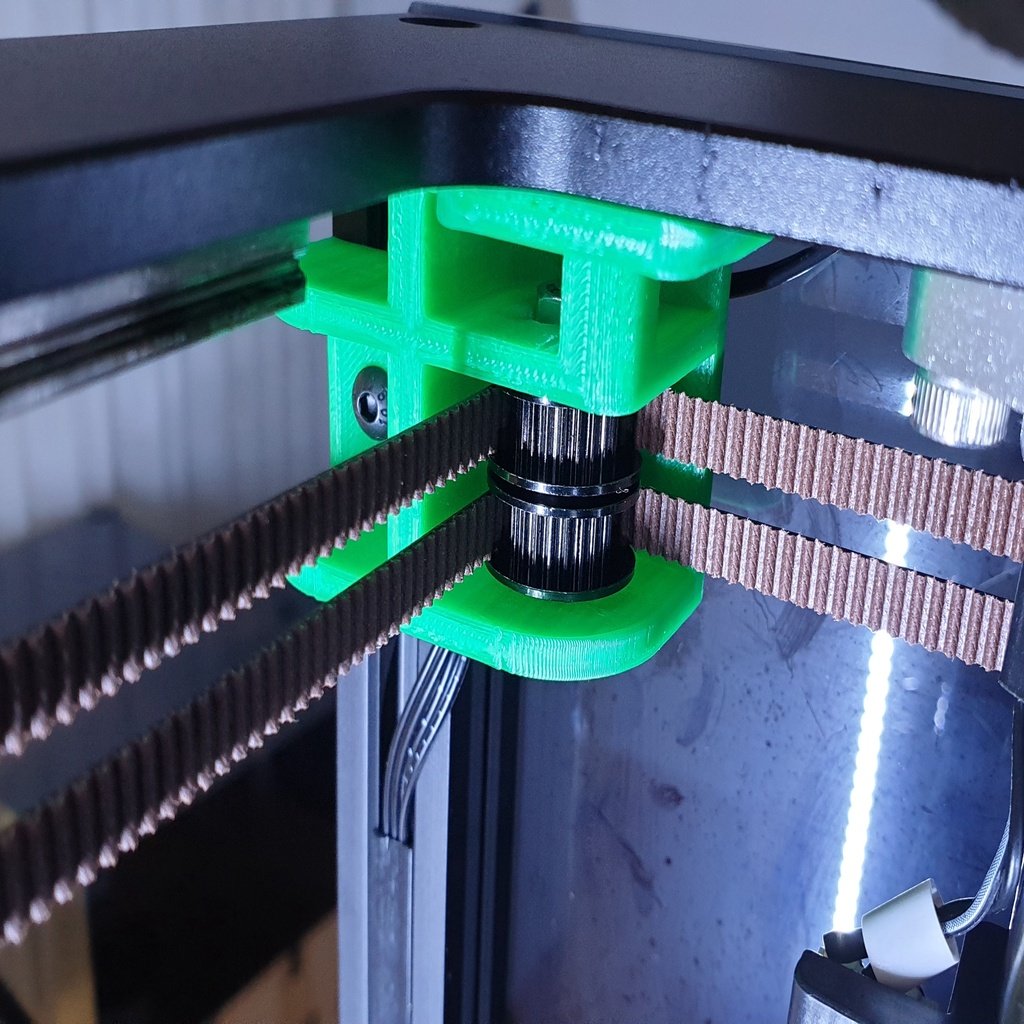
Sapphire Pro CoreXY-Misalignment Fix #2
thingiverse
UPDATED VERSION!!! The COREXY-geometry of the Sapphire Pro is not precise. The biggest issue is that the stepper motors are located 8mm too far inwards (see https://www.thingiverse.com/thing:3969752). The 2nd biggest issue is that the corner pulleys are located 4mm too far outwards. This leads to a distortion in the Y-direction. As a side effect, the tension of the belts also changes. See it by yourself: Move the hotend towards Y=200 and watch the belt section from the corner pulleys to the nearest pulleys. The angle belt/rail changes! In a well designed COREXY-system, no angle ever changes during movement and the relevant belt sections are always parallel to the rails. These pulley mounts correct this issue. They replace the metal mounts. This can be done in 15 minutes. It is not necessary to remove the belts from the hotend. The new stepper motor mounts allow to tension the belts after installation (see https://www.thingiverse.com/thing:3969752). You need 4 M5 screws (2 8mm and 2 30mm), 2 M5 nuts, 2 spacers, 2 M4 screws (8mm), and 2 T-nuts. Follow these steps (change one pulley mount after the other): 1. Loosen the belts (untighten stepper motor mount screws). 2. Remove corner pulley holder. 3. Remove rollers and spacer. 4. Insert 8mm M4 screw with T-nut into new pulley. 5. Insert 8mm M5 screw into the new pulley mount (use tweezers; yes, it can be done!). 6. While holding the screw with the short side of an Allen key, attach it to the upper plate and tighten it well. 7. Tighten T-nut screw. 8. Place nut in upper chamber at the correct position; it should fall into its place. 9. Insert long screw from the bottom just a little bit. 10. Insert spacer in lower chamber; move screw upwards. 11. Insert lower roller with belt; move screw upwards. 12. Insert spacer; move screw upwards. 13. Insert upper roller with belt; move screw upwards. 14. Tighten the screw. 15. Do the same for the second pulley mount. 16. Tension the belts (see https://www.thingiverse.com/thing:3969752). 2019-11-18: New version, easier screw insertion. 2019-11-26: New version, additional attachment to V-slot.
With this file you will be able to print Sapphire Pro CoreXY-Misalignment Fix #2 with your 3D printer. Click on the button and save the file on your computer to work, edit or customize your design. You can also find more 3D designs for printers on Sapphire Pro CoreXY-Misalignment Fix #2.
