Sapphire Pro / S - Z-Wobble FIX - Anti Z Wobble
thingiverse
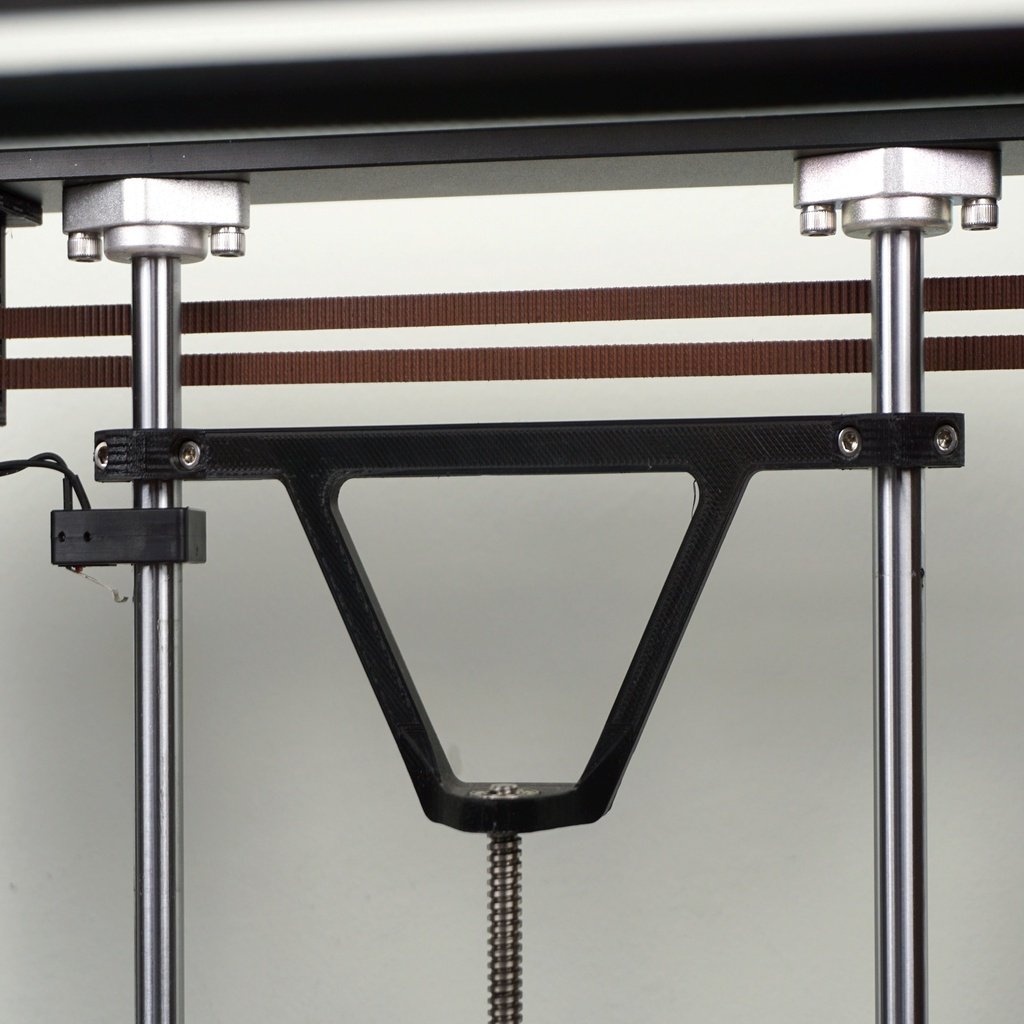
<h4>If You enjoyed this project and You want to say "Thank You" please consider supporting me by sending a tip on thingiverse or my PayPal <p><a href="https://paypal.me/ArturPetrzak">here</a>.</p> </h4> <br/> --- I was fighting with the Z Wobble effect on the prints and finally I have come up with a decent solution. Here is it in a few steps: ###1. Elastic coupler The easiest way of fixing Z Wobble is to swap original solid coupler for the elastic one - it will help a bit but it's not a final solution. My Sapphire Pro was equipped with non elastic coupler for connecting Z motor with lead screw. It would be a good solution if everything were parallel and straight, but this is Chinese, cheap 3D printer and trust me it will never be machined well enough. It was giving me a bit of Z wobble effect, so I have switched from stock couplers for elastic ones: - http://bit.ly/2jNzA4U It was much better, but these cheap couplers may also be not machined precise enough. For example: In one of mine couplers 5 mm hole was not on the axis with 8 mm. They are also bad for one big reason. Screw and motor axis are locked by pressing to a wall by the screw. It's not an ideal way to set two rods in one axis, so I bought better couplers for use with cnc machines: - http://bit.ly/2rAuptv - http://bit.ly/2IxDgSo You need 5 mm to 8 mm coupler. (I'm using the second one) These are machined a lot better, and they are clamping on shafts which should set them in axis a lot better. <h4>2. Kind of Oldham Coupler</h4> I was working on a Oldham Coupler for this 3D printer. If You don't know how it looks like You can check it out here: - http://bit.ly/33MHLTC In the same time I was reviewing Artillery Sidewinder X1 for my Youtube channel and there I found some interesting coupler. It allows the screw to move sideways and simultaneously transmit torque to the nut. So it's doing similar job like the Oldham Coupler but it's more compact. Fortunately someone shared this design on thingiverse recently: - http://bit.ly/34sWXqi You need to print z_mount_antiwobble.stl and z_nut_spacer_3.8mm_STOCK.st. I have printed these on 0.1 mm layer height without support. It fits perfectly just be sure that Your 3D printer is well calibrated. You may want to try z_nut_spacer_4.0mm.stl. Mine with stock version had some free play but it shouldn't be a problem. **IMPORTANT:** Make sure that this part works with as less friction as possible. Use sand paper if needed. Install it under the bed plate just like on the photos. I have used M3x7 screws to install it, but I don't remember the length of the original ones, maybe they are the same size? Let me know in the comments to make this description better ;) You can drill the thread out from the holes if You want - This will make installing it easier. This part with elastic coupler will allow the lead screw to easily move without moving the bed horizontally - goodbye Z Wobble! Hooray!!! But now we have another problem. If You move the lead screw from side to side You will notice that the bed is moving up and down and we don't want that. ###3. Z lead screw Stabilizer So in order to fix lead screw in place I have designed this part. It's easy to print and install. You will need 688zz bearing which You can buy here: - http://bit.ly/361t1BG It's a tight fit so You will need to press the bearing with some force. You will also need 4 x M3x12 (or longer) screws and nuts to install it. **IMPORTANT:** Make sure that both sides of the stabilizer are on the same height! You can check it by using calipers. Also it will limit Your maximum print height to 210 mm in my case. I'm rarely printing so high objects so it's not a problem for me. Just remember it or change it in Your firmware if You are using Marlin. ###4. Z lead screw Stabilizer v3 Versions v1 and v2 were not stiff enough in order to make coupler work properly. So I have added 2020 profile which You can see on the photos. It makes stabilizer super stiff and simple. Now, if Your coupler is properly made and lubricated it will work like a charm! For this version You will need: - 335 mm 2020 profile: http://bit.ly/2TErsH8 - 2 x 2020 L-Connector: http://bit.ly/2GaPrpo - 6 x M5x8 Screw: http://bit.ly/2sJA3x3 - 6 x M5 T-Nut: http://bit.ly/37g9Fd4 --- **Changelog:** - 14.01.2020 - Added version 2 - shorter and stiffer with place for endstop. - 21.01.2020 - Added version 3 - Small and super stiff - requires additional 2020 profile. I will post the results, comparison and video soon.
With this file you will be able to print Sapphire Pro / S - Z-Wobble FIX - Anti Z Wobble with your 3D printer. Click on the button and save the file on your computer to work, edit or customize your design. You can also find more 3D designs for printers on Sapphire Pro / S - Z-Wobble FIX - Anti Z Wobble.