Scale markers for RealityCapture (April tags)
thingiverse
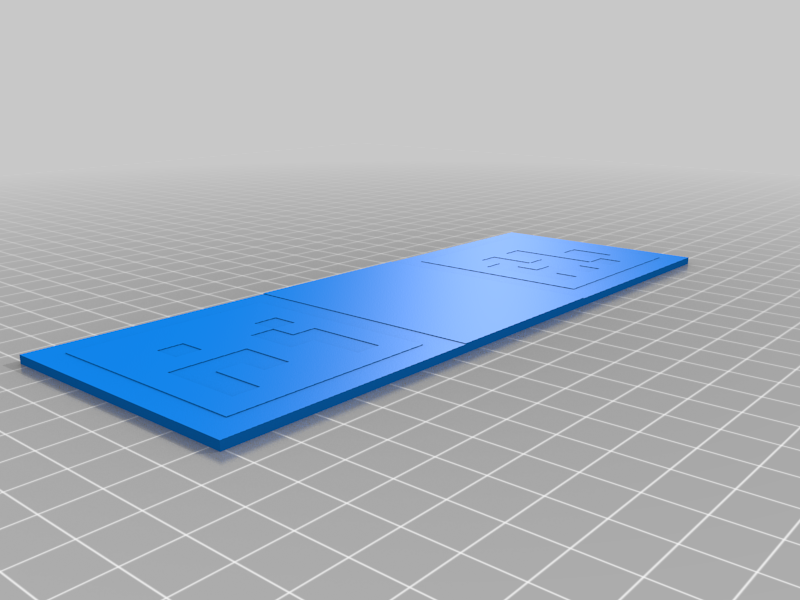
April tags to set correct scale for a model / 3d scan for photogrammetry software that support automatic detection of April tags (like RealityCapture). At 1:1 scale, the model is 18cm across, 6.5cm width, and 2mm high. ## Included files - STL of the model to print - GCODE to print it (USE IT AT YOUR OWN RISK) - A RealityCapture script (.rccmd) file to automate the detection and setting the distance for your scan. - A "detectMarkers.xml" settings file that's necessary for the .rccmd script file to work. ## How to print: - Use 2 contrasting PLA filaments like black and white (although I used marble grey here cause that's what I had available). - At 0.4mm nozzle diameter and 0.2mm layer height, the print should be 11 layers high. - Set a filament change at Layer 11 - Layers 1 - 10 should be black. Layer 11 should be the contrasting color. ### How to use in RealityCapture 1. Measure - The distance between the April tags is designed to be 116mm apart. Of course, every 3d printer will be tuned differently and your print might be at a different size, so MEASURE THE DISTANCE BETWEEN THE TWO TAGS YOURSELF! - You have 2 options for the next steps. One is an automated way using a RCCMD script I made to automate a bunch of the steps. The other is doing it manually. ### Automated Option 1. Open the "ScaleMarkers.rccmd" in Notepad or similar. - In the 1st line, change the location "detectMarkers.xmd" to match wherever you have downloaded or stored the files from this thingiverse post. 2. Open up RealityCapture and import your photos. 3. Drag and drop the "ScaleMarkers.rccmd" file into the project and the script will do the following automatically: - detect markers (creates control points at the center of the April tags) - creates a distance constraint and sets the names of the 2 points to "36h11:001" and "36h11:003" and sets their distance as "0.116" meters (CHANGE THIS TO WHATEVER YOUR MEASUREMENT IS). - align - update the scale of the scene ## Manual Option 1. Open up RealityCapture and import your photos. 2. Align the photos 3. Go to Alignment > Optional > Detect Markers - set the Marker type to: "Square, April Tag, 36h11" - select "Detect" - if the markers get detected, they show up as control points with the names "36h11:001" and "36h11:003" 4. Create Distance - in the Control Points section, select "Create distance" - expand the newly created "Constraints" in the area above (still in the Control points section) - select distance 0 - in the "Selected constraints" panel bellow, enter "36h11:001" as A and "36h11:003" as B. Set Defined distance as: "0.116" (OR YOUR OWN MEASURED DISTANCE) 5. Save (this is really important, otherwise, the next step won't work) 6. Select Alignment > Registration > Update - this will change the scale of the scene to reflect the IRL measurement.
With this file you will be able to print Scale markers for RealityCapture (April tags) with your 3D printer. Click on the button and save the file on your computer to work, edit or customize your design. You can also find more 3D designs for printers on Scale markers for RealityCapture (April tags) .