Scale Model of Earth's Layers
thingiverse
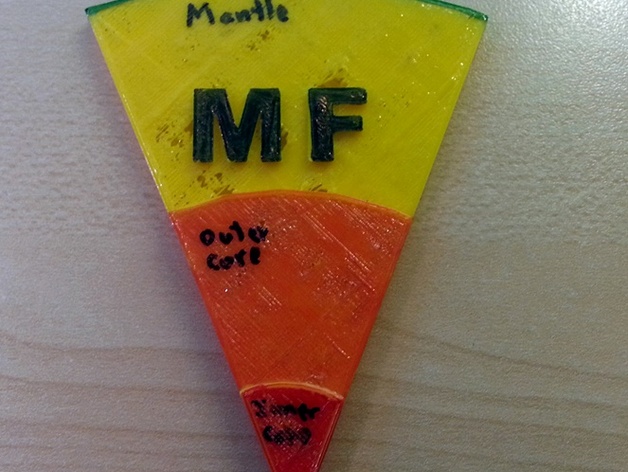
This is a project for a 5th grade earth science class. It will be their first experience with 3D printing and Tinkercad. I hope that I'll be able to turnkey it and lead the lesson with one class and the teacher, then have the teacher do the lesson with her other class. The procedure uses most of the important actions on Tinkercad other than lifting objects off the workplane - moving and resizing, holes (negative space), grouping, the adjust tool, etc. This project uses overlapping cylinders for the layers of the earth. It could also be done using the Variable Tube shape generator to make shells, but I found the sliders for the parameters to be a bit too fiddle for the students to use accurately. Standards NGSS Overview and Background This is a project for a 5th grade earth science class. It will be their first experience with 3D printing and Tinkercad. I hope that I'll be able to turnkey it and lead the lesson with one class and the teacher, then have the teacher do the lesson with her other class. The procedure uses most of the important actions on Tinkercad other than lifting objects off the workplane - moving and resizing, holes (negative space), grouping, the adjust tool, etc. This project uses overlapping cylinders for the layers of the earth. It could also be done using the Variable Tube shape generator to make shells, but I found the sliders for the parameters to be a bit too fiddle for the students to use accurately Lesson Plan and Activity Login to Tinkercad Make and align the layers of the Earth Drag a cylinder onto the workplane Grab one of the corners of the cylinder and drag into to make the diameter 1 mm. Hold the shift key down while resizing to keep it round. Change the color to black. This is to mark the center of the earth and will be deleted later. Make the height of the cylinder 10 mm. Drag another cylinder onto the workplane and resize it to diameter of 30 mm and a height of 5 mm. Color it red. This is the inner core. Don't worry about the position of the cylinders, we'll arrange them properly later. Drag another cylinder onto the workplane and resize it to diameter 83 mm and a height of 4 mm. Color it orange. This is the outer core. Drag another cylinder onto the workplane and resize it to diameter 150 mm and a height of 3 mm. Color it yellow. This is the mantle. Click and drag a rectangle that touches all the cylinders to select them. Use Adjust --> Align to align the cylinders in the X and Y directions. Cut a wedge out of the Earth Drag a rectangle onto the workplane. Resize it so it completely covers the right half of the Earth. Click on Hole to make it negative space. Use the Tilt control to rotate the rectangle 22.5 degrees clockwise. If you mess up the tilting use Undo and try again. Drag another rectangle onto the workplane and resize so it completely covers the left half of the Earth. Click on Hole to make it negative space. Rotate it 22.5 degrees counterclockwise. Move the negative space rotated rectangles into position so that the intersect at the center of the earth (use the black center cylinder as a guide). This should leave a 45 degree wedge uncovered. When the negative space rectangles are in position select the black center cylinder and delete it. Click and drag and drag a rectangle around all the pieces on the workplane. Click on Group to combine them. This should leave you with a wedge shaped model of the layers of the Earth. Group will change the color of the layers, if you want the original colors back click on Color and choose Multicolor. Your model is now ready to download and print. Print in yellow, then color the inner and outer cores with a marker. Color the outer edge with a think border for the crust. Optional - add your initials by dragging letters onto the mantle. The letters are 4 mm high so they should stick out 1 mm above the mantle. Project: 3D print the layers of the Earth Objective Students will learn to use Tinkercad and make a scale model of the layers of the Earth Audience This is a lesson for a 5th grade science class Preparation This project will be part of a 5th grade earth science unit. This will be their first experience with Tinkercad, they will need to make accounts on Tinkercad first. Scale Model Scale Model - using a scale factor for 43 km = 1 mm. At this scale the crust is less than 1 mm and will be drawn on with marker rather than being modeled in 3D. This should drive home the idea of just how thin the Earth's crust really is. Measurements are measured from the core, they are not thicknesses. Inner Core - 1,300 km = 30 mm Outer Core - 3,550 km = 83 mm Mantle - 6,450 km = 150 mm Crust - 6,550 km = 150 mm Steps Login to Tinkercad Make and align the layers of the Earth Drag a cylinder onto the workplane Grab one of the corners of the cylinder and drag into to make the diameter 1 mm. Hold the shift key down while resizing to keep it round. Change the color to black. This is to mark the center of the earth and will be deleted later. Make the height of the cylinder 10 mm. Drag another cylinder onto the workplane and resize it to diameter of 30 mm and a height of 5 mm. Color it red. This is the inner core. Don't worry about the position of the cylinders, we'll arrange them properly later. Drag another cylinder onto the workplane and resize it to diameter 83 mm and a height of 4 mm. Color it orange. This is the outer core. Drag another cylinder onto the workplane and resize it to diameter 150 mm and a height of 3 mm. Color it yellow. This is the mantle. Click and drag a rectangle that touches all the cylinders to select them. Use Adjust --> Align to align the cylinders in the X and Y directions. Cut a wedge out of the Earth Drag a rectangle onto the workplane. Resize it so it completely covers the right half of the Earth. Click on Hole to make it negative space. Use the Tilt control to rotate the rectangle 22.5 degrees clockwise. If you mess up the tilting use Undo and try again. Drag another rectangle onto the workplane and resize so it completely covers the left half of the Earth. Click on Hole to make it negative space. Rotate it 22.5 degrees counterclockwise. Move the negative space rotated rectangles into position so that the intersect at the center of the earth (use the black center cylinder as a guide). This should leave a 45 degree wedge uncovered. When the negative space rectangles are in position select the black center cylinder and delete it. Click and drag and drag a rectangle around all the pieces on the workplane. Click on Group to combine them. This should leave you with a wedge shaped model of the layers of the Earth. Group will change the color of the layers, if you want the original colors back click on Color and choose Multicolor. Your model is now ready to download and print. Print in yellow, then color the inner and outer cores with a marker. Color the outer edge with a think border for the crust. Optional - add your initials by dragging letters onto the mantle. The letters are 4 mm high so they should stick out 1 mm above the mantle. Results This project was completed with two 5th grade classes. Students were able to create a scale model cut out of the Earth in one class period. It was their first experience using Tinkercad. The most common problem was not using the shift key when resizing the cylinders, so they ended up oval. The kids added their initials to the models, and I stuck some magnetic tape on the backs to make them into refrigerator magnets.
With this file you will be able to print Scale Model of Earth's Layers with your 3D printer. Click on the button and save the file on your computer to work, edit or customize your design. You can also find more 3D designs for printers on Scale Model of Earth's Layers.