Schmidt Coupling - Offset Coupling
thingiverse
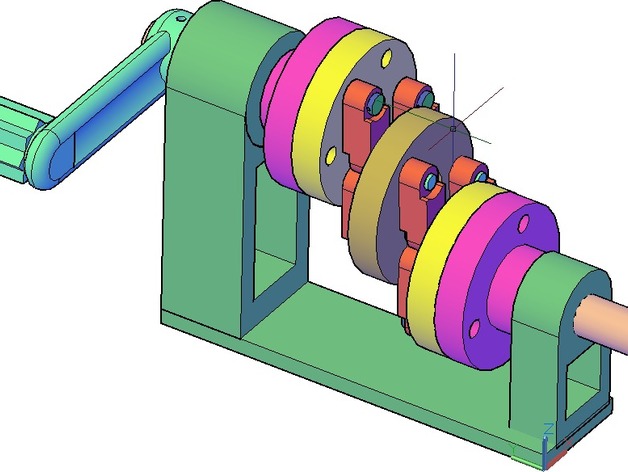
+++++++++++++++++++++++++++++++++++++++++++++++++New design: http://www.thingiverse.com/thing:243983 +++++++++++++++++++++++++++++++++++++++++++++++++ Anyone wishing to modify parts or print parts using metric slicing/printing software such as Cura must download the "METRIC" file versions. Schmidt couplings have the ability to connect two shafts that are misaligned or that undergo changes in radial displacement during operation. Because there is an equal distribution of pushing and pulling forces amongst the two sets of links, the two forces overlap in a sinusoidal pattern which makes possible the transfer of constant torque between the input and output shaft regardless of their radial displacement relative to each other. Assembly: Crank arm and crank handle are pinned in place using short pieces of 1.75mm filament. There are two sizes of pivots for the links; 6 pins with shoulders that fit into counter-bores on the two end plates, and 3 pins that are 1/8th" (3 mm) in diameter that connect to all 6 links through the middle plate. Once the larger pivots have been pushed through the counter-bores on the end plates and links added, metal spines salvaged from common household twist-wraps can be inserted through the tiny hairpin holes in the pivots to keep the links captive, alternatively, the ends can be deformed with a hot knife (preferable). The 3x 1/8th" pins are fixed in place by flattening both ends with a hot knife/screwdriver after complete assembly. I used 8-32 hex socket screws to attach the two coupling plates to the endplates. They could instead be taped together around the circumference or glued together with acetone. If gluing together, use it very sparingly near the rim so that the plates can be pried apart if a pivot breaks. Parts reference: EndPlate - (Yellow) 2x (quantity) ShaftCoupling - (Pink) 2x Links - (Red) 6x Pivot1 - (Blue) 6x Pivot2 - (Cyan) 3x MidPlate - (Bronze) 1x CrankShaft - (Tan) 2x Stand: The uprights are intended to be glued to an ABS plate. "Stand2.stl" is a fixed upright that holds the output shaft in the lowest position. Alternatively, I've included a slotted one "StandPosable" where the output shaft can be moved around by hand to demonstrate the constant-velocity effect. I had ABS plate laying around and have not printed the base included here. It might need shapes subtracted from the middle to prevent warping. http://www.youtube.com/watch?v=04gZ8Nc38fU https://www.youtube.com/watch?v=G2DU1s2ukHQ Instructions Links, pivots, and crank shafts should be printed with slow speed and solid fill, everything else can be loosely filled. I print the endplates with the counter-bores facing upwards to make for a better fit with the pivots, but there is usually a bit of curling on the side the links ride against and it may require sanding flat to improve its operation. I also sanded the contact faces on the links and midplate.
With this file you will be able to print Schmidt Coupling - Offset Coupling with your 3D printer. Click on the button and save the file on your computer to work, edit or customize your design. You can also find more 3D designs for printers on Schmidt Coupling - Offset Coupling.