ScoutMega Printbot
thingiverse
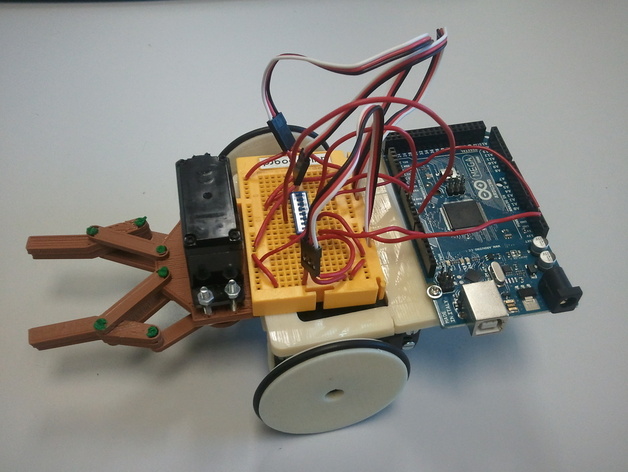
The original SCAD code of the Scout printbot has been converted into OOML code (http://www.iearobotics.com/oomlwiki/doku.php). The ScoutMega printbot derives from the MiniSkyBot (http://www.thingiverse.com/thing:7989) by Obijuan (http://www.thingiverse.com/obijuan). The OOML version of the castor wheel in the rear part is utilized, sourced from avalero's design (http://www.thingiverse.com/thing:12198). A video demonstration can be found at http://www.youtube.com/watch?v=821ua42vHks. The main design is similar to the Scout printbot, but a front bumper has been added for mounting a gripper. The selected gripper is a modification of one posted on (http://www.thingiverse.com/thing:2415). The electronics include an Arduino Mega board and three Futaba S3003 servos, used for the wheels and gripper. All source code, including SCAD files, STLs, and a C++ file featuring the chassis' OOML code, are provided in the attached files. Assembly necessitates at least 11 M3x8mm screws, 4 M3x20mm screws, 14 M3 nuts, two 50x3 mm O-rings, one 16x3 mm O-ring, and potentially six additional M3x6mm screws and six more M3 nuts for the gripper. To-do items involve resizing the gripper to fit within the chassis dimensions, simplifying assembly procedures, and improving gripper anchorage. Apologies for the issues encountered during this project, which may be attributed to the fusion of electronic design with mechanical engineering. Instructions include downloading the zip file, printing all STL files, assembling the printed parts, hacking two servos for the wheels, mounting the remaining unmodified servo on the gripper, attaching an Arduino Mega (with potential additional weight on the rear part for stability), wiring and programming the board, and enjoying the experience.
With this file you will be able to print ScoutMega Printbot with your 3D printer. Click on the button and save the file on your computer to work, edit or customize your design. You can also find more 3D designs for printers on ScoutMega Printbot.