Screen Print Stencil: Psych Pineapple Design
prusaprinters
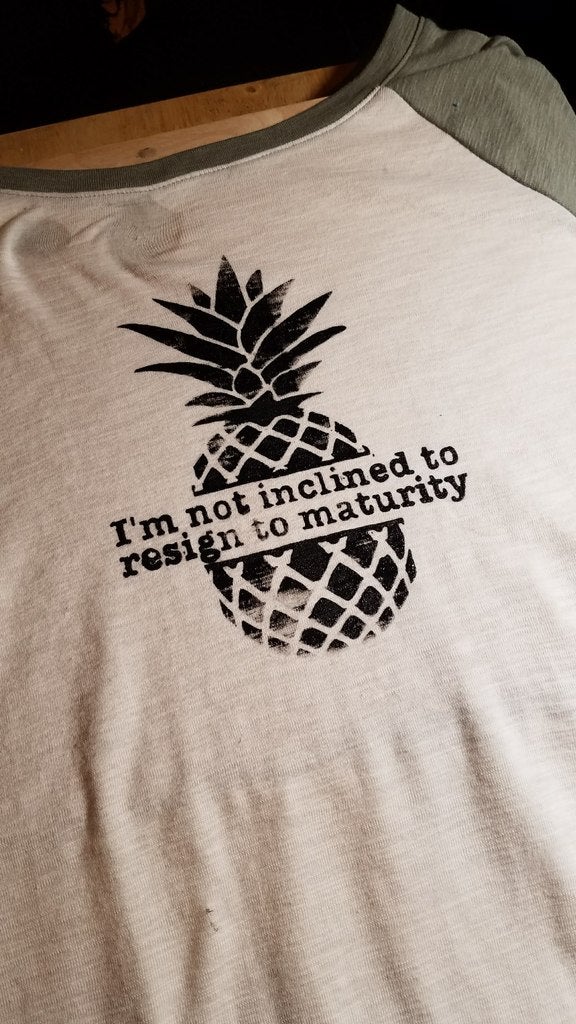
<p>This is a Stencil for Screen printing, Pineapple Design from Psych TV show with theme song quote.<br/> I printed this stencil directly on Silk screen mech fabric to Screen print the design onto a shirt.</p> <p>The stencil is reusable if washed after use and works on many different types of material.</p> <p>If you make one or something like it post it! I'd like to see!</p> <p><em>Gift for GF valentine's day 2018</em></p> <p><strong>Creation process:</strong></p> <ol> <li>GIMP > Made Black and White Design saved as PNG File.</li> <li>Incscape > Convert PNG to Vector lines and exported it as DXF file.</li> <li>Sketchup > Imported DXF, extruded all faces, Saved as STL file.</li> <li>Cura > Opened STL, scaled to correct size and a height of one layer. Also Included are Models for Screen Printing tools:</li> </ol> <ul> <li>Squeegees </li> <li>Paint scoop<h3>Print Settings</h3> </li> </ul> <p><strong>Rafts:</strong></p> <p>No</p> <p><p class="detail-setting supports"><strong>Supports: </strong> <div><p>No</p></div><strong>Resolution:</strong></p> <p>.2</p> <p><br/> <p class="detail-setting notes"><strong>Notes: </strong> </p><div><p>Here are some notes on how I got a successful 3D print and Screen Print </p><strong>Preparing the 3D Model:</strong></div></p> <ul> <li>Import the STL model to a slicing program (I used Cura) scale it to the size you like.</li> <li><p>Next uncheck “Uniform Scaling” and change the Z Height until the model is only ONE layer thick. <strong>How to Print:</strong> (See pictures)</p> </li> <li><p>I leveled the bed as normal, WITHOUT the mesh Silk Screen fabric on it.</p> </li> <li>Next I cut a sheet of mesh fabric to roughly match the size of the bed.</li> <li>Using binding clips, I clamp down the fabric onto the bed around the entire perimeter.</li> <li>I did NOT readjust the bed level after putting the fabric down.</li> <li>I clipped the fabric down so it was completely level with the bed and tight enough not to form hills or areas where the fabric could bunch up as the nozzle moved.</li> <li>I did NOT stretch the fabric!! Just held down so there was little to no slack. </li> <li><p>Tip: move your finger across the bed gently feeling for slack. If you find any push it to the nearest clip and re-clip the fabric to hold it in place. <strong>What to watch out for:</strong></p> </li> <li><p>If you stretch the fabric when clipping it down, it might peel off the Stencil when you unclip if from the bed.</p> </li> <li><p>Make sure the nozzles path does not hit your clips! <strong>Post printing & Screen Printing:</strong></p> </li> <li><p>Remove the clips and cut off the spare fabric around the edge of the print.</p> </li> <li>Tip: Fill in any holes with hot glue, flatten as much as you can.</li> <li>Tape the Print down in place, making sure it’s on a flat surface</li> <li>Follow Normal Screen Printing guides here.</li> <li>Put a large bead of paint at the top, use screen printing squeegee to slide paint all the way down stencil to fill all holes. </li> <li>It’s a good idea to test on paper/card board to get a feel for it before trying on a shirt.</li> <li><p>Make sure to clean off stencil with a warm gentle water wash soon after using it before the paint hardens so it can be reused. <strong>Want to try next time:</strong></p> </li> <li><p>Smaller layer height</p> </li> <li>Different Colors in same print</li> <li>Screen printing jig to hold in place </li> </ul> </p> Category: Fashion
With this file you will be able to print Screen Print Stencil: Psych Pineapple Design with your 3D printer. Click on the button and save the file on your computer to work, edit or customize your design. You can also find more 3D designs for printers on Screen Print Stencil: Psych Pineapple Design.