Sculpting in Clay vs Sculpting on a Computer
thingiverse
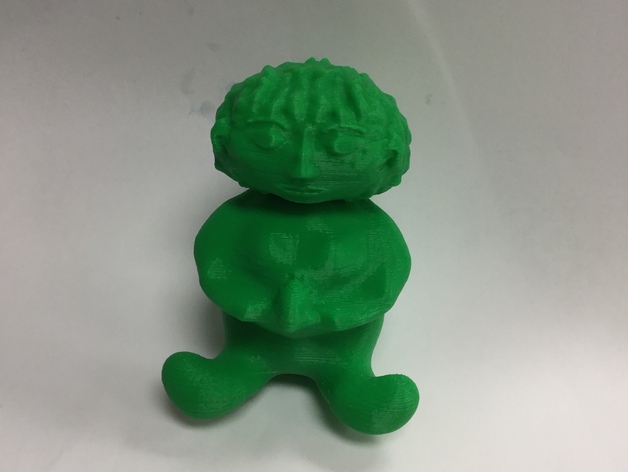
An art teacher friend of mine suggested to me that she would like to get involved in 3D design and printing. This is my attempt to help her to incorporate 3D printing into her art classes. Print Settings Printer Brand: MakerBot Printer: MakerBot Replicator (5th Generation) Rafts: Yes Supports: Yes Notes: I used the default settings of my machine, but I did use supports for my "art" How I Designed This Let me begin with - I teach math - please don't judge me. My plan was to design something in clay and then try to recreate it in modelling software. I apparently can't work in clay. So this design was made using Sculptris design software. Since I am a pre-novice with this software, my sculpture is more abstract than I would have liked. I wanted to import it into other software, but the detail of the part was so great that no other software would accept it, so I just saved it as an .obj file and brought it into Makerbot Desktop to print. I then tried to recreate it in clay and we can see how that turned out. Again...math teacher... Standards NGSS CCSS Overview and Background Online Sculpting Art is becoming a high tech field. Many forms of art are now created on computers, when they were once done by hand. This lesson takes the tactile lesson of sculpture, and transforms it into a technology art form. Skills Learned Students will choose from a range of materials and methods of traditional and contemporary artistic practices, following or breaking established conventions, to plan the making of multiple works of art and design based on a theme, idea, or concept. Through experimentation, practice, and persistence, students will demonstrate acquisition of skills and knowledge in a chosen art form. Lesson Plan and Activity Phase 1 Phase one of this project is for the student to create a clay sculpture based on criteria set forth by the teacher depending on the level of the students. Since my level is novice, I made a simplistic model of a person. Those with better skills and better tools should be held to a much higher standard. The reason for this phase is that students tend to get online and just get lost in the 3D design. Having them create a solid model first lets the instructor know that they will be focused when they get into the software. Minor adjustments could be allowed, but students must recreate their clay sculpture in the software. Phase 2 Phase two of this project is where the students take their clay sculpture and recreate it in the design software. If a 3D scanner is available, this may also be used to import the structure into the software. I have no experience with this, but I hear it is wonderful. Phase 3 Phase three is printing out the digital copy of the sculpture and comparing it to the original. Materials Needed Phase 1 Requires standard sculpting tools: clay, tools for manipulating clay (Optional: 3D scanner to import sculpture into software) Phase 2 Students will require access to a computer with design software (with appropriate accounts) like Scuptris, or Blender. Phase 3 3D printer with filament Skills Learned design concept design idea design theme Duration of Lesson In a high school art class, this project could take two weeks or more depending on the complexity and quality of work expected. References http://www.incredibleart.org/ http://www.incredibleart.org/files/Rubric3.htm
With this file you will be able to print Sculpting in Clay vs Sculpting on a Computer with your 3D printer. Click on the button and save the file on your computer to work, edit or customize your design. You can also find more 3D designs for printers on Sculpting in Clay vs Sculpting on a Computer.