See Saw Controller Mini
thingiverse
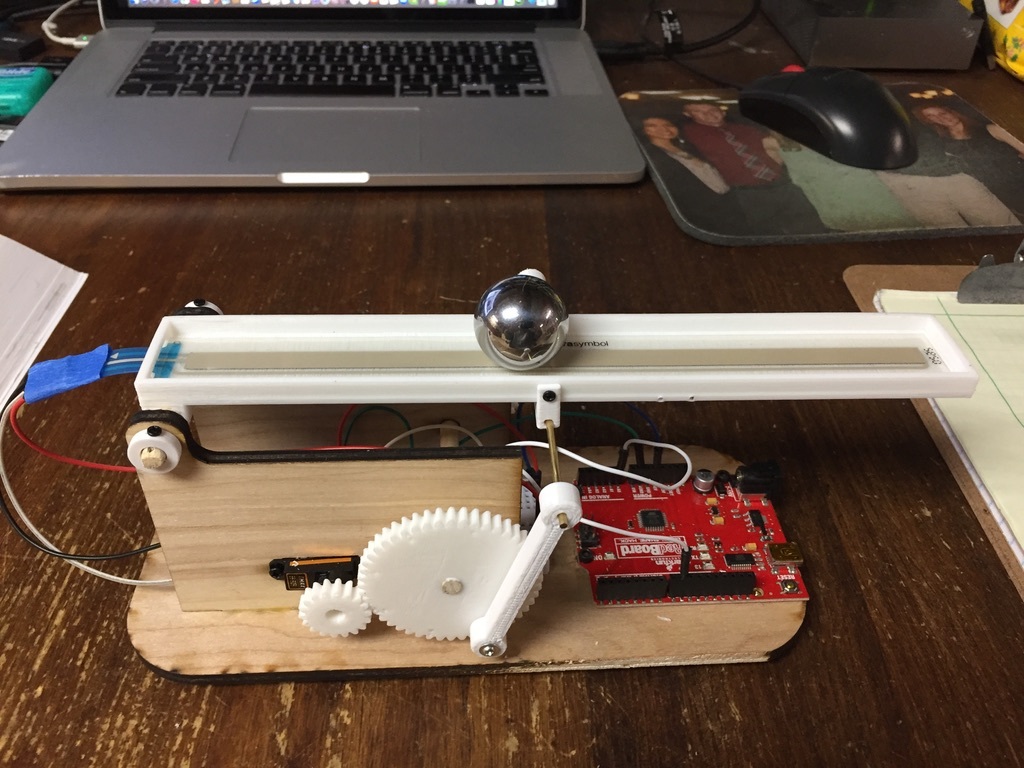
Control experiment with an Arduino, servo and softpot, all parts laser cut or 3D printed Notes For see-saw control lab 1) Laser parts were cut on an Orion 60watt laser using Luan plywood. Luan is very cheap ~ $14 for a 4’x8’ sheet. You could make a dozen of these from that much material. 2) I used some micro wood screws M3x8 or M4x8 to put it together. 3) I used 3/8 and ¼ dowel wood for the shafts. 4) Any standard Micro Servo will work, 5) When I glued main parts together; I used some scrap molding to make the parts square up on the sides. The better level it is the better it will work! 6) Servo connection to the gear is shown above. Make sure servo is centered on the gear. 7) See image above. It’s important to align the gears so there won’t be twisting forces. I used a level to get everything aligned. Device should move freely without any resistance for roughly -30 < Theta < 30. 8) Wiring diagram is shown above. Final comments I drilled small holes for all of the set screws before putting the devices together. I used a 1” OD steel ball. A marble would probably work, but the weight of the ball makes the system slower and therefore easier to control. The first thing I did was to get the servo working and to find out where zero was. I powered the servo and balanced the arm before attaching the gear to the system. The next thing was to get the softpot working. I do not provide the balancing code. This is something the builder should do on their own. I give code for the servo and the softpot. Numerous examples can be found on the web at Sparkfun and elsewhere for both. Suggest you start with a proportional system. If done correctly the ball will rock back and forth and stay stable. If the ball is hitting the stops, you probably need to adjust your Kp variable. When you add the derivative term keep in mind it’s Kd is proportional to the change from one moment to the next. I found good results when I used 20-60ms delay in the code. The code from the larger model work Ok on this too. Have fun and good luck. I used a ES9051: https://www.racedayquads.com/products/emax-es9051-4-3g-digital-mini-servo ~ $5.00?variant=31485582508145&gclid=EAIaIQobChMIj5OH0p737QIVSVXVCh10rgNNEAQYASABEgISOvD_BwE Sparkfun: https://learn.sparkfun.com/tutorials Print Settings Printer brand: Prusa Printer: i3 MK3 Rafts: No Supports: Yes Resolution: 0.16 Infill: 25% Filament_brand: Polymaker Polyflex Filament_color: White Filament_material: PLA Notes: // Servo Code // Simple servo program include Servo myservo; // make servo object int pos = 0; // variable to store the servo position void setup() { myservo.attach(9); // servo set to pin 9 // Servo moves from 0 to 90 myservo.write(90); // This is my zero } void loop() { for (pos = 90; pos <= 180; pos += 1) { // goes from 0 degrees to 90 degrees // in steps of 1 degree myservo.write(pos); // writes position delay(50); // waits 50ms between movement } for (pos = 90; pos >= 0; pos -= 1) { // goes from 0 degrees to -90 degrees // in steps of 1 degree myservo.write(pos); // writes position delay(50); // waits 50ms between movement } } // Softpot Code int value; int SENSOR_PIN = A0; // Analog input pin void setup() { Serial.begin(9600); pinMode(SENSOR_PIN, INPUT); } void loop() { int sensorValue; // Read the voltage from the softpot (0-1023) value = analogRead(SENSOR_PIN); Serial.println(value); delay(50); } Standards NGSSCCSS
With this file you will be able to print See Saw Controller Mini with your 3D printer. Click on the button and save the file on your computer to work, edit or customize your design. You can also find more 3D designs for printers on See Saw Controller Mini.