Seed Dryer
prusaprinters
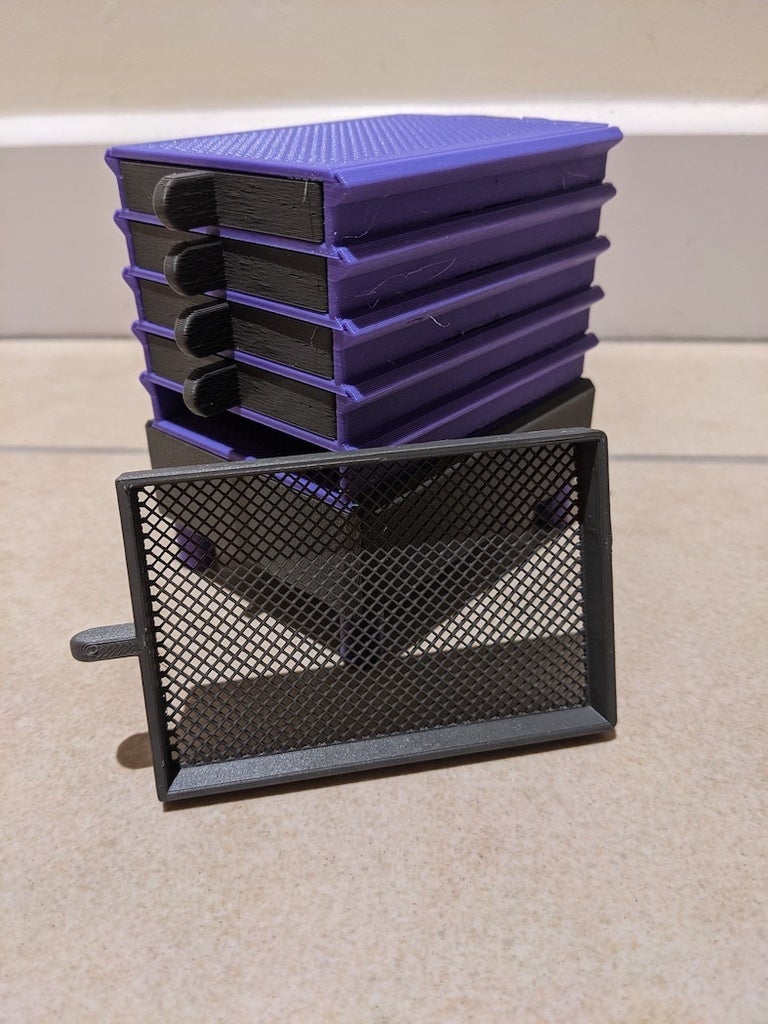
<p>This has been designed as a modular seed dryer enabling you to print and stack as many layers as you require. (Two lengths of the dovetail are included one for a stack of 5 the other for a stack of 10) The idea is there is a fan housed in the bottom that pushes a gentle stream of air through the stack to expedite the seed drying process. This system is designed to be used with small/medium seeds. (chillis, tomatoes ect.)</p> <p>There are two version of the base, one designed to have M3 screws self tap into the plastic the second to have brass M3 threaded inserts heat set into them.</p> <p>Please read the printing instructions carefully.</p> <p>Bill of Materials:</p> <p>60x60x10mm fan<br/> power jack<br/> Power supply<br/> 4x M3x12mm machine screws.</p> <p>Optional<br/> 4x M3 brass inserts (i use Ruthex ones.)</p> <p>Tools:</p> <p>Soldering equipment (or something to make the connection between the power jack and fan) When soldering the fan to the power jack make sure you have checked the polarity of your power supply first.</p> <p>Driver to match the heads of your machine screws.</p> <p>Parts Used: below i will put links for the exact components i used.</p> <p>Fans: any 60x60x10mm fan with a 50mm hole spacing should work as long as you get the correct voltage power supply for the fan you buy.</p> <p>Power jack: Again make sure you get ones to match the output plug on your power supply. If you use something different to me you might need to modify the mounting hole as it has been designed for the fitting linked below. (or send me a message and i can create a different version to work)</p> <p>Power supply: Make sure you get the correct voltage for the fan you use.</p> <p>Parts I used:</p> <p>Power Jack- <a href="https://www.amazon.co.uk/gp/product/B01N8VV78D/ref=ppx_yo_dt_b_asin_title_o01_s00?ie=UTF8&psc=1&tag=tvad0304-20">https://www.amazon.co.uk/gp/product/B01N8VV78D/ref=ppx\_yo\_dt\_b\_asin\_title\_o01\_s00?ie=UTF8&psc=1</a></p> <p>Fans- <a href="https://www.amazon.co.uk/gp/product/B07GX86CJN/ref=ppx_yo_dt_b_asin_title_o01_s00?ie=UTF8&psc=1&tag=tvad0304-20">https://www.amazon.co.uk/gp/product/B07GX86CJN/ref=ppx\_yo\_dt\_b\_asin\_title\_o01\_s00?ie=UTF8&psc=1</a></p> <p>Power supply - <a href="https://www.amazon.co.uk/gp/product/B07KZNVZ2N/ref=ppx_yo_dt_b_asin_title_o01_s00?ie=UTF8&psc=1&tag=tvad0304-20">https://www.amazon.co.uk/gp/product/B07KZNVZ2N/ref=ppx\_yo\_dt\_b\_asin\_title\_o01\_s00?ie=UTF8&psc=1</a></p> <h3>Print instructions</h3><p>Print Settings:</p> <p>-No support required for any parts. (The base has a support modelled into the design for the power jack hole. It should just be a single layer extrusion you need to break through and clean up before installing the power jack)<br/> -Models should load in the correct print orientation,</p> <p>Base + legs:<br/> 0.2 layer hight<br/> 2-3 perimeters<br/> 0-10% infill</p> <p>Drawer + Lid + Seed Dryer Body + Dovetail<br/> 0.3 layer hight<br/> 2-7 perimeters<br/> 0-10% infill</p> <p>Creating the mesh on the Drawer + Lid + Seed Dryer Body (the slightly trick part) there are two method you can use, both using the principle of remove top and bottom layers and setting infill density to create a mesh. You can manipulate how small the mesh is to suit by changing your infill density.</p> <p>1st method (the easy way): Set the number of perimeters to 7, top and bottom layers to 0, infill 40% The minor downside to this method is it uses slightly more material. You might have to tweak the infill percentage and infill anchor setting to create a good bond between the infill and rest of the model. I get the cleanse results when i also enable 'detect thing walls' and "Avoid crossing perimeters". You could also use a hight modifier to apply the changes to just the bottom phew layers.</p> <p>2nd Method: (my preferred one) this one is slightly more complex but the result is having the mesh just where its needed. Load the part into your slicer (don't move it) then use the load Modifier function and select the modifier file i have provided for the part you are printing (it should automatically load into the correct place) You should then be able to select and set the top & bottom layer as well as infill density separately for the modifier. Again uses 0 top & bottom layer and i use grid infill at 40% You might also need to play with you infill anchor setting to make sure you get good anchors to the rest of the model.</p> <p>Note: Before anyone asks, yes i did create a version where i modelled the mesh in CAD, While i could model the mesh no problems (my computer wasn't much of a fan!!) slicing software didn't like it at all, the usual result was a file that took 15-20 minutes to slice, and the mesh not properly attached to the print/big gaps in it. (I spent 2 days trying to get it to work, tweaking the model and slicer setting but didn't get to a solution i was happy with.)</p>
With this file you will be able to print Seed Dryer with your 3D printer. Click on the button and save the file on your computer to work, edit or customize your design. You can also find more 3D designs for printers on Seed Dryer.