Project: Paper Air Rocket Tail Sections
thingiverse
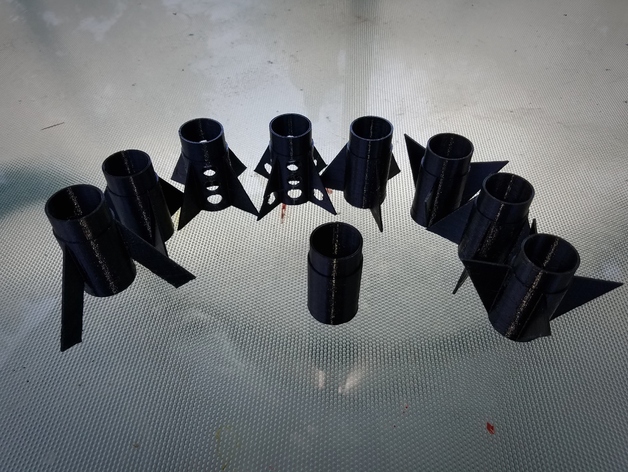
I have designed this project as an extension to the paper air rockets that were in MAKE Magazine Volume 15. I have designed a variety of tails and an activity to test what type of aerodynamics provide the best flight for these small inexpensive rockets. I have a related nose cone project: http://www.thingiverse.com/thing:1729183https://youtu.be/VPjsU4TNLrg Print Settings Printer: Generic Prusa i3 Rafts: No Supports: Yes Resolution: 0.2mm Infill: 100% Notes: Printed with 1.2mm walls so effectively solid infill. How I Designed This Took measurements of PVC pipe and sketched up a simple idea of how the paper interface would work and looked at a ruler for a minute using my engineering judgement to determine what I thought a good length for the main tube to attach the tail fins to. Next I sketched out a couple ideas on tail fin style that I planned to model. I then moved into Fusion 360 and made concentric circles to represent the PVC and the paper ledge for the tail tube. I extruded these out to the length I determined earlier. Next I moved to side profile and then started sketching profiles of 1 fin. I used a 2 sided extrusion on the fin, to keep it centered and perpendicular, and created a new body. Next,I grabbed that new fin body and created an array around the central axis with 3 or 4 copies as needed. The only changes to this were some modifications needed to improve the interface of the fins with the body, or to rotate the fins that are rotated (which also required extra extrusion to tie into the main body. Finally I combined all the bodies in the model before exporting the STL files. TIP Make sure you do not have little bits of fin sticking down past the bottom of the tail body. See the picture below for what happened to me. Little tiny triangles of fin where sticking down past the body and kept several of my tails from sticking to the build plate, which in turn destroyed the whole print! Standards NGSS CCSS Overview and Background In 2008 Make Magazine published published Volume 15 with instructions to build an air based paper rocket launcher. I built one, let tons of kids make and launch rockets at several events. The original template included some fins, but paper fins are not the most durable for multiple launches (sometimes don't survive the first launch). The concept of building a more durable fin system has evolved into a project to design, print, and test for the best design for small scale rocket science aerodynamics. Audiences I make no assumption on the subject that you are trying to teach: kids ages 4-70 have had a blast playing with my paper rocket setup. Objectives Learn about air resistance. Learn air pressure in storage can convert to kinetic energy. Learn to use scientific method to test a design. Skills Learned (standards) MP.4 - Model with mathematics. (HS-ETS1-1), (HS-ETS1-2), (HS-ETS1-3), (HS-ETS1-4) RST.11-12.9 - Synthesize information from a range of sources (e.g., texts, experiments, simulations) into a coherent understanding of a process, phenomenon, or concept, resolving conflicting information when possible. References http://makezine.com/projects/make-15/compressed-air-rocket/ http://www.airrocketworks.com/ http://www.nakka-rocketry.net/fins.html http://www.hobbizine.com/rocketaltitude.html https://play.google.com/store/search?q=clinometer&c=apps&hl=en search clinometer on itunes appstore Lesson Plan and Activity Lesson / ActivityStep 1 - Background Knowledge Discuss air pressure. Discuss potential and kinetic energy. Discuss the mechanisms that convert stored air pressure into thrust for the rockets. Discuss air resistance and friction. Discuss aerodynamics. Discuss center of mass. Print and use one or more tail sections for as a visualization aid. Have students develop hypothesis about which design is going to be the most efficient and why they think that is. Or why their design is going to be most efficient. ( NOTE: you may have to impose some size parameters and/or weight parameters to make everything even) Step 2 - Design and/or build Option 1: Have students design a tail section and print it. Option 2: Print one or all the tail sections I have in the thing files. Step 3 - Practical testing Option 1: Assemble the parts as shown: Photos below Paper body -> tape -> tail sectionSAFETY NOTE: always be aware of what is down range Setup rocket launcher Perform a repeatable scientific collection of data: Launch rockets at same pressure, same angle, same direction, into same wind conditions. Measure the distance to landing. (option to layout a landing grid ahead) Record all data in a table of distances. Repeat above for so each tail section launches the same number of times. Option 2: Extension ideas Do above several times with different air pressures: 20 psi, 30 psi, 40psi, etc... (observe limits of your equipment)OR Do above with different launch angles.OR Come up with your own variation to test. Step 3 - Calculations Have students evaluate their data for any trends and come up with the average distance their tail design was able to achieve. Graph class wide data and determine which tail section, if any, was the best and why? Step 4 - Review Discuss why we got the results we got. Discuss how students think they could do the experiment differently. Rubric What is potential energy? What is kinetic energy? How does air pressure provide thrust to the rocket? What is helping our design be more aerodynamic? What is creating resistance for our designs? How does friction (drag) apply to rocketry? Tips and Tricks Tail design does in fact matter - at least it did for me. You get different flight characteristics from different tails. You can launch for height at ~90° launch angle or go for distance at ~45° launch angle rocket tube being paper, can usually be straightened out good enough without having to remake the rocket. Materials Needed Accessories The following materials and items can be helpful with this project. rocket launch kit (either assembled from Make instructions, or now at least one company makes an almost ready to go kit) paper 18" length of 1/2" PVC pipe (or diameter that matches your launcher) tape scissors long tape measure, roll wheel, or GPS and an app for measuring could get close enough in the right hands. open space to launch (foot ball field, greenway, use good judgement!) calipers, rule, or tape to measure smaller things (if you are doing design-builds) clinometer SAFETY GEAR Assets I have included the tail_no_fins.f3d fusion 360 design files in the thing files. Modifications for other pipe sizes or nose designs could be made. tail_no_fins.f3d http://www.thingiverse.com/thing:1729214 Project: Paper Air Rocket Tails Secure tail to paper and use PVC to roll the body. Tape it all up and smooth it out Launch setup from Make Magazine article with rocket ready to go! Ready for launch in T-minus 3....2... Can you say Rocket on right straightened right back out.
With this file you will be able to print Project: Paper Air Rocket Tail Sections with your 3D printer. Click on the button and save the file on your computer to work, edit or customize your design. You can also find more 3D designs for printers on Project: Paper Air Rocket Tail Sections.