Sega Nomad 18650 Rechargeable Battery Pack
thingiverse
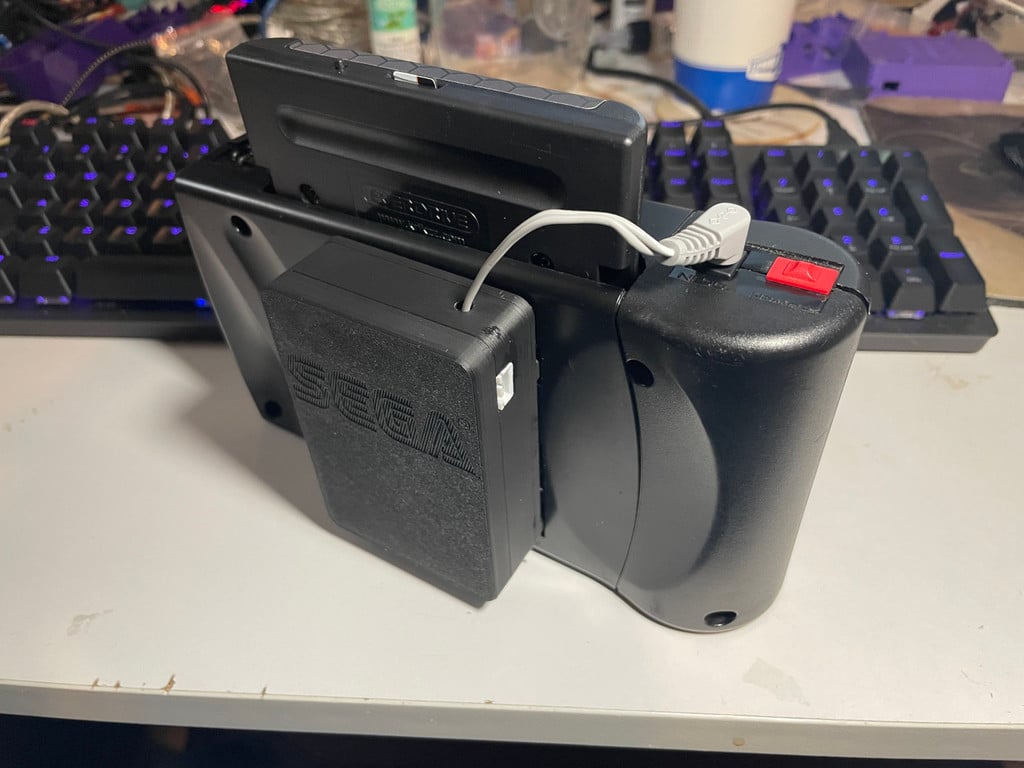
This Thing(TM) is a rechargeable battery pack for the Sega Genesis Nomad. It doesn't attempt to do anything fancy; it doesn't have a USB charge port, it doesn't use pogo pins to use the internal power contacts on the back of the Nomad. What it _does_, though, is supply 7.4v to the Nomad through the DC input jack, meaning you can use it on a completely stock Nomad without issue. It prints in three parts, so that you can print all of them on a flat face with no supports. The pack charges using a 2S balancing lithium battery charger, hence the JST XH 3-pin connector. You should try to find one that supports charging at lithium ion voltages, and you shouldn't exceed 0.8A charge current if you're using 22 AWG wire. I'm not your dad, though, so you go figure out how you want to charge it. I'm still working on a version that uses contact/spring plates for the batteries so that you don't have to weld tabs to the cells, but for now this is the smallest, fastest way to build it. Tools required: - 2mm Hex key or driver - Soldering iron - Battery tab spot welder (sorry) - A lighter or heat gun (for the heat shrink tubing) Parts required: - Battery Body.stl - Bottom Plate.stl - Cover Plate.stl - 4x M3x20mm Ball Head Cap Screws - 4x M3x4mm knurled brass heat set inserts - 2x 18650 Lithium Ion battery cell, flat top (I've used Sony VH5A cells. If you buy cheap cells, expect to get cheap results.) - EIAJ-3 (4.75mm OD, 1.7mm ID) DC barrel jack connector/pigtail, right-angle preferred - JST XH 3-pin male header Materials Required: - 22 AWG stranded wire, in either two or three colours (red/black, red/white/black, etc.) - Heat shrink tubing - 8mm nickel strip (for the battery tabs) - Solder (I like 60/40 lead/tin solder, but you do you) - Some kind of sealant or adhesive. I used clear silicone RTV; if you're feeling crafty, you could use hot glue. - Optionally, cyanoacrylate (super glue) Assembly: - Sink the four heat set inserts into the four holes in the Cover Plate - Cut three pieces off the 8mm nickel strip for the battery tabs. Two should be ~24mm long; fold those two in half; these get soldered to the power leads on one end of the fold, and welded to the tops of the cells on the other. One should be ~40mm long, because it's going to join the two cells, and you want a little bit left over to solder to without getting in the way of the welder. - Cut three lengths of wire: the red (or whatever colour you're using for positive) should be long enough to reach from the JST connector hole in the side of the housing to the top of the closest cell; the black (or whatever colour you're using for negative) one should reach the top of the second cell; the white (or whatever colour you're using for the middle pin of the JST) should reach the bottom of the closest cell. - Strip the ends of the wires, enough to solder to the pins of the JST header - Solder each of the wires to the pins of the JST connector as in the attached wiring diagram - Slip a length of heat shrink tubing over each of the wires, butt it up against the connector covering the pin and solder joint, and heat them. - Tin one end of each of the nickel strips with a nice handy blob of solder - Strip the remaining ends of each of the wires and tin them - Solder each lead to the strip as indicated in the wiring diagram (the long wire from the middle pin goes to the long strip that will join the two cells) - Measure enough wire on your barrel jack pigtail to reach from the nomad's DC input jack to the inside of the battery pack when the battery is installed, and trim to that length - Separate the wires, strip them, and tin the ends - PASS THE TINNED ENDS OF THE BARREL JACK WIRES THROUGH THE HOLE IN THE TOP OF THE BATTERY BODY NOW, otherwise you'll be desoldering them and doing this after. - Solder the negative lead of the barrel jack to the nickel strip you soldered the negative wire from the JST connector to earlier - Repeat with the positive lead - Orienting the 18650 cells as shown, go ahead and weld the tabs to the ends of each cell, using the long strip to join the negative lead of the first cell to the positive lead of the second cell (since we're wiring them in series to get 7.4v out of two 3.7v cells) - Run the M3x20mm screws through the holes on the bottom plate - Place the battery body onto the screws and slide the two together, using the screws to locate the body on the base plate - Place the cells into the grooves in the battery body - If you're using cyanoacrylate/super glue to hold the JST XH connector in place, stick a dab of it on the land for it in the cutout - Shove the JST XH connector in place - If you're using super glue, wedge something between the top of the JST XH and the cutout lip above it to hold it in place, and give the glue a few minutes to set a bit - Get out your adhesive/sealant of choice and just absolutely go to town sealing the cells to each other and to the battery body, and to hold the long wire down out of the way - Caulk that JST XH connector firmly into its slot, trying to keep the edge of the connector flush with the outside of the housing - Let the adhesive cure - Place the cover plate on, flip the assembly, and use the 2mm hex driver to tighten the screws into the heat set inserts, holding the assembly together - Plug the JST XH connector into your favourite 2S balancing charger and charge the pack Congratulations, your Nomad now has a battery.
With this file you will be able to print Sega Nomad 18650 Rechargeable Battery Pack with your 3D printer. Click on the button and save the file on your computer to work, edit or customize your design. You can also find more 3D designs for printers on Sega Nomad 18650 Rechargeable Battery Pack.