Self-Centering Turntable for use with Vertical Laser Engraver
thingiverse
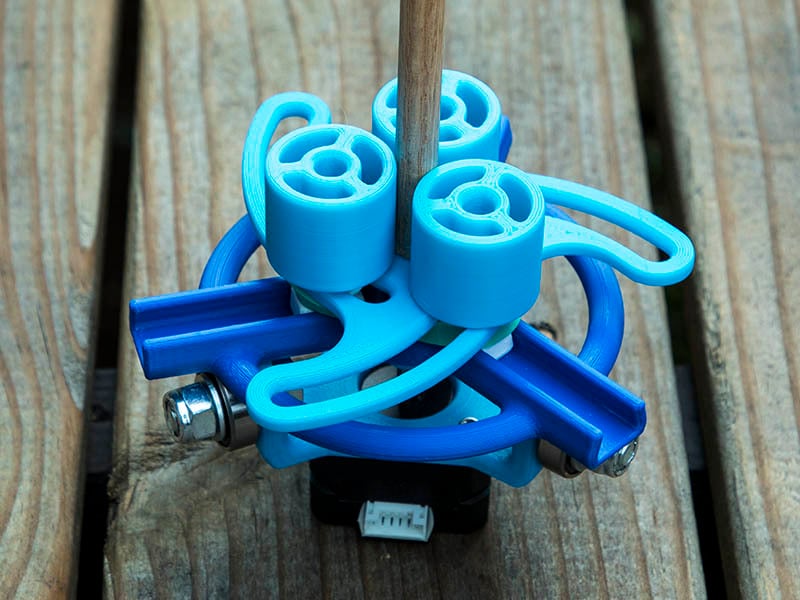
I designed this centering turntable to be used with my Horizontal / Vertical Laser engraver in Vertical mode. https://www.thingiverse.com/thing:4934772 There is a PDF Assembly guide attached for putting this together. Here are a couple of videos of the turntable & laser in action. Engraving a toothpick: https://youtu.be/ohvQ0817M7w Engraving a 3/8" birch dowel: https://youtu.be/M0yXAkeJ-YI This design took an interesting path with the help of others along the way. It started with the idea from Mark Carew on OpenBuilds asking if I could take my horizontal/vertical laser engraver a step further & make a turntable to use as a rotary axis in the vertical mode. That idea blossomed into a Minimal Turntable. https://www.thingiverse.com/thing:4940478 After the 1st test, it was difficult to get the part exactly centered & during a long burn the object might drift further off center. Something was needed to keep the cylindrical object centered during its use. Peter Van Der Walt on the OpenBuilds forum pointed me to a Longworth Chuck: https://www.popularwoodworking.com/techniques/longworth-chuck/ I created 2 simple test rings & used just M3 screws & nuts to hold the object centered. That seemed like too much effort for each setup to use it manually & I would have to use locknuts to keep the screws from coming loose. I was getting very close to the final design when I found this slot-cam-four-slider mechanism at: https://grabcad.com/library/slot-cam-four-slider-follower-mechanism-1 He had the fusion 360 files for this, so it was easy to adjust his design to what I needed. The only problem now was to keep the slider pegs in position during the laser engraving. I added M5 holes & locknut traps at the end of each of slide opening to manually lock them in place, but that was still a little aggravating to have to do each time you changed the object. Then someone on the v1engineering forum asked if springs would help. That made me think about using a rubber band. Attaching an appropriate size rubber band around the 3 pegs below the table top fixed the problem. Before publishing this, I looked into the terms of service licensing that grabcad has & was not sure whether I could publish this or not. The next morning, I realized those sliders were like the sliders in the Trammel of Archimedes & I had designed a modification of that idea a while back, https://www.thingiverse.com/thing:2927475 I redrew the whole design again incorporating those sliders & cut out another 20% volume in the design & made 2 versions this time, small & large. Big thanks to those that helped me bring this design to its current state. I won't say it is finished, because something seems to always change when I say that. Print one each of these parts: BearingBase_3.stl 3 - Slider_7_0mmPeg.stl 3 - Spacer_12_7mm_Hold.stl (Optional for smaller diameter objects 1/2" to around 1") (28:20) .26oz 3 - Spacer_5mmODx25mm_Hold.stl (Optional for really small diameter of 5mm or larger) (2:00:00) (1.2oz) For objects about 27mm-103mm diameter print these 2 parts: DoveTail_Guide_Small.stl TableTop_Small.stl For objects about 27mm-148mm diameter objects print these 2 parts: DoveTail_Guide_Large.stl DoveTail_Guide_Large.stl Purchase these: 1 - Nema17 motor (I am using a pancake size, but any size should work) 3 - 608-2RS bearings 3 - 5/16"x1" Hex bolts (or 3 - M8x25mm) 3 - 5/16" washers (or 3 - M8 washers) 3 - 5/16" Locknuts (or 3 - M8 Locknuts) 1 - M3x10mm screw (to lock turntable to motor) 4 - M3x8mm screws (attach plate to motor) (10mm seemed too long for pancake motor) 1 – rubber band of appropriate size I had all the hardware already on hand except for the 5/16" hardware that was purchased at local hardware store. Cost of this hardware should be $15-$20. I used PrusaSlicer for the slicing. The DoveTail_Guide_Small.stl & Sliders.stl I used 3 perimeters, 20% infill & Adaptive height from 0.2 - 0.28mm with 0.4mm nozzle The BearingBase_3.stl needs to be strongest part. I printed this at 6 perimeters, 60% infill & Adaptive height from 0.2 - 0.28mm The TableTop_Small.stl I printed with 5 perimeters, 50% infill & Adaptive height from 0.2 - 0.28mm A 26.5mm diameter cylindrical object is the smallest diameter without holding spacers. Placing 3 of the Spacer_12_7mm_Hold.stl around the slider pegs will allow you to use down to a 1/2" diameter object. Using 3 - Spacer_5mmODx25mm_Hold.stl will allow you to use objects down to 5mm in diameter. There is a fusion 360 file and sketchup file that shows all the parts assembled together.
With this file you will be able to print Self-Centering Turntable for use with Vertical Laser Engraver with your 3D printer. Click on the button and save the file on your computer to work, edit or customize your design. You can also find more 3D designs for printers on Self-Centering Turntable for use with Vertical Laser Engraver.