Semi-Auto Alternative Config
prusaprinters
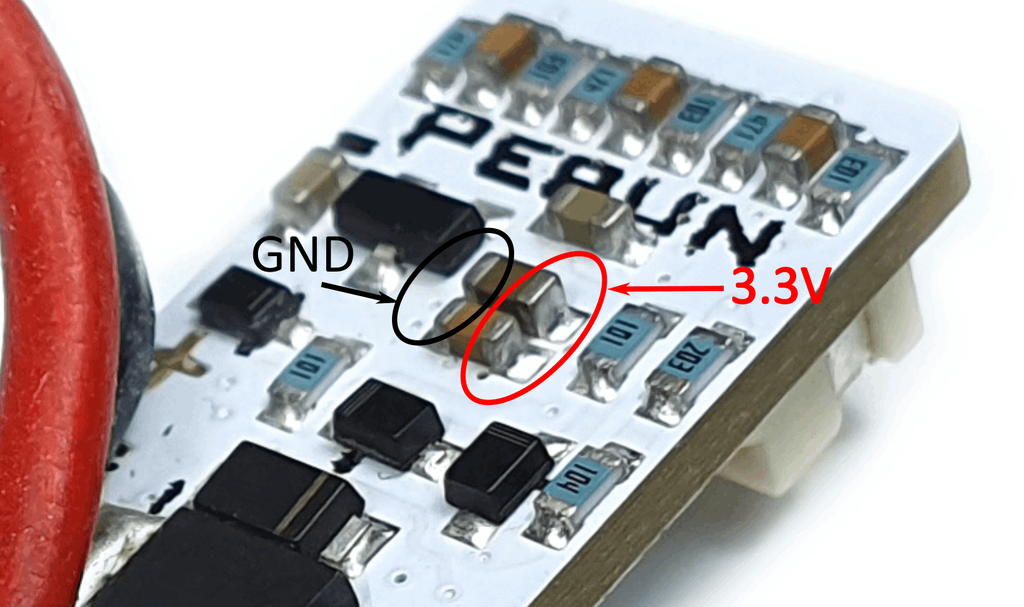
<p>Semi-auto modifications using the Perun ETU++ Mosfet.<br><strong>This was my original planned design. Personally, I have chosen a different approach to this now. However, the theory of it still holds up and I figured it's worth sharing. </strong></p><p><strong>Notably, you will need to very carefully solder to a capacitor on the MOSFET for the sector gear sensor, which is outside my skill level. </strong></p><p>I'm using a similar system to Jakeps remix, with a few notable changes:</p><ul><li>"Automagic" magazine based safety</li><li>Triggerguard fire selector</li><li>More robust sector gear sensor</li></ul><p>You will lose out on the dedicated battery switch from Jakep's version with this remix, but hey, you could always remix this and add it yourself.</p><ul><li>Fire selector switch is located in the trigger guard with the<i>trigrocker</i> files. You may need to change the size of the hole to accommodate your specific rocker switch.</li><li>Safety is integrated into the magwell/trigger with the<i>dovemag</i> and<i>magmomentary</i> files. You'll need a small microswitch for integration into the<i>dovemag</i> file, I'm using a dongnan k10 switch. Again, you may need to edit it to fit your specific switch. By wiring the microswitch that is inserted into<i>magswitch</i> in series to the trigger, you prevent the ETU++ from firing the gearbox while a mag is not inserted. (Or the microswitch is not pressed, more accurately.)</li><li>The sector gear switch is a hall effect sensor, it needs to be unipolar with an operating voltage of 3.3V or less at the minimum, as this is what the ETU++ uses for its power. This fits into a slot in the<i>rightboxhall</i> file.</li></ul><p>The hall effect switch has 3 separate wires:</p><ul><li>Universal ground, connected to the ETU++ ground,</li><li>Signal, which is connected to the ETU++ positive for the sector gear switch</li><li>Input, which is separately soldered to the ETU++ to provide power to the sensor. It can be soldered to the rear of the ETU++, directly to a capacitor. I have included a photo from Perun of where this can be wired. Check the voltage before wiring, however.</li></ul><p>You will need a small, fairly powerful magnet attached to the sector gear for the hall effect sensor to register it.</p><p>Some soldering to the ETU++ may also be required as a direct plug for it is difficult to source.</p><p>You may also need to lengthen the motor leads on the ETU++, I found mine were too short.</p><p>I have included a schematic photo for how to wire up the system, it's very quick and dirty but hopefully you get the gist. It's worth reading up on how the ETU++ itself operates on Perun's website, as you can pretty much make any combination of trigger, sector gear sensor, safety and fire selector.</p><p>This remix could also be used with the Tachyon fire computer, negating its need for an IR bb detector attached to the barrel.</p><h3>Print Settings</h3><p><strong>Printer:</strong></p><p>Prusa Mini</p><p><strong>Resolution: </strong></p><p>0.3 (mostly)</p><p><strong>Infill:</strong></p><p>60/80</p><p><strong>Filament:</strong></p><p>N/A PETG</p><p>N/A</p><p><br> </p><p><strong>Notes:</strong></p><p> </p><p><i>Magmomentary</i> needs supports.<br><i>Dovemag</i> should be printed at 0.1 or variable height to reduce the gap, anyone who is better with CAD feel free to add that back in, it is beyond my feeble knowledge lol.<br>Be smart orienting parts, flat sides to the bed. Parts have not been oriented correctly, do this in your slicer.</p><p>I use at least 60% infill on these parts</p><h3>Post-Printing</h3><p>Sanding will probably be needed for the<i>magmomentary</i> and<i>triggergroup</i> files.</p><p>Be careful with the wiring for the<i>dovemag</i> and<i>magmomentary</i> file, the tolerance is quite tight and its a pain to remove the switch once its in</p><p>I recommend wiring it up in sections, and then installing the sections, and then wiring to the ETU for a nice fit.</p><p> </p><p> </p><p>Category: Mechanical Toys</p>
With this file you will be able to print Semi-Auto Alternative Config with your 3D printer. Click on the button and save the file on your computer to work, edit or customize your design. You can also find more 3D designs for printers on Semi-Auto Alternative Config.