Semi-automatic Bed Level Probe
thingiverse
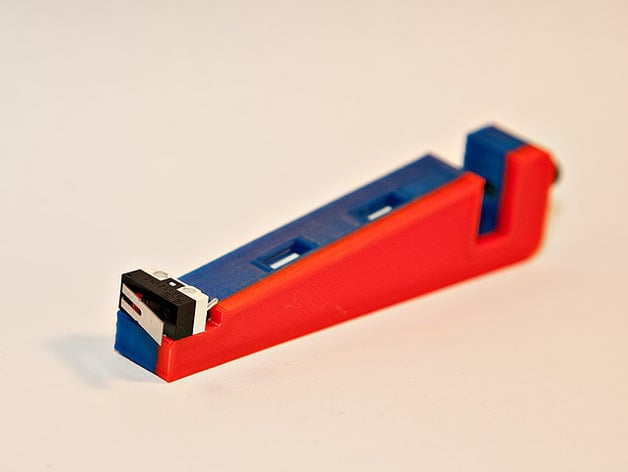
This is a simple, micro-switch based bed level probe that costs less than $1 to make and gets the job done, reliably. Is is semi-automatic, in the sense that you attach it to the extruder or carriage, run the calibration routine (G29 in Marlin or G32 in Repetier) and then remove the probe. That means it does not add any weight to the print head, a nice plus for Delta or Bowden based printers. As long as you don't bump the printer or change the bed plate, the re-calibration is not needed. It was designed to be quick-mount: it slides right on the effector plate on a Kossel (use the Customizer or OpenSCAD to adjust for other printers) and it takes only a few seconds to tighten for increased repeatability. In terms of accuracy: I get a 20 micron repeatability but I can't say how much of that is because of the printer vs the probe vs the switch, the bottom line is all of those combined are less than 20 microns which is more than sufficient for most prints. NOTE: If you are discouraged by manual probes and still waiting for that fully automatic sensor you might be surprised to how much of a difference this little thing can make: consider this will at least allow you to get the printer in a shape where it can actually print parts for a more complex probe. This should be lot more precise than the Kossel original allen key probe and more reliable than the newer FSR solution (at least for the time being) in the sense that it allows you to have a heated bed as well as a super-tight bed plate (safe removal of stubborn prints). Update The OpenSCAD/Customer can generate a multitude of variants to fit different printers and carriages and can take both 1/2" (small) and 20mm (large) micro-switches. Additional parts needed: Optional but recommended: 12mm M3 (thumb) screw and hex nut 1/2" micro-switch or similar. The _large version also works with 20mm long micro-switches common in many printers. Note: Height maps generated with Repetier (Tools->Bed height map) and Excel. Instructions It was designed with the assumption of an uncalibrated printer so print however you can, none of the features are terribly important, the only surface that is important to be flat is the face that attaches to the bottom of the plate (the face that the screw tightens against). I am using mine with Repetier, I followed the instructions here: http://www.repetier.com/documentation/repetier-firmware/z-probing/ I connected my probe to the Aux-2 connector (GND and A9/D63) on RAMPS 1.4 and in the config I use the following (note some of the settings are overwritten by EEPROM): define FEATURE_Z_PROBE 1 define Z_PROBE_PIN 63 define Z_PROBE_PULLUP true define Z_PROBE_ON_HIGH false define Z_PROBE_X_OFFSET -1.11 define Z_PROBE_Y_OFFSET -30.30 define Z_PROBE_WAIT_BEFORE_TEST false define Z_PROBE_SPEED 50 define Z_PROBE_XY_SPEED 150 define Z_PROBE_SWITCHING_DISTANCE 1 define Z_PROBE_REPETITIONS 1 define Z_PROBE_HEIGHT 17.4 define Z_PROBE_START_SCRIPT "" define Z_PROBE_FINISHED_SCRIPT "" define FEATURE_AUTOLEVEL 1
With this file you will be able to print Semi-automatic Bed Level Probe with your 3D printer. Click on the button and save the file on your computer to work, edit or customize your design. You can also find more 3D designs for printers on Semi-automatic Bed Level Probe.