Semi-automatic bed levelling brackets
thingiverse
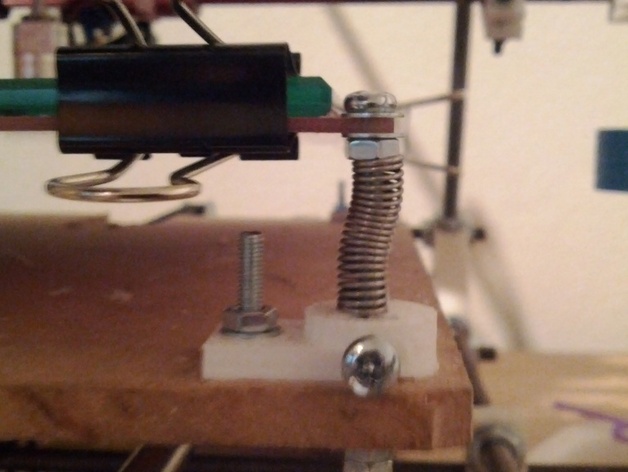
The brackets are designed to allow you to easily adjust each corners of your print bed. This part is design to be a fastening bracket for a heated bed attached to a long bolt. A spring is to be used to push the heated bed up. The bracket allows free movement of the bolt unless the fastening bolt is tightened. I have successfully used this in a few printers already. It eliminates the need to "guess" that you have the right "feel" of a thin material. Make sure that your slicer includes an initial 1 layer height on print start. The provided STL uses the following parameters: boltDiameter = 3.9; bracketDiameter = 15; bracketHeight = 6; nutHeight = 2.4; nutDiameter = 5.6; plateHeight = 3.5; The bolt Diameter should NOT match y our bolt diameter, it should be larger so the bolt doesn't snag too much. NOTE: This device requires your print head to push against the print bed. Make sure the fasteners are undone before calibrating and that your springs are not too strong as to damage your print head. Instructions You will need the following Per bracket: 4 x M3x20 (M3x25, or shorter. As long as you can fasten it) 1 x M3x40 (or whatever bolt you currently use) 1 x M3x10 as a lock bolt 6 x M3 washers (4 for fastening, 2 for protecting heat bed, 1 for spring shield on plastic) 5-6 x M3 nuts (2 for fastening to bed, 2-3 for long bolt, 1 for locking. This parts list isn't strict. You may opt out of using so many washers, or glue the bracket in place for example. Print the provided STL or modify and render the SCAD file to your needs. The SCAD file isn't perfect but should allow you to adjust within a reasonable parameters. Before beginning make sure that Z home doesn't push down too much on the bed. If it does then you may experience problems at Y home or Y max with the bolt running into the frame. To prevent this try to minimise the bed push by adjusting your Z stop. The attached image shows one of my printers with the bolt pushed in from the heated bed. You might actually find it easier to turn the bolts upside down and lock the heat bed with two nuts instead of locking two nuts together. This saves you an M3 nut. Both ways work fine, Print your parts Fix each corner to the build plate where your bolt passes through. Assemble each corner so that a spring is used to push the heat bed away from the bracket. (See photo) To calibrate. Fully extend all springs and make sure all bracket bolt locks are loose. Allow the print head to home Z at min x,y then lock the first bolt. Lift Z 10mm Move head to max x,y, home z then lock the bolt Repeat for each other corner (We are using a diagonal/X pattern here) Make sure you lift your Z up 10mm between each corner to avoid horizontal stress on your print head. Repeat each corner until level. You may need to repeat some corners depending how un-level your bed is at full spring extensions. Before printing make sure that your slicing software includes a 1 layer height at the start of a print to avoid a 0 layer.
With this file you will be able to print Semi-automatic bed levelling brackets with your 3D printer. Click on the button and save the file on your computer to work, edit or customize your design. You can also find more 3D designs for printers on Semi-automatic bed levelling brackets.