Sewable 5mm LED mount
thingiverse
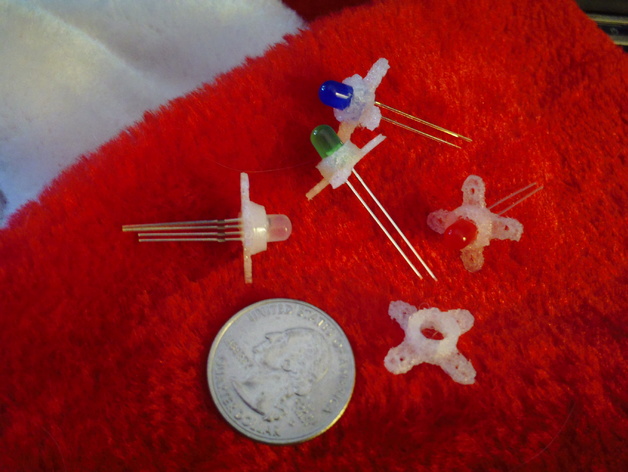
I needed a way to mount a standard 5mm LED onto my "wearable" project (a Santa hat). I created this little sewable mount, and printed it with NinjaFlex (I used "Semitransparent White", http://www.adafruit.com/product/2445 printed at 100% fill). There's a groove inside to hold the ridge on a 5mm LED. The hole in the middle is tapered to ease insertion from the side with the mounting ears. These mounts are NOT designed for use with conductive thread. You'll have to use a more conventional wiring technique, like wire wrapping, soldering, or crimp connectors. By the way, the LED in the picture with 4 leads is an addressable LED, https://www.sparkfun.com/products/12986 that is compatible with Adafruit's Neopixels. Instructions These parts are designed to be printed with NinjaFlex. I used "Semitranslucent White", from Adafruit (www.adafruit.com) PID# 2445. I used Cura as my slicer program, and used 100% fill (hey, they're really small, so won't use much filament). These are designed to be mechanical mounts for a standard 5mm LED. I'm using SparkFun COM-12986 "addressable" LEDs, compatible with Adafruit's Neopixels, but they should work with any standard 5mm LED. THEY ARE NOT INTENDED FOR USE WITH CONDUCTIVE THREAD! You'll have to figure out some other method for the electrical connection, such as wirewrap or soldering to the LED leads. The mount has a groove in the middle for the ridge on the LED, with a taper to ease insertion of the LED from the side that has the mounting ears. The design has four ears that can be sewn onto cloth. If you need fewer ears, you can either modify the design or just trim the extras off with sciscors or a knife. I advise that you print one, and see if it needs to have the size adjusted with the scaling factor in your slicer program. If you need several, you may wish to print them several at a time -- the time to clean the print bed is longer than the actual print time for one. I've printed four at a time, and although they come out rougher than printing one at a time, they're quite usable, though need a little trimming with a knife. I inserted the LED into the mount, then shoved the leads through the cloth. I used a needle and ordinary thread to sew the ears onto the cloth. Once I had all of my LEDs mounted in this way, I soldered wires to them. (Since I wanted high flexibility, I used silicone insulated stranded wire, such as www.adafruit.com/products/2517 for black, and some other colors.) A word on soldering technique: I normally wouldn't recommend this technique (I've been soldering things for about half a century), but as they say "if it's stupid, but it works, it ain't stupid" (from the "rules of combat"). Spread out the leads (especially if you have a four-lead LED). Then, using a high-temperature soldering iron, tin each lead, making sure you have a lot of solder on the lead. Tin the stripped end of the wire to go onto the lead, slip some heat- shrink tubing over the wire, then hold the wire to the lead so it's in line with the lead, and heat both with the iron. Hold the wire steady until the solder has solidified. (Under "normal" conditions, I'd recommend twisting the wire around the lead, then heat both with the soldering iron, and apply solder. However, these aren't "normal" conditions.) I then slid the heat-shrink tubing down to cover the lead, and "brushed" it with the iron to get it to shrink down. I had 11 LEDs, each with 4 leads, with power and ground "daisy chained", and data wired from one to the next, with the cloth in question being polyester, and had no sign of the cloth being damaged by the heat. I also used a "cross tweezers", that is, tweezers you squeeze to open, to hold the wires while soldering.
With this file you will be able to print Sewable 5mm LED mount with your 3D printer. Click on the button and save the file on your computer to work, edit or customize your design. You can also find more 3D designs for printers on Sewable 5mm LED mount.