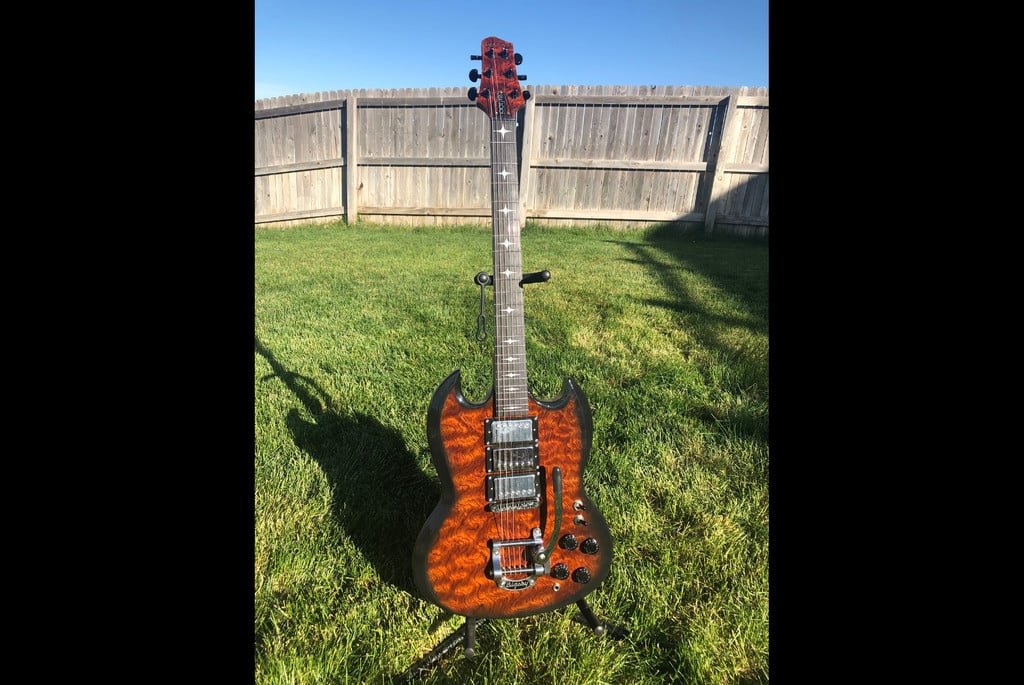
SG style playable electric guitar
thingiverse
After seeing the incredible work by TechSupportGo (Jessie Sassser) at https://www.thingiverse.com/thing:1068688, I realized what was possible. Unfortunately, while those plans are amazing and groundbreaking for sure, I am more a fan of the SG-style body shape. So, I decided to design and print my own electric guitar from scratch. My dream was to create a playable high-end 3D-printed guitar in the style of the Gibson SG, but with three pickups and a 24 fret neck. I also wanted the ability to use a bolt-on custom neck, such as one from Warmoth.com. I settled on a 25.5" scale intonation. This allows using a standard bolt-on 25.5" necks (including the Warmoth 24 fret neck), or any conversion neck that fits a fender pocket. You can choose from two centerblock files: one with two pickups or the other with three. Also, I wanted to integrate sound chambering similar to the Gibson Elegant series. Chambering would be very difficult for me to manually route from a true wood block. 3d printing seemed like a logical alternative, and more appealing than buying a pre-cut or solid block wood kit model that did not have the acoustic chambering. Bolt-on necks are not easy to mesh with the SG design, which is why it is hard to find an SG with a bolt-on neck. Traditionally, you either have to sacrifice neck access by dropping the fingerboard into the body of the guitar (e.g. the cheaper Epiphone SG versions and most SG precut wood kits), or, if you keep with the true SG neck placement, you will encounter structural issues. This is why true SGs are traditionally made with a set neck, providing a strong neck plus retaining fret accessibility. However, I wanted something more: specifically, I wanted the ability to use a custom-built neck tailored to my exact wishes AND an have an SG body style. I wanted to have my cake and eat it too, and spent a long time analyzing and designing. Also, I didn't want to spend $6k for a custom shop guitar that still might not have everything I wanted. I succeeded by using a compromise in my design--only the 22nd fret is below the neckline on the body, but to attach a bolt-on neck this high above the body I had to extend a pad from the pocket for bolting. I kept some pocket for alignment and reinforcement, but nowhere near what the Epiphones are doing. Because I was 3D printing, I was able to easily create holes for two 1/4" stainless steel dowels through the neck pocket back for support strength. I got a 24” rod on Amazon and sawed it in half. I had to use a drill and coat hanger to get the supports out of the holes so the rods would fit all the way in. I was originally not happy extending the pad for the neck bolts, but I'm now seeing that even with the extension pad, the neck at the 20th fret is still almost half the thickness of my Les Paul. So, not 100% SG purist but still incredible neck access. The 3D printed wood is SOLID. For guitar resonance it sounds similar to a guitar made out of really hard, very dense wood. A simple sound demo is available at https://youtu.be/8V14xpDhN2o with the caveat that I don't have any recording equipment so I just recorded some goofy blues runs using my phone (and I don't claim to be the best guitar player in the world). So it should go without saying it sounds better live. I printed with Hatchbox Wood PLA over about 3 weeks to get everything printed. I printed with 100% infill for the centerblock and 60% for the body. I used stainless steel center rods and steel dowel pins, I don't know if it would work well without them. I bought a cheap $100 fender squire for neck testing. I test assembled the parts and added the junky fender neck and a cheap bridge to try it out. It worked! I verified the guitar is structurally sound and passed the important mechanical/functionality test. The added strength support bonus of the dowels/rods is very nice. It is solid with these additions! The pilot holes were a little wide for my bridge/tailpiece but I drilled new holes for the tailpiece. Intonation is perfect but I initially just set the bridge on a shim for testing, without drilling it. It feels and sounds exactly like a wood guitar, and with lots of sustain like you would get from a really hard wood. I've discovered a huge amount of variance in saddle sockets so I made the 25.5" scale bridge block with simple pilot holes instead of pre-cut holes. The blank version is still available for more flexibility. Weight is about the same as I would expect for a wood guitar. After testing the design, I veneered, then sealed with shellac, then nitrocellulose. The resonance is incredible. The body vibrates for ages, kind of like a tuning fork. When I first tested it I was a little worried I might have to mute it a little with tape or cotton on the inside if it started causing feedback problems when amplified, but the veneer and nitrocellulose tamed it a little. Acoustically (not plugged in) it's about 2x louder than my Gibson LP and just a little louder than my Gretsch Electromatic, and a lot brighter than the Gretsch. Having played for a bit now I can say this is a killer guitar. It has better playability and neck access than my Gibson Les Paul, and I can make it sound like (or even better than) either the Gibson or the Gretsch. I did have to modify the final design with braces in the control area (I found holding the guitar at some angles would flex the body, breaking the veneer) and also across the seams inside the guitar to hold the sections together stronger. I did have to re-veneer because of the cracks, but it is solid now that I re-enforced the seams to prevent them from pulling. If you want to make a quality guitar, it is possible, but be prepared to put in time to do it right. Turning this into a high-end guitar was not a quick process. As pictured the total cost for all materials was ~ $1200, but I think someone could probably make it for as little as $200. Just depends on how nice you want it to be and how many tools/parts you have laying around. I used Blender, my own guitars, and several reference blueprints to create this design. I have about 80 hours into the electronic design alone, and probably 80 or more hours building the guitar (including re-veneering and re-finishing the new veneer). I've learned an incredible amount about building guitars. I admit I'm not skilled enough nor do I have the right tools to do it in real wood, but now I don’t need to be skilled in woodworking. 3D printing has opened up a ton of new possibilities for me. I did learn that superglue works great for assembly and repairs, and that scoring the PLA and using sufficient amounts of veneer glue will help immensely with adhering the veneer (initially I did not use enough glue, hence another reason I had to re-veneer). Printing was done on an Ender 3 with Hatchbox wood PLA at 200/33 temp and 100% fan. Initially I had a lot of warping; you’ll have to really know your printer/filament to get the solid parts to print without warping. I've added holes for using 1/8"x1" dowel pins to help align and strengthen the final design and to identify any minor warping so it can be fixed during finishing. Stainless steel pins are only ~$4 per 25 on Amazon. I bought the veneer (I chose figured bubinga) from veneersupplies.com, as well as the veneer glue and veneer softener. I just clamped the veneer on the body, I did not use a veneer press. Neck scale: I originally designed it with the Gibson 24.75" neck in mind, but realized this is not easily feasible. I moved the bridge/saddle holes to accommodate the neck for proper intonation since I had to drop the neck slightly for better structural integrity. I uploaded a "blank" saddle block for those who want to drill holes for a different saddle or a different scale neck, or if you want to precisely set your intonation. Keep in mind the neck pocket creates a 2.5 degree neck tilt--check your saddle/bridge if you want to use something other than gotoh tune o' matic. I installed a bigsby B5 with a roller saddle bridge. I also braced the bottom two holes of the bigsby with a thin piece of wood on the inside of the guitar (the top two holes are in the centerblock). Assembly: press fit the neck to the centerblock to make sure it fits and the saddle scale length is correct BEFORE gluing parts, so if it doesn't work you can adjust the model, and reprint only the heel pocket or the saddle block and not the whole guitar. Using superglue, put the centerblock together first, then the sides, and the bottom two pieces, so you have four parts. Attach assembled sides to centerblock (using dowel pins and glue) and then attach the bottom assembly to the centerblock and sides. If you're brave enough to not use dowel pins you can put this together in almost any order; however, I've found that my printer always has a small amount of variability in the bottom layer so the pins are immensely helpful. I don’t think I would veneer this without pins—the seams just won’t be strong enough. I needed to run a 1/8" drill through the holes to clear them out or the pins would have been too tight to get the pieces together. The easiest way to set intonation is to initially screw in the tailpiece but just lay the bridge under the strings, and then tune it up. The tension will hold it on. Then you can adjust forward or back and mark drill holes when it’s right. MAKE SURE YOU DRILL THE RIGHT SIZE HOLE FOR YOUR BRIDGE. Don't make the hole a little smaller for press fit like you would with real wood. Wood PLA does not expand like real wood. If the hole is even a tiny bit too small you will not be able to press or hammer the post in like you could with real wood. You will end up with it stuck halfway in, or break the guitar trying to make it go in. Also don't forget to drill a hole and add a grounding wire before you press the post in, or your guitar will buzz when you touch the strings. Or worse, it will pick up a radio station. Finishing: Remove the hardware you installed for testing/intonation. Fill any gaps and then sand/stain and finish as desired. One note: I have made both the face and back (not the bevels) 1/42" (0.61mm) short from the blueprint spec to allow addition of veneer (quilted maple, burled, etc.) without it interfering with setting the neck. If you don't want veneer you can either raise the top surface 1/42" or just ignore the fact that the fingerboard will be half a millimeter higher from the body. Future plans: I need to enlarge the switch hole and perhaps add a version with a second switch hole. I didn't realize the switch needs 1/2" opening, the current hole is too small and has to be drilled out. Also, I will add the supplemental seam braces into the design if possible. Thank you for looking/making, and please make constructive comments! I'm super excited to see this come together in a way that makes people happy. I truly believe this is the wave of the future for people like me who can't properly handle a wood router to make the custom sound cavity that this design has.
With this file you will be able to print SG style playable electric guitar with your 3D printer. Click on the button and save the file on your computer to work, edit or customize your design. You can also find more 3D designs for printers on SG style playable electric guitar.