Shapeoko 2 Limit Switch Brackets
thingiverse
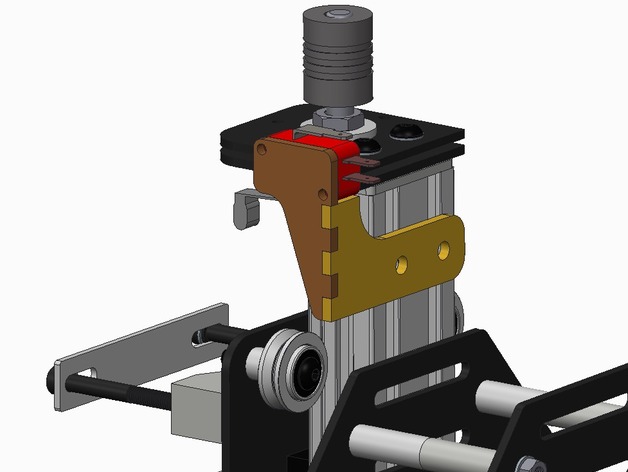
These brackets are for mounting limit or homing switches to your Shapeoko 2 CNC. Design goals: 1.) Most importantly: no reduction in cutting area! 2.) Use existing holes in motor plates. 3.) Use existing leftover M5 hardware. 4.) No disassembly of the axes to install parts, if possible. 5.) Mount the switches to stationary portion of each axis. 6.) Easily adjustable Limit switches these are meant to be used with:http://www.amazon.com/gp/product/B00H8TIEHW/ref=oh_aui_detailpage_o00_s00?ie=UTF8&psc=1 All parts are reversible, allowing you to assemble these brackets on either end of any axis. Added a slot to the X axis bracket (not shown in pictures) that can be used for zip-tying stepper motor wires. The bracket uses a hole that I previously used for cable-tying. Instructions They are intended to be milled from .125" G10 fiberglass which can be purchased from McMaster, ePlastics, and other vendors. DON'T FORGET TO SET YOUR CAM SOFTWARE TO OVERCUT THE CORNERS! I have not included overcuts in the model. Installation notes: I sized the X and Y bracket mounting holes, and the adjustment screw holes to be tapped with the M5 tap that came with your Shapeoko kit. G10 taps easily, and still allows you to turn the screws tight without stripping threads. Installation of the Z axis brackets requires removal of the 2 screws at the top of the Z axis in order to slide-in 2 insertion (tee) nuts into the makerslide (or you could get drop-in nuts). The X-axis kick-plate uses no screws and is fairly snug when installed, but I chose to use some CA glue to hold it in place better. Just be careful not to get too much CA glue in the eccentric nuts.
With this file you will be able to print Shapeoko 2 Limit Switch Brackets with your 3D printer. Click on the button and save the file on your computer to work, edit or customize your design. You can also find more 3D designs for printers on Shapeoko 2 Limit Switch Brackets.