SharkByte RunCam Camera Body for CaddX 1.66mm M12 Lens
thingiverse
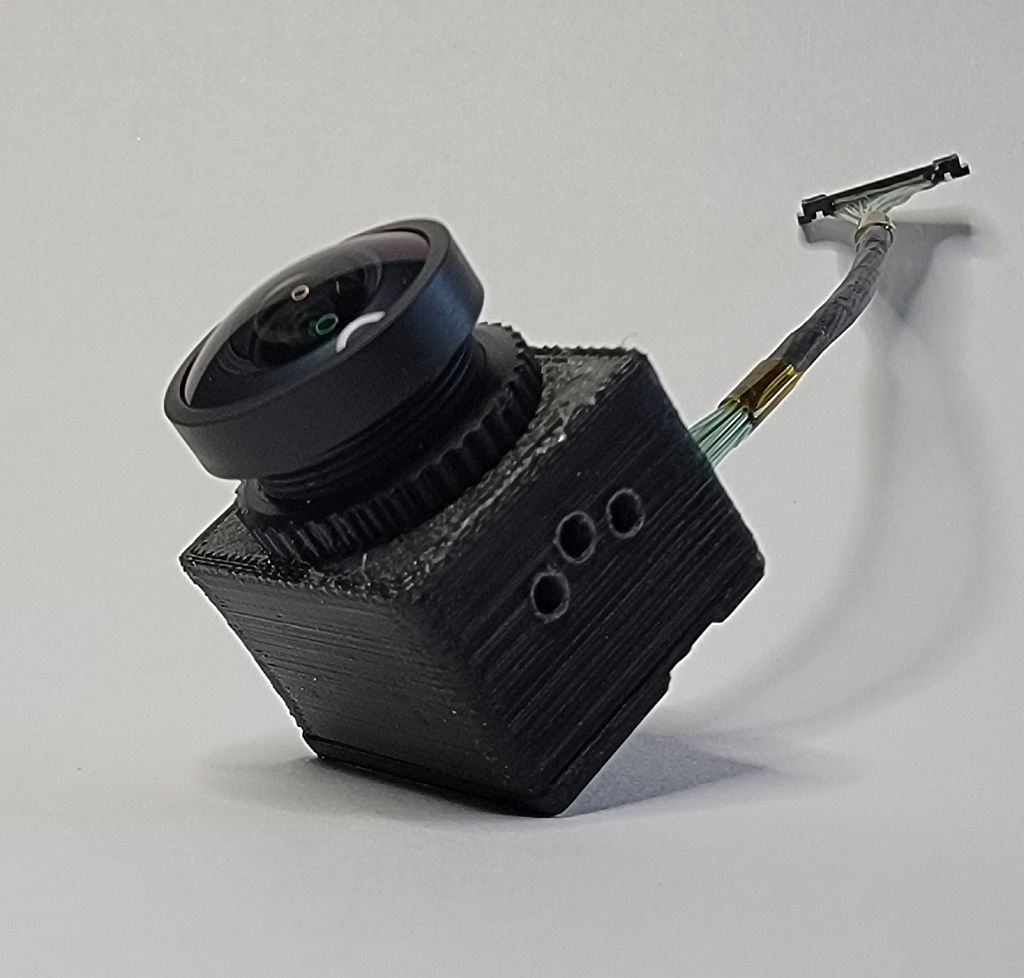
Update 6/19/2021 - New version that includes a ledge to help keep the board as level as possible. Mounting holes have been removed in favor of drilling all on a CNC mill. Lens thread is just a pilot to machine tap. Also includes fixtures for clamping in a lathe chuck to tap true, and for placing in a vice on a CNC mill. Only for 19 and 20mm versions. Since mechanically threading less print resolution is required. 0.10mm or 0.20mm should be sufficient (I used 0.10mm). Based off the work of Alf_Skaar on RCGroups I wanted to go a step further for my SharkByte RunCam HD to CaddX M12 lens upgrade. This shell mounts the RunCam sensor board internally, retains the MIPI connector and protects the back of the board. Very much mimics the DJI camera format. I've created 3 different variants - micro and full size, as well as a 20mm that works with the 20mm spacing of many frames, eliminating the need for washers/spacers to anchor firmly. Mounting holes are only point marked and will need to be pilot drilled and the M2 holes tapped. The holes for the board and the cover only need to be piloted. ABS takes tapped threads nicely. I use a #66 orifice drill (0.033in) in a pin vise to pilot the board mounting holes and retainer holes, using the cover and the board to make sure the center holes are accurate as possible. To tap the camera mounting holes (there are 3 each side, you can tap all or just the ones you want to use), I start with the same #66 to start the holes, then a 1/16" drill in a pin vise followed by an M2 tap. If you're stingy and don't want to spend the $6 for an import M2 tap on Amazon you can take a long M2 and using a Dremel and a cutoff wheel make a slot in it to make a workable tap for plastic use. After tapping the mounting holes I clean up the lens threads. I picked up an M12x0.5mm tap on Amazon (around $13) for the finals but during protoyping I just used an M3 tap to scrape the threads (the standard M3 thread is also 0.5mm pitch) until the lens threads in without too much effort. The lens threads are aluminum so they can take a fairly tight fit without damaging it. I will recommend the proper tap though as it's easy to get the lens off angle which make focusing the entire frame impossible - non perpendicular lens will result in a vignetting effect with the center in focus and the edges blurry. I picked up a small assortment of M1, M1.2, M1.4 and M1.7 self tapping screws on Amazon for $7 to use to replace screws that ran away and to mount the cover. You can also use some of the small self tapping screws that come with some of the micro AIO FCs. The 20mm version you see here was printed with a 0.25mm nozzle and Polymaker PolyLite ABS in black, but during the prototyping process I was printing with a 0.40mm nozzle. Print time on the 0.40mm was around 90 minutes, the 0.25mm takes significantly longer at between 5 and 11 hours depending on the size you choose. All version have been printed at 0.06mm layer height to make the fine M12 threads as accurate as possible. I have not needed to spray paint the housing to block IR using the ABS like when using TPU. I also have not needed to scale up the print or adjust horizontal expansion to get the threads close enough for the lens to thread in with only minor scraping/chasing like many have experienced with the original Alf_Skaar version. I have an enclosure made of 8020, black foam core and a Lexan door on my modified Ender 3 but no active enclosure heating beyond the radiated heat from the bed and the ABS yields a nice result. Mass statistics: Standard RunCam HD w/ nano->micro adapter & cable = 5.56g Printed body w/ sensor, CaddX lens and cable = 8.98g And since the lens itself is a 2.08g premium (RC: 2.52g v CaddX 4.60g) the body is only a 1.34g premium so on your typical 5" quad the additional mass is negligible. Links: [RC Groups thread](https://www.rcgroups.com/forums/showthread.php?3372597-Fatshark-Shark-Byte-Byte-Frost%2Fpage264&fbclid=IwAR2V66tr4psrCy8ZmRzxv33BsgrfEnenqZkFt83kfTk3dMqpV_BCkmMnO7c#post46558403) [Link to relevant post](https://www.rcgroups.com/forums/showthread.php?3372597-Fatshark-Shark-Byte-Byte-Frost%2Fpage264&fbclid=IwAR2V66tr4psrCy8ZmRzxv33BsgrfEnenqZkFt83kfTk3dMqpV_BCkmMnO7c#post46558403) [CaddX Ratel Lens at Pyrodrone](https://pyrodrone.com/products/caddx-1-66mm-replacement-lens-for-ratel?fbclid=IwAR2Femksr--vfhC5ChahHbyBWaSqlzrfQzX9bQIoGlxN7wSBbjVm4-PpHd4) [Screws on Amazon](https://www.amazon.com/gp/product/B07GKXMSVR/ref=ppx_yo_dt_b_asin_title_o02_s00?ie=UTF8&psc=1) [M12x0.5mm Tap on Amazon](https://www.amazon.com/gp/product/B07BF8WBPM/ref=ppx_yo_dt_b_asin_title_o03_s00?ie=UTF8&psc=1) [M2 Tap on Amazon](https://www.amazon.com/uxcell-Metric-Machine-Titanium-Plating/dp/B07Z9RR7PP/ref=sr_1_15?dchild=1&keywords=m2+tap&qid=1622212693&s=hi&sr=1-15)
With this file you will be able to print SharkByte RunCam Camera Body for CaddX 1.66mm M12 Lens with your 3D printer. Click on the button and save the file on your computer to work, edit or customize your design. You can also find more 3D designs for printers on SharkByte RunCam Camera Body for CaddX 1.66mm M12 Lens.