Shelf Clock
thingiverse
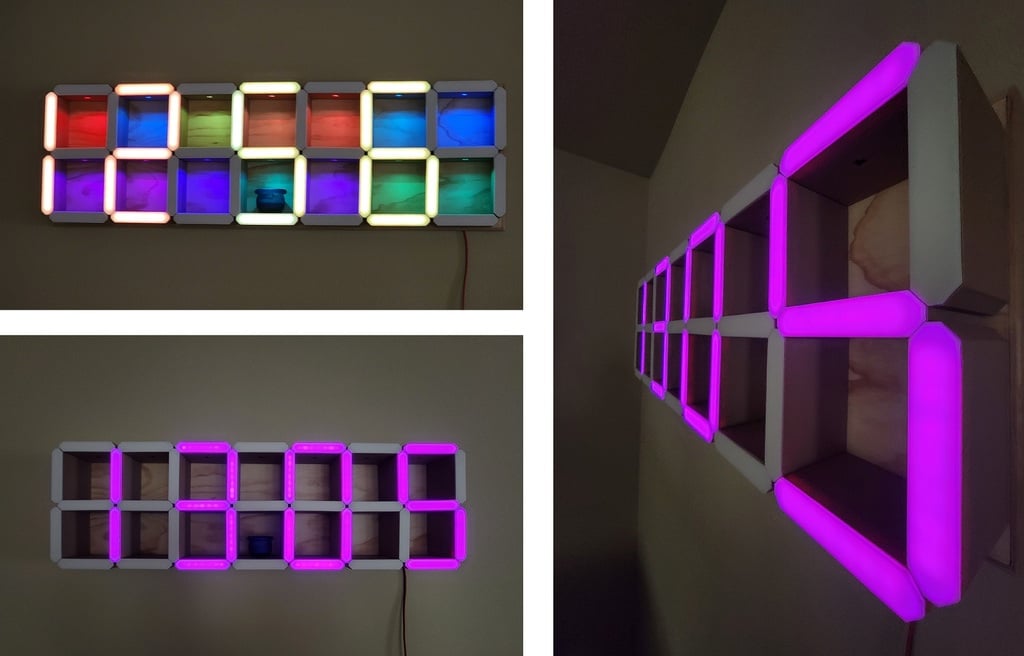
This is a clock I made for my daughter that is a remix from an idea I saw on Youtube once (https://www.youtube.com/c/DIYMachines/videos). My code here resembles nothing of what the idea was based on. (original code at https://github.com/DIY-Machines/DigitalClockSmartShelving) A lot of feature ideas came from https://github.com/helpquick/7-Segment-WiFi-Clock It's also a visual audio meter. https://www.youtube.com/watch?v=hknXNxCtM_E It has lots of features, those include: Clock Mode Date Mode Temperature Mode Humidity Mode Various Lightshow Modes (like Snake and Matrix displays) Various Music Visualizer Modes A Scoreboard A Count-down Timer A Count-up Timer New Years Mode Text Scroller Web Interface. It uses the following hardware: LOLIN32 featherboard (ESP-WROOM-32) DS3231 AT24C32 IIC RTC Clock Module DHT11 Temperature Sensor Photosensitive Resistance Sensor SparkFun Sound Detector BTF-LIGHTING WS2812B RGB 5050SMD (271 of them) I used one of these as the speaker. 5v Computer Buzzer (as a speaker) NPN Transistor BC548 with either a 1k or a 2.2k resistor (sorry I forgot witch one) as a simple 5v amplifier. I made tons of settings, and the ability to save them as presets in NVS. Because it uses soooo much NVS space for Preferences and AutoConnect I had to create a newer partition scheme for the ESP32 that moves the NVS to just before SPIFFS and then takes away some space (this was easier then trying to get it to boot the App from a different memory location (other than 0x10000) after extending the original NVS size. I included the cvs and text for it in parttition-info.txt Note: I don't write C code nor do I write Javascript or CSS for that matter, but if there's something I want to do I can usually kludge something together by using the infinite examples made by much smarter people out there. This is not my code as much as it is me researching and mixing 50 examples together, none of it is written efficiently or well. I use global variables everywhere, I don't release memory, or even initialize variables correctly. I know enough to know that I don't do any of it correctly. I just keep hacking on it until it works, and just barely most times. If you like this code and actually know what you are doing, please feel free to remake it the right way. If you can show me the places I really made bad mistakes feel free to show me the correct way and I'll try to fix it. It's close to 7000 lines long with all the web page code included, so cut an amateur with no training some slack. :) I included the modified STLs I used to make mine, basically smaller versions of DIY-Machines version and more of them and I added separate diffusers instead of his multi-filament versions, so that they can be printed on my smaller single-color 3D printer (210x210mm). The 3D versions I made using TinkerCAD are here: https://www.tinkercad.com/things/fyxXr27PCph My shelf sleeves are printed in bamboo PLA, this stuff clogs continuously so if you can live without it being real wood, it will save you a bunch of trouble. The LED diffusers are printed in white PLA. The scaffolding is printed in whatever PLA I had laying around. Print the following number of each: 37 - Lid-diffuser.STL 37 - LED Mount.STL 36 - Scaffolding.STL 1 - Scaffolding - Arduino Housing.STL 10 - Sleeve1-Bottom & Sides.STL 7 - Sleeve2-Top with Light.STL 12 - Sleeve3-Vertical Middle.STL 7 - Sleeve4-Middle with Light.STL 1 - Sleeve5-For Ardunio.STL or Sleeve5-For Ardunio with Mic-hole.STL 1 - Back-Cover.STL 1 - Back-Cover-plug.STL 1 - Arduino-Mount Insert.STL 1 - Corner Stand-off Legs.STL Printing this will take forever, something like 300+ hours, so make sure it is really what you want to spend the next month doing. Assembly instructions: Print all of the pieces. Cut the LEDs into strips of 7 LEDs. Tin all 6 leads on each strip (this will make your life a lot easier later). Mount the scaffolding elements to a board of some sort (I made a WIP template, use at your own risk). Don't forget to keep the indent for the drop lights pointing down. Glue the LED mounting strip to the scaffolding with hot-glue or super glue. Mount the LED strip to the mounting strip with hot glue or super glue. Wire the LED strips to each other as outlined in the LEDs.png in the diagrams.zip file, making note to connect the 5V to 5V and GND to GND, and keep the arrow on the strip flowing in the right direction when connecting the Data from strip to strip. I would maybe add in extra runs of 5V and GND to each segment to stop the voltage drop, voltage drop will present as a dimming the further out you go until the last LED is yellow when everything is supposed to be white. Assemble the circuit as best you can to fit in the top-right most segment, I did it, you can too, or split them between segments if you have to, but don't forget to route the wires correctly through the wire paths so your sleeve will seat all the way. Drill a hole out the back, mount the wire cover. Mount the stand-off feet. Mount the French cleat used to hang it on the wall. You should see the Autoconnect first run as it's own Ad-Hoc device in your phone's wifi connections, you will use this to setup the initial wireless settings (joining it to your wifi). If your router is nice and allows MDNS, you should be able to reach the ESP32 at http://shelfclock after the AutoConnect setup and a reboot otherwise you will need to figure out what IP it's being assigned on your own. The distance the LED diffusers (printed at 100% infill) are away from the LEDs mostly fixes the hotspots from the LEDs. The trade off is that you will get bleed through on the shelfs, so if you look at the image with 9 smaller images in it, it shows my solution to the bleed through problem, black spray paint (but only about an inch down). I made a jig out of cardboard so that I could paint 37 of them without too much trouble. I cut out a tight opening so that a shelf sleeve can just go through out of some cardboard, and then I put blue painters tape over the hole (and over the edge of the sleeve) and with a very sharp razor-knife I remove the inside of the tape leaving just the edge, then I spray paint them (making sure to cover the droplight holes too to prevent overspray from the inside out). I was able to get about 3 or 4 uses of each tape cover before it started to transfer to the sleeve and I had to cut out another one. I tried a bunch of stuff first, like 3M metal duct tape, and in the end mat black spray paint was the easiest. Programming the ESP32 is outside the scope of these instructions, but you can figure it out, I have included the custom csv for the partition and the needed lines for the other parts, just do some research. I used Arduino IDE 1.89, and the libraries and versions listed in the image file libraries.png in the file diagrams.zip. But remember, you will need to create a new version of the ESP32 that has a different type of partition (I included the needed files and settings, default_nvs.csv & partition-info.txt). First add the build environment "https://raw.githubusercontent.com/espressif/arduino-esp32/gh-pages/package_esp32_index.json" and libraries, then modify the "C:\Users\username\AppData\Local\Arduino15\packages\esp32\hardware\esp32\1.0.6\boards.txt file" and put the csv file in the location in partitions.txt, restart IDE, select the new board "ESP32 Dev Module", select the new partition scheme "Default (512KB NVS) (1.3MB APP/1.0MB SPIFFS)", compile and the upload the code, then push the data files with ESP32 Sketch Data upload. It's been a while but the "ESP32 Sketch Data upload" is also an add-in to IDE you will need to install, ESP32FS I think. Links to places I know I used code examples from: https://github.com/DIY-Machines/DigitalClockSmartShelving https://github.com/helpquick/7-Segment-WiFi-Clock https://github.com/FastLED/FastLED/wiki/Overview https://github.com/mattncsu/FastLED_examples http://84.107.155.75/forum/index.php?action=view&id=300 (all the RTTL songs) I uploaded my poorly written code "ShelfClock-github.zip" here: (updated, but use at your own risk) https://github.com/MacGyverr/ShelfClock Its code is going to confuse people because I have fake segments for the scrolling and I basically "remap" the LEDs to accomplish different views and display modes. (notice that there are really only 4 complete segments, to make it display 7 full segments would take about 100 LEDs more and make it look weird) I uploaded videos of it here. https://www.youtube.com/watch?v=FABxgoq68Fs&list=PLkV6jp60iXvjmrqkrMTHSjlMShLybMzkE
With this file you will be able to print Shelf Clock with your 3D printer. Click on the button and save the file on your computer to work, edit or customize your design. You can also find more 3D designs for printers on Shelf Clock.