Shell Load Gunpowder reloading
thingiverse
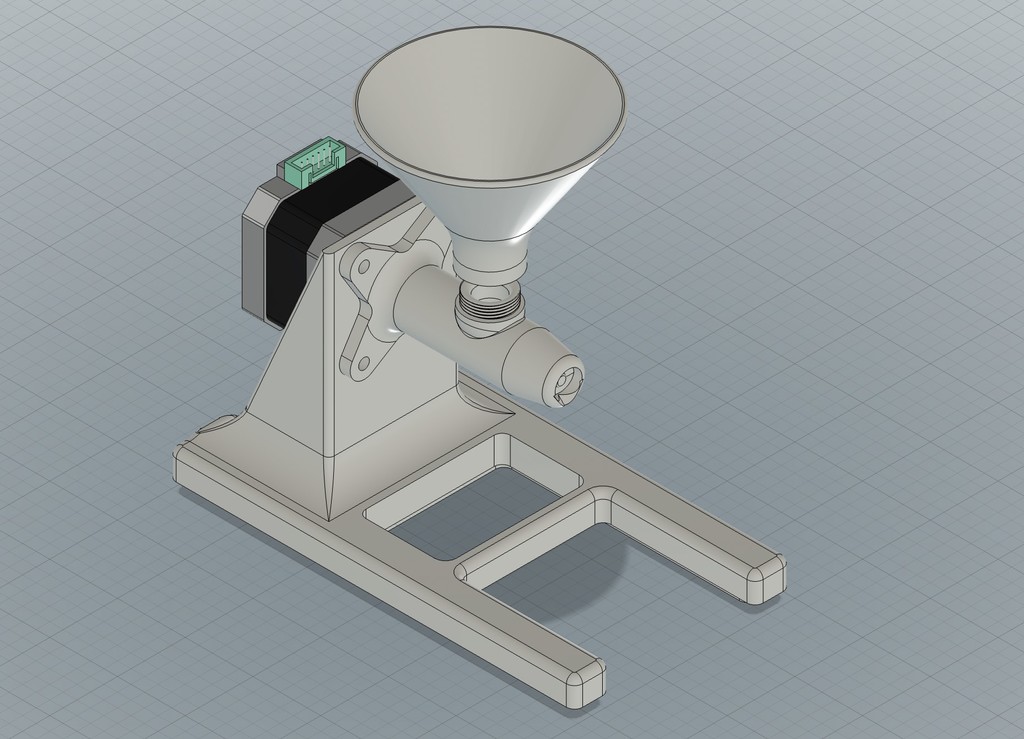
# Shell_Load-powder-measure The Shell Load powder measure packs unparalleled powder-measuring accuracy in a compact package. The Shell Load is an effective, accurate powder-measuring tool. The accuracy is between 0,02 gn - 0,05 gn with fast dosage under 5s per dosage. <img width="743" alt="Zrzut ekranu 2022-02-12 o 12 56 21" src="https://user-images.githubusercontent.com/99535681/153711311-cbba8a5c-9140-4083-9c4c-7bd0480c446c.png"> Precision Accuracy The hopper holds amount of smokeless powder for about 200 - 300 rounds, and can dispense anywhere between 0-1000 grains with a +/-0.05 grain accuracy. <img width="776" alt="Zrzut ekranu 2022-02-12 o 13 23 12" src="https://user-images.githubusercontent.com/99535681/153711299-505fe82c-baef-4240-8939-e545e822a88c.png"> LCD Display This one-piece unit features an LCD display that ensures accurate data input. <img width="725" alt="Zrzut ekranu 2022-02-12 o 13 26 23" src="https://user-images.githubusercontent.com/99535681/153711285-df8135f5-1311-49fa-9663-69d8d6b4bdfd.png"> Firmware functions: - Automatic calibration of the keyboard on the first boot, - Automatic scale calibration by any mass of the weight set for example 10g weight / 20g weight, Menu that allows user to set the following functions parameters: 0. Ability to save 10 different configurations depending on the type of ammunition and gunpowder types in relation to the weight that we want to achiev, 1. Ability to set the Units Grains (Gn) / Grams (g) as a default value to take measurements, 2. Recalibration Shell Load Scale, 3. Enable - Autotare, 4. Set point when Shell Load Scale shoud start to dosing in more slowly way and more accurate to get finall dosage, 5. Set the point when Shell Load Scale shoud start dosing super slowly way and in maximum accurate way to get finall dosage, 6. Set the Fast dosing speed, 7. Set the super accurate slow dosing speed, 8. Set the tolerance value that is acceptable by user / Maximum weighted dosage deviation, 9. Set timout for dosing, 10. Set compensation value, 11. Reset to defaults, 12. Ability to upgrade firmware. Dashboard: 1. Set the dosage to weight (gn/g) 2. Current actual weight of the dosage, 3. Tare Shell Load manually, 4. START/STOP Dosing, 5. Information about: - Dosing process Finished returning OK, - Dosing process Finished but weight is Overdosed, - Dosing process took too long and give an error of Timeout. <img width="1126" alt="SHELL LOAD v 2 0" src="https://user-images.githubusercontent.com/99535681/154578469-d5a04926-b439-4270-a12a-62b053932476.png"> [SHELL LOAD v. 2.0.pdf](https://github.com/Psyche607/Shell_Load-powder-measure/files/8092501/SHELL.LOAD.v.2.0.pdf) What is needed: A) You have to print on 3d Printers in two technologies SLA / FDM or just on SLA Printer: Firstly Print 3 main components: 1. On SLA/FDM Printer with the highest possible tolerance - BASE, - COMPUTER CASE, - SCALE 2. ONLY on SLA PRINTER !!! (Don't Print on FDM printer this can generate and accumulate electrostatic charges, leading to ignition of gunpowder.) - FUNNEL, - MOTOR GEAR, - PAN, - POWDER TUBE, - SNAIL. 3. Electronic / Firmware The main computer unit is using Arduino with specially dedicated hat, with all connectors that you need and uploaded firmware. The rest of electronic / mechanicall items that will be needed: Electronic Parts for Shield: - 1x Arduino Uno - 1x Loadcell 50g (High accurate) / 100g (Normal accuracy) - 1x HX711 Modul - 1x LCD Display 1602 with I2C Interface - 1x 5 Buttons AD Key Pad - 1x Buzzer (active high) - 1x step-down DC Mini360 LM2596 - 1x DRV8825 - 1x NEMA17 Stepper Motor - 1x Capacitor 100uF min 12V - 2x Diode 1A - 1x DC Plug 5,2x2,1mm - 1x Power Supply min 12V 1A with Plug 5,2x2,1 - 1x calibration weight (5g / 10g / 20g it is relevent what you choose, everything will work), 4. Make a SHIELD for Arduino THE SHIELD: https://aisler.net/p/MCQLSMDE 5. Upload the firmware from this site. 6. Screw everything :) SCREWS: - 19x M3x06 / For main computer TOP and all internalss (LCD, KEBOARD, MAINBOARD), Scale TOP. - 2x M3x16 / For Loadcell mount, - 2x M3x25 / For mounting Boul to Loadcell, - 4x M3x8 / Bottom of te computer unit, - 4x M3x12 / NEMA17 MOUNT, - 1x M3 screw tap Logic diagram of cable connections: <img width="800" alt="Zrzut ekranu 2022-02-17 o 15 36 26" src="https://user-images.githubusercontent.com/99535681/154504167-fdf9b303-08cd-45f3-ab63-6049bd9bd834.png">   Below Accuracy proof of the Shell Load v2.0 - Click it to watch. <div align="left"> <a href="https://www.youtube.com/watch?v=FIMm3iuClW4"><img src="https://img.youtube.com/vi/FIMm3iuClW4/0.jpg" alt="IMAGE ALT TEXT"></a> </div> Below calculation of measures as a statistics: <img width="499" alt="Zrzut ekranu 2022-02-20 o 13 00 43" src="https://user-images.githubusercontent.com/99535681/154841448-814493c2-76d0-4423-9657-0530d47b77f6.png"> 7. Have a lot of fun with it :) If you think this project is great and you want to support us, give us oportunity for further developemnt. Click on the button "sponsor this project" - below: https://ko-fi.com/psyche60715611 Thank you for all your support !!!
With this file you will be able to print Shell Load Gunpowder reloading with your 3D printer. Click on the button and save the file on your computer to work, edit or customize your design. You can also find more 3D designs for printers on Shell Load Gunpowder reloading.