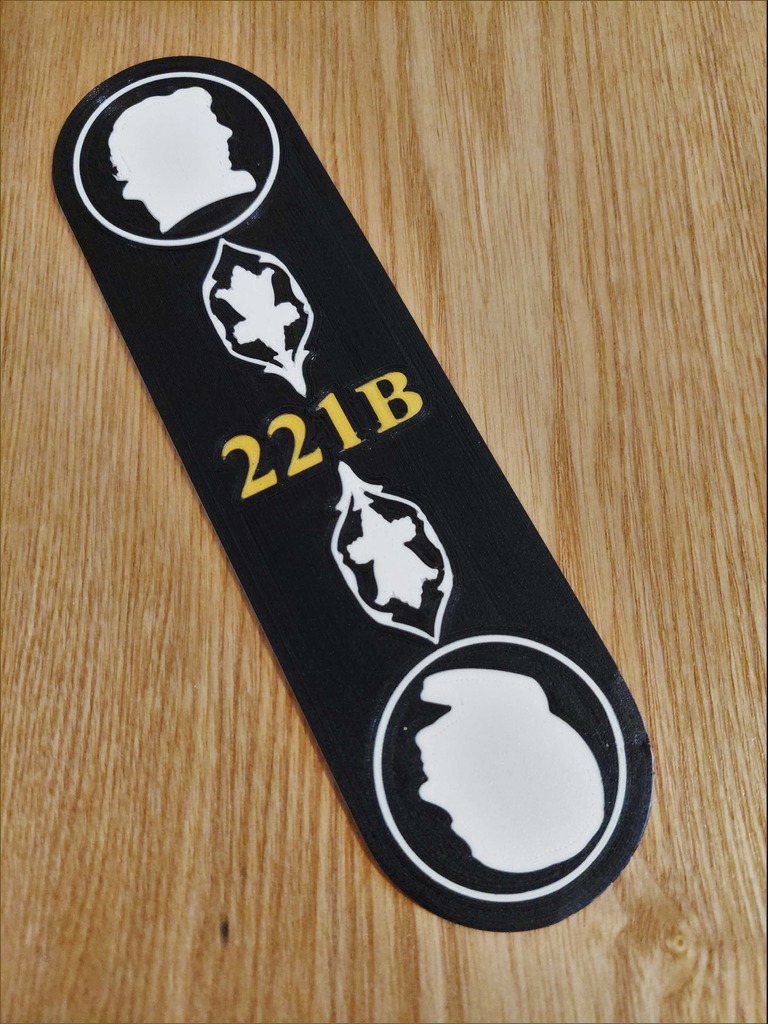
Sherlock and Watson 221B Bookmark
thingiverse
## Sherlock and Watson 221B Bookmark ##### **A Sherlock and Doctor Watson bookmark with 221B and matching wallpaper design!** ##### If you have any questions about the design or how to print, please let me know in the comments and I'll be happy to help. ------------------------------------------------------------------------------------------------------------------------ ## Before You Print This bookmark *does not* require a multi-material extruder. Instead, each STL is printed as a different colour, or multiple colours in the case of the main STL. This means that you need to align all parts in your slicer before positioning them on the bed. All parts share the same coordinate origin. Any printer with at least 180mm in either the x or y axis will fit the model. ------------------------------------------------------------------------------------------------------------------------ ## Slicing Instructions **For Cura Users:** *(as of 4.8.0)* 1. Import all STL's into Cura 2. Select all STL's and right-click anywhere in the view window, select "Merge Models" (Ctrl+Alt+G) 3. Rotate the merged models so that the side with visible emboss is facing up. The gold and white STL's should be touching the bed now. 4. Position the bookmark on your bed * It's important to position the bookmark on a level part of your bed with no blemishes or texture inconsistencies. The texture of the bed in this location will be the resultant texture of the bottom surface of the print. 5. Delete all but the gold STL in the slicer 6. Set the print settings * Layer Height: 0.2mm * Top/Bottom Line Directions: 90 degrees (if aligning longest edge with x axis) * Initial Layer Print Speed: ~12mm/s ; Slower produces a better result on the first layer, especially one with high detail such as this. All other layers apart from top surface skin layers can be printed at ~50mm/s. * Top Surface Skin Speed: ~15mm/s * Build Plate Adhesion Type: None or Skirt (brim or raft will destroy the print) 7. Slice with these settings and *save* the GCODE file 8. UNDO (Ctrl+Z) until you have all STL models back in the slicer (this will not undo your print setting changes). 9. Delete the gold and main models, leaving the white STL remaining. * **IMPORTANT** - For the white STL, you must enable "Z Hop When Retracted", with Z Hop Height: >0.5mm ; I use 0.8mm. As we will be printing each GCODE separately, the slicer won't know where the gold has been printed when we are printing the white GCODE. So Z Hop is required to avoid any collision between the nozzle and previously printed GCODE when doing a retraction move. 10. *Save* this GCODE, then Undo (Ctrl+Z) until you have all STL models back in the slicer (this will not undo your print setting changes). 11. Delete the gold and white models, leaving the main STL remaining. * **IMPORTANT** - For the main STL, you must enable "Z Hop When Retracted", with Z Hop Height: >0.5mm as mentioned in step 9 ; You may use a skirt for this, as it will not overlap any other model 12. **Before slicing this** you need to modify the GCODE with Cura's built in "Post Processing Extension > Modify GCODE" which is found in the top "Extensions" menu. * If you don't want to have a white embossed top you can skip to step 16 13. Press the "Add a script" dropdown and select "Pause at height" 14. Enter the pause settings for your printer, my CR10S Pro V2 stock firmware only works with the BQ M25 Method. Standby temperature should be set to your print temperature. * Select "Layer Number" in the "Pause at" dropdown * Set "Pause Layer" to 2 15. Repeat steps 13-14 but set "Pause Layer" to 5. * This will pause the print at layer 2 and 5; layer 3 and 6 if you count from 1, but the slicer counts from layer 0. When printing, during the first pause switch to white from black, then switch back to black for the second pause. Ensure that you fully purge the remaining colour before resuming the print. 16. Save the GCODE for Main and start warming up your printer! ------------------------------------------------------------------------------------------------------------------------ ## Printing Process 1. Print the gold STL 2. Remove the skirt if you used one, leaving the printed white on the bed. 3. Print the white STL 4. Remove the skirt if you used one, leaving the printed gold on the bed. 5. Print the Main STL in black 6. At the first pause, change and purge your filament to white 7. Resume the print, 2 white layers should print. 8. At the second pause, change and purge your filament back to black. 9. Resume the print, 2 black layers should print on the top surface. 10. Wait for the bed to cool down to ~30 degrees before attempting to remove it. * If you have a BuildTak like surface, use a shim like the 0.2mm one that comes with Creality printers to slide under the bookmark to prevent any bending that may occur when removing. You did it! Wow! Be sure to post a make if you do. Feel free to experiment with colours, and try this multi-colour 3d printing technique on another of your projects.
With this file you will be able to print Sherlock and Watson 221B Bookmark with your 3D printer. Click on the button and save the file on your computer to work, edit or customize your design. You can also find more 3D designs for printers on Sherlock and Watson 221B Bookmark.
