Shishi-odoshi water fountain. No glue or screws.
prusaprinters
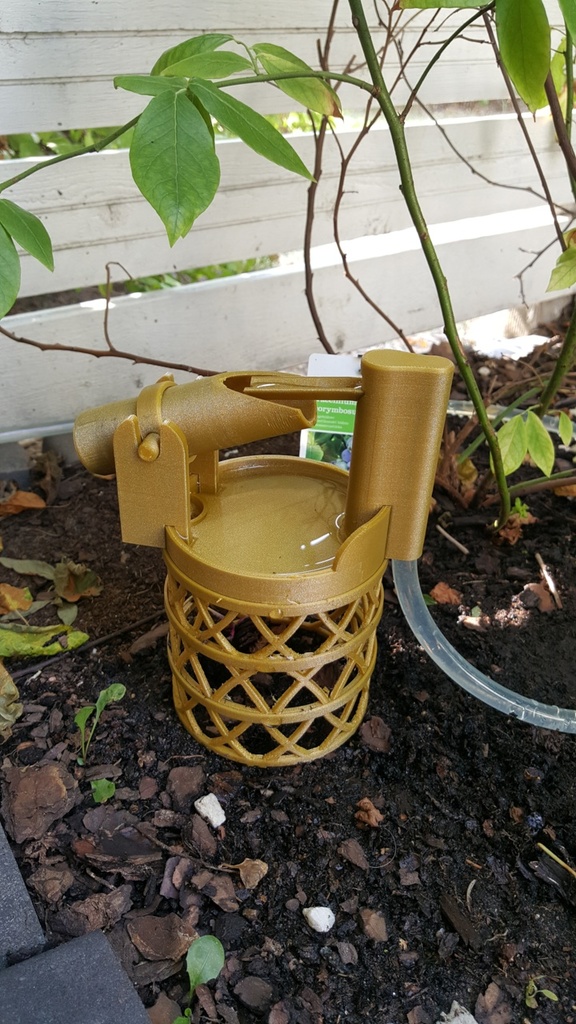
<p>We have had a super hot summer here in Finland. One day I was in our garden and realised that our neighbours AC units condense water runs to us. So i started to use it as an automatic garden waterer.</p> <p>Please see (and give a vote in the constest ;) the condense water project in Instructables: <a href="https://www.instructables.com/id/Condense-Water-Garden-Waterer/">https://www.instructables.com/id/Condense-Water-Garden-Waterer/</a></p> <p>The idea grew and it was time to make a Shishi-Odoshi. Please see below for part descriptions.</p> <p>This model consists of many parts. There are a couple of rules I follow throughout the design process:</p> <ol> <li>No glue, screws or other sticking supplies shall be needed to build the model</li> <li><p>No supports shall be needed while printing With my printer (Flashforge Createor Pro) these rules are fulfilled. Maybe if you have a printer with better tolerance the parts can be loose.</p> <p>Video of the device working:<br/> <figure class="media"> <oembed url="https://www.youtube.com/watch?v=9BKCdHRfR4A"></oembed> </figure> </p> <h3>Print Settings</h3> </li> </ol> <p><strong>Printer Brand:</strong></p> <p>FlashForge</p> <p><strong>Printer:</strong></p> <p>Creator Pro</p> <p><strong>Rafts:</strong></p> <p>No</p> <p><strong>Supports:</strong></p> <p>No</p> <p><strong>Resolution:</strong></p> <p>0,2 mm</p> <p><strong>Infill:</strong></p> <p>20 %</p> <p><strong>Notes:</strong></p> <p>There is no need for supports! The whole model has been designed to be able to print just by putting it on the printing bed and press print. See below for detailed printing instructions.</p> <p>I printed almost everything in 0,2 mm layer hight and 20% infill. The only part with different infill is the water collector. The base is printed with 100% infill to get some weight. The rest is with 20%.</p> <p>I used the same basic settings to all parts:</p> <ul> <li>Material: Fillamentum golden PLA</li> <li>Nozzle temperature: 210 C</li> <li>Bed Temperature: 50 C</li> <li>Speed: 50 mm/s</li> <li>Top and bottom solid layers: 4</li> <li>Perimeters: 2</li> <li><p>Cooling: First layer 0%, then 100 %</p> <h3>Post-Printing</h3> <p>Shishi-Odishi at work</p> </li> </ul> <p><strong>Printing instructions</strong></p> <p>Below are pictures and descriptions of how to get a succesful print. There are probably other ways also but I did exactly like below and it worked. I printed almost every part as a separate print job (as below). I find it more easy than filling the bed with lots of parts.</p> <p><strong>10 Pool like pond (left), 11 Pool like shower (right)</strong></p> <p>The water is falling to this water collector. Choose the one you like more. 10 keeps 8 mm of water on the bottom of the pool (like a bird bath) while 11 lets all water through like a shower.</p> <p>My print settings:</p> <ul> <li>0,2 mm layer</li> <li><p>20% infill <strong>20 Water canal</strong></p> <p>This part takes water from the bottom of the model to the top, where it is flowing to the water collector.</p> <p>The hole is 11 mm OD. My 10 mm hose fits perfectly in the hole. Push it deep enough so it won´t start leaking.</p> <p>My print settings:</p> </li> <li><p>0,2 mm layer</p> </li> <li><p>20% infill <strong>21 Water canal to collector</strong></p> <p>This part transfers water from the water canal to the collector.</p> <p>When printing, please be sure to put it on the table the same way as in the picture. Otherwise it might be hard to fit in the canal hole. Also please ensure that the flat area is really flat on the print bed. It goes easily a little bit tilted which results in failed print.</p> <p>My print settings:</p> </li> <li><p>0,2 mm layer</p> </li> <li><p>20% infill <strong>30 Water collector</strong></p> <p>This is the part that collects water and dumps it in the pool.</p> <p>On the bottom is a 12,5 mm solid part. I printed this with 100 % infill. Rest of the model is with 20% infill.</p> <p>If your slicer does not support different infill %, please print it with constant infill. It will also work but is a little bit harder to calibrate.</p> <p>My print settings:<br/> 0-12,5 mm:</p> </li> <li><p>0,2 mm layer</p> </li> <li><p>100% infill 12,5 mm to the finish:</p> </li> <li><p>0,2 mm layer</p> </li> <li><p>20% infill <strong>31 Water collector holder</strong></p> <p>You insert this part on the edge of the pool. It holds the water collector. On the back side is a stopper that keeps the water holder so that it does not hit part 21 water canal to collector.</p> <p>My print settings:</p> </li> <li><p>0,2 mm layer</p> </li> <li><p>20% infill <strong>32 and 33+33. Water collector ring and Water collector ring tab</strong></p> <p>The ring goes around part 30 Water collector. You calibrate the desired speed and force of the water collector dump by adjusting the position of the ring.</p> <p>You need two tabs, one for each side</p> <p>My print settings:</p> </li> <li><p>0,2 mm layer</p> </li> <li><p>20% infill <strong>40 and 41. Foot for pool and Foot connector</strong></p> <p>You need a foot under the pool to release the water. You also need it to fit the water hose (unless you dig it into the ground).</p> <p>Part 41 Foot connector is a ring which keeps foot aligned with pool or foot aligned with foot.</p> <p>Print as many feet as you need. I used three feets in my garden. Each foot is 30 mm high.</p> </li> </ul> <p><strong>Next are instructions how to build the device</strong></p> <p>The building process is really straight forward. Just click the parts together, calibrate the swing and you are finished!</p> <p>Tha calibration is done by testing the device with water and moving the water collector ring backwards or forward. When the collector comes nicely back up after a dump and you hear a click when it is up and down, then it is in the optimum position.</p> <p><strong>Here are all parts that you need and a couple feet "too much"</strong></p> <p><strong>Water collector ring with two tabs. Put the tabs through the holes from the inside. Push them all the way through.</strong></p> <p><strong>Like this!</strong></p> <p><strong>Put the ring around the water collector and push it to about the middle. The tolerance is really tight so use equal pressure around the ring when pushing</strong></p> <p><strong>This is a good location for the ring.</strong></p> <p><strong>Align the water collector holder with the squares on the pond and push it in. It can be hard to remove so please align it good on the first try</strong></p> <p><strong>Perfect!</strong></p> <p><strong>Do the same with the water canal. In the picture I have already attached the transport nozzle because I could not get it off anymore.</strong></p> <p><strong>Looking good!</strong></p> <p><strong>Starting to like something! If the water collector drops to the pond while empty you need to adjust the holding ring position</strong></p> <p><strong>Time for the feet. Take a foot and a ring</strong></p> <p><strong>Put the ring on top of the foot. Do not push it too far. Look at the photo</strong></p> <p><strong>Add as many feet you like together. Here is three = 9 cm high tower</strong></p> <p><strong>Take your 10 mm OD tube and stick it in as deep as you can to avoid leakages. Pro tip: you can put another 10 mm OD tube to the water exit hole</strong></p> <p><strong>Connected!</strong></p> <p><strong>Find a good spot for your Shishi-odoshi and enjoy</strong></p> <h3> How I Designed This</h3> <p>Designed in Fusion 360<br/> Sliced with Simplify3D<br/> Printed with Flashforge Creator Pro</p> Category: Outdoor & Garden
With this file you will be able to print Shishi-odoshi water fountain. No glue or screws. with your 3D printer. Click on the button and save the file on your computer to work, edit or customize your design. You can also find more 3D designs for printers on Shishi-odoshi water fountain. No glue or screws..