Shopbot CNC Pendant
thingiverse
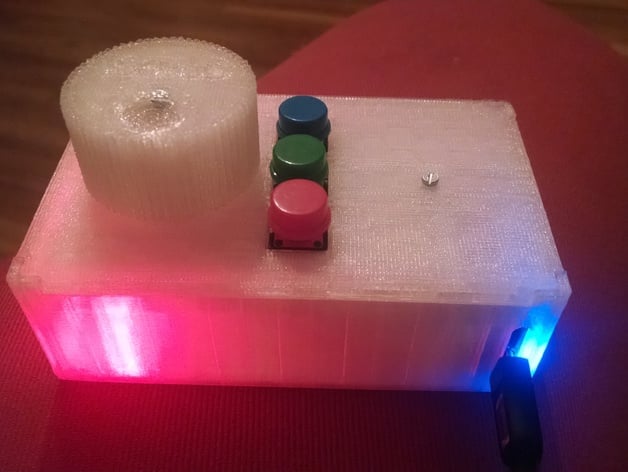
I was inspired by this CNC pendant, but I wanted to make one that I could hack on my own, add buttons, change functionality, and that I could guarantee would work well with my Shopbot. The way this works is you plug it into your Shopbot controller computer, and enter "Keyboard Control Mode" in the control software. The red/green/blue buttons on the pendant change you into "X/Y/Z" axis mode. Then the jog wheel moves the machine. The jog wheel button puts you into "detail" mode, where each movement steps the machine by a much more precise amount. Naturally, you could expand this, for example add a button for "jog" mode to move the machine faster, or add buttons to zero the X/Y/Z axes. Here's a parts + tools list: 3D Printer (I use a Makerbot 5th Gen) + filament Arduino Micro - I used the "headerless" version and then soldered on some 0.1" female headers so I could add/remove wires willy-nilly. Perma-proto 1/2-sized PCB Colorful round tactile buttons Rotary encoder 8mm through-hole Neopixel Hookup wire + soldering iron + solder etc. if you don't already have that stuff Instructions 3D Print the parts, no supports should be needed, but I had better success with rafts on a Makerbot 5th gen. Solder / assemble the electronics as indicated from the diagrams. You can get everything there from http://adafruit.com . Download the "shopbot_pendant_micro.ino" file to your Arduino Micro. Put it together. It's pretty straightforward to assemble, though you might have to file the box top a bit to get it to stick in the lid.
With this file you will be able to print Shopbot CNC Pendant with your 3D printer. Click on the button and save the file on your computer to work, edit or customize your design. You can also find more 3D designs for printers on Shopbot CNC Pendant.