Short travel manual translation stage
thingiverse
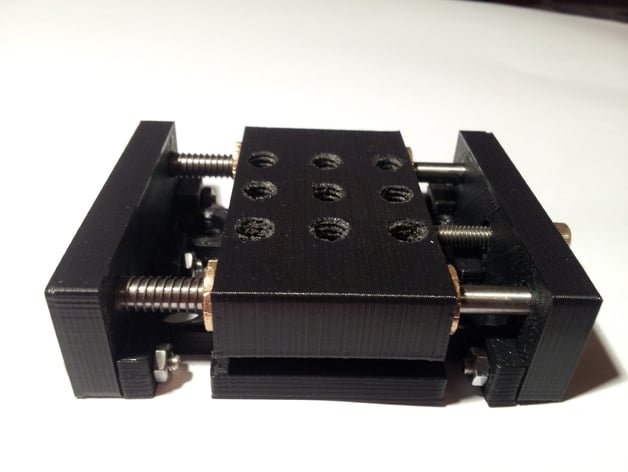
This is a proof of concept manual positioner/translation stage for optics or whatever precise things you need to place/move around. You do need some hardware to build it, but it is pretty low cost compared to a commercial version. I am just using a standard nut and screw to move the stage, but it should be pretty straightforward to put in a more precision screw. I do plan to put in a ultra fine pitch screw into one of them in the future, but in my experience for many applications standard thread screws should be adequate. I have tried my best to make the source code relatively editable and at least understandable. I am not a professional programmer or anything, so design patterns are not my forte. I wanted to make it easily changeable for people to use whatever materials they have available. I got most of them from mcmaster, but I am sure ace or a local hardware store should have everything you need. In the following list I have the mcmaster carr part number so you can see what it is. Materials needed (as configured): 2x Springs with ID > 3/16" (9657K66) 2x dowel pins with 3/16" diameter and 3" length (98381A525) 4x bronze oil impregnated bushings (6338K311) 7x M3 nut 1x M3 screw ~ 30-40mm length. 6x M3 screw 16mm length 1x small square of tape(i used kapton) to protect plastic I recommend using slightly longer springs and also maybe slightly larger diameter and k. it takes a while to get things to fit smoothly, but it should work pretty nice once you get it together. Using the 4 bushings which fit perfectly on the dowels constrains the motion well. There is no noticeable unwanted angular movement. I want to try printing one off that does not use bushings and slides directly on the plastic. I also want to experiment with nutserts because tapping 3d printed parts is kind of wonky. The files I provided are optimized for my printer, so there may be some weird stuff(mainly hole size). Feel free to edit the source code to make sure things fit snug. Luckily this thing prints pretty quickly. I am also working on making the source a bit cleaner, but I was excited about how well this stage worked and wanted to get it out there. Instructions Print off both end plates the platform as the STL has them. The platform should be printed so the holes are in the Z direction. I used 0.3mm layer height. This is probably a good time to tap the holes and place a small square of kapton tape in the middle of one of the edges of the platform so that the screw can rotate nicely on it. insert a hex nut into the hole on the end plate with a hole. tighten a screw into the hex nut to bring it in tight. It should fit tight, but if you are worried a dab of glue didnt hurt anyone. Insert the Dowels into the other endplate. Add the springs and then 2 bushings to either dowel(1 each). Then add the platform and the other bushings. press the threaded endplate into the dowel. Press the bushings into the platform by sliding it up and down on the dowels. Make sure that things move relatively smoothly. You basically want to make sure that the spring can push the platform back to its original position. Once you are sure everything slides nicely measure the distance between the endplates and edit the scad file to set baseL to this value in mm. It should have automatically created the right length, but if for whatever reason things don't work try editing it. Print the base attach the base with those nimble fingers of yours with the remaining screws
With this file you will be able to print Short travel manual translation stage with your 3D printer. Click on the button and save the file on your computer to work, edit or customize your design. You can also find more 3D designs for printers on Short travel manual translation stage.