Shorter Kalium Mag for 235mm build plate (18-dart)
thingiverse
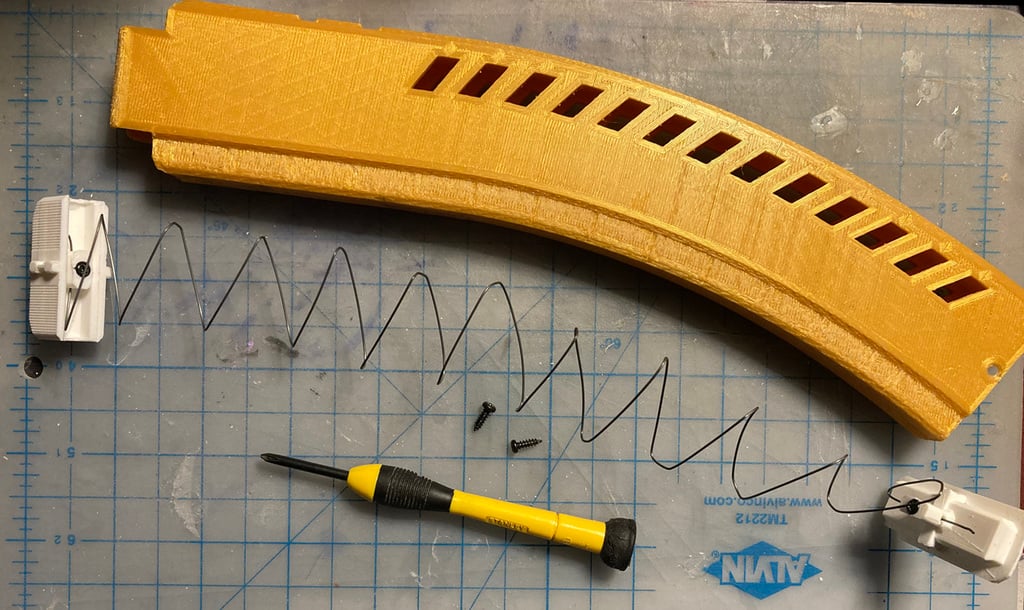
This is a remix of the <a href="https://www.thingiverse.com/thing:4647680"><b>Kalium Mags v1.0</b></a> by <a href="https://www.thingiverse.com/Thanhtacles">Thanhtacles</a> that has been shortened to a smaller 18-dart capacity in order to comfortably fit on a 235mm x 235mm build plate (such as for a Ender 3 on vanilla settings, without interfering with bed clips, purge/skirt lines, etc). Just as the original, it is a 3D-printed magazine that implements Worker's Talon standard for half-dart adapters in the hobby foam blasting ecosystem. I added an extra cm of length to the flat section of the magazine as I think that this will help to mitigate the magazine's dramatic curve and help it catch more reliably. But aside from that, I hesitated to even release this as a remix as it just shortens the original design (effectively making it <i>worse</i>) for those of us that have smaller printers and/or don't want to mess with the reserved build plate margins. Since I have been experimenting a bit with creating homemade springs using generic music wire, I figure this is as good a place as any to document the implications and insights I've run across in this particular process. So skip the following write-up and go directly to the <b>HARDWARE</b> section unless you care about such things. <hr> <b><u>On homemade springs using generic musical wire</u></b> When it comes to homemade magazines, the models by <a href="https://www.thingiverse.com/Thanhtacles">Thanhtacles</a> are designed to use <a href="https://foamblastshop.com/product/nerf-replacement-drum-spring/">drum</a> <a href="https://outofdarts.com/products/replacement-drum-spring-created-by-foamblast/">springs</a> unlike the box springs exemplified by their commercial counterparts, for what I assume is the most straightforward reason: drum springs are nothing if not predictable in their compression and release path. Unlike a custom box spring, they can also be acquired fairly easily from community shops for a modest markup, and there are enough factors in material tolerance, grain, finishes, etc. choices involved in 3D printing that mitigating the most imperative of these variances is always preferable whenever possible. So you may ask, why even bother with DIY custom springs? They require more labor and may not even prove as reliable if one lacks the skill and equipment to form them properly. First, because while it's difficult to perfect, fabricating homemade springs is fairly straightforward and doesn't require more than a bend guide and perhaps a rod of some kind (like the handle of a hobby knife). Consider for example the implication of being able to make custom tube magazine springs for more esoteric community projects like the <a href="https://www.thingiverse.com/thing:3031987">Kronos Shotgun</a> or the <a href="https://www.thingiverse.com/thing:2846629">Spring Thunder</a>. Secondly, cost-effectiveness: because they are generic within the musical industry, this kind of spring wire is fairly cheap and easy to acquire like any other standard hardware. I personally found that the going rate for this specific purpose becomes something like USD$0.05 to USD$0.10 per spring coil, cheaper if you get them from a bulk seller on AliExpress. Buying music wire was hardly going to break the bank in the first place, but unless you're impatient it doesn't hurt to wait for one of the big seasonal sales when there are across-the-board discount coupons and waived shipping fees. After running tests on both 0.6mm and 0.7mm gauge wire, I have come to the conclusion that 0.6mm is more viable for this purpose: while 0.7mm wire is stiffer and easier to work with manually (ease of bending, ability to hold its shape, etc), it seems to add a bit too much pressure on darts even with a reduced coil/dart ratio. This results in terminal darts getting crushed or popping out of the magazine lips inadvertently. Mind you, the initial selection of 0.6mm gauge wire was based on what's currently used in Nerf magazines: so while the material and tempering of generic music wire may be different from commercial magazine springs cured for this express purpose, the gauge specification at the very least seems to carry over. Would suggest sticking to 0.6mm gauge music/spring wire until further testing proves otherwise. As far as I've observed, further heat treatment does not seem necessary after using generic music wire, if only because the tempered steel is sufficiently strong as is for this repurpose. Finally, on fabricating the springs themselves: unlike with drum springs, the uniformity of the individual coils in a box spring is more critical due to how much longer the spring has to be: the greater the capacity, the greater the travel of the spring, and thus the greater the likeliness of the individual coils "locking" into each other inadvertently during full compression. If the coils are not shaped uniformly, things become a bit unpredictable as a result as the "weaker" coils having an oversized impact on how the spring compresses. In short, while it's not terribly difficult to eyeball and guesstimate a <b>functional</b> spring, overall reliability will be impacted by uniformity or lack thereof. Personally, I've found that even homemade mags fail rather rarely, perhaps once per 20 complete magdumps: but it is a concern just because a mold-injected Worker mag would not have this quality control issue to begin with. I've found that a okay-ish ratio is something like 1 coil per dart capacity, plus 2 inactive coils at the terminal ends. A 18-dart mag for example will need 20 coils (18 active, 2 inactive). Using a lower number of coils seems to be too much for the spring to take, and it will deform as a result, retaining part of the compression and thus the travel becoming too "short" to push out the final darts; on the other hand, using a higher number of coils seems to create too much pressure, and as a result the first darts will find themselves squished around the lips and/or just randomly pop out, neither of which is conducive to reliable firing. <hr> # HARDWARE <u>If using the original bumper and follower:</u> - (<b>2</b>) 8mm self-tapping <i>M2.6</i> screws - (<b>1</b>) Foamblast replacement <a href="https://foamblastshop.com/product/nerf-replacement-drum-spring/">drum</a> <a href="https://outofdarts.com/products/replacement-drum-spring-created-by-foamblast/">spring</a> <u>If using the modified bumper and follower for square springs:</u> - (<b>2</b>) 8mm self-tapping <i>M2.6</i> screws - (<b>2</b>) 6mm self-tapping <i>M2.6</i> screws - (<b>1</b>) Roll of generic music wire or spring steel - <i>Size 10</i>, 0.024" (<b><a href="https://www.aliexpress.com/item/3256802969223214.html">0.6mm</a></b>) gauge Printing in PLA seems to work fine, but the dovetail joins are rather fragile due to the direction of the grain so I would either sand down the dovetail edges with needle files, or use localized heat (aka, soldering iron) to facilitate assembly. PETG will be less snappy, but will offer better longevity and have a simpler assembly due to material flex. If you intend on using the original's instructions and were only interested in a shorter mag to print, you'll only need the <i>KaliumLeft</i> and <i>KaliumRight</i> stl files from this page. Then proceed as per the <a href="https://www.thingiverse.com/thing:4647680">original design</a>. <u>For those interested in attempting this with a box spring:</u> Use this <a href="https://www.thingiverse.com/thing:4653156">bend guide</a> to form the spring from the music wire. It should be sufficient to the task, though in recent times I have come to the conclusion the coil shape and ratio is not quite ideal. As each re-bending and adjustment inherently weakens the spring a bit more, a more accurate guide would facilitate getting it right on the first pass. I will probably create my own guide and add it to this project later on after more testing. <u>Also keep in mind that <b>steel</b> wire wants nothing more than to poke/stab into your soft, squishy body: so as usual, friendly reminder to use goggles and cut-resistant gloves when attempting this. It bears saying tbat while risk of bodily harm is rather low, poking an eye out this way would definitely be most <b>non-triumphant</b>.</u> To attach the bumper/follower to the spring, just insert the terminal end of the spring into the opening, make sure it is centered, and lock it in place with a 6mm screw. Then insert the follower+spring+bumper assembly into the magazine and lock the bumper in place using 8mm screws (you could technically get away with 6mm screws here too, but it won't be as secure).
With this file you will be able to print Shorter Kalium Mag for 235mm build plate (18-dart) with your 3D printer. Click on the button and save the file on your computer to work, edit or customize your design. You can also find more 3D designs for printers on Shorter Kalium Mag for 235mm build plate (18-dart).