Shrunken Head
thingiverse
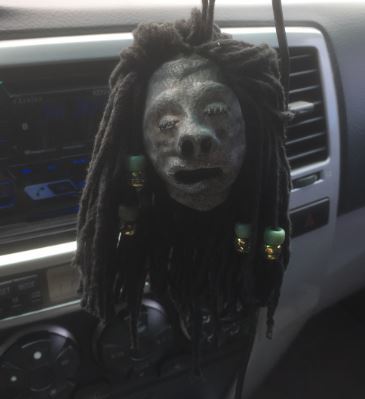
<h3> Who/ what? </h3> This is a shrunken head based off of Dre. Dre is the shrunken head on the Knight Bus in Harry Potter. <h3> The Files: </h3> There are 6 different files. The .stl files are labeled intuitively. Each version has just the head where you can add your own supports. Each version also has a version with tree supports, no additional supports needed. The shrunken heads featured were printed with the tree supports. Here's a quick summary of the differences: <h4> No Hoop Version </h4> Just the shrunken head. If you aren't planning on hanging it, this is the choice for you! <h4> One Hoop Version </h4> One with the shrunken head with one hoop. The one hoop model is more traditional and will let the head swing and twist freely. <h4> Two Hoop Version </h4> If for some reason you need the head to not twist and turn, the two hoops will help. <h3> Supplies Needed: </h3> Black Thread Super Glue (Do not use hot glue as it can melt when exposed to interior car temperatures) Beads (Optional) A Dark Colored Filament <h3> Filament Choice/ Temperature Concerns </h3> ABS should have no issues wherever your car may be. PLA has a decently low glass transition temperature. However, I have had my shrunken head (printed in PLA) in my car sitting in 90 degrees Fahrenheit (32 degrees Celsius) in full Florida sun for almost two weeks now with no signs of problems. I have no reason to believe it ever will have a problem in these temperatures. <h3> The Steps to Recreate the Featured Picture: </h3> <h4> Step 1: Print and Remove Support </h4> The one pictured was made with silver PLA. I advise a dark color as we will only apply a thin layer of paint as to not hide the details. And thus, it may not be enough paint to hide filament of a very different color. <h4> Step 2: Paint </h4> I used a mixture of brown and black paint. More brown in some areas. More black other areas. Mixed it up to my liking. I used pure black in the nose and in the mouth. You could do this anywhere from a golden brown to a darkish black. <h4> Step 3: Remove Extra Paint </h4> You need to remove the extra paint or you will lose the finer details like the threads holding the eyelids sewed shut. I find the best way is to take a napkin and dap (not rub) the head. <h4> Step 4: Paint Eyelid Threads Black </h4> You need a very small paintbrush (toothpick might work) and a steady hand, but the little details help make the final product pop. <h4> Step 5: Draw Guide Line </h4> It's better to err on putting this line too low. This is basically a little reminder to not let yourself get carried away in steps 8 and 9. <h4> Step 6: Attach Hanging String </h4> You can always make it shorter later... <h4> Step 7: Cut Black Thread (Hair) </h4> Make varying lengths. I don't know how many of you have experience in shrinking heads, but it's common for the hair to get messed up. Use longer pieces in step 9 than in step 8. You can always give your shrunken head a haircut if need be. <h4> Step 8: Glue on Bottom Hair </h4> Reminder: you should not be using hot glue. It will melt in hotter weather when in a car and your hair will fall out. Glue the hairs facing away from the line. Continue line by line until you reach the line. Depending on your glue, it may help to do a few and then wait a bit and repeat. <h4> Step 9: Glue on Top Hair </h4> Same idea. Glue the hairs facing away from the line (note this is the opposite direction as in step 8). However, you want to use longer pieces then what you used on the lower half. Make sure to get hairs in front of the hoop(s) and on top of the hoop(s). You will likely glue the hanging string in place in this process, so make sure the knot is at the top. <h5> A Quick Note on the Hair </h5> This is just an explanation of how I did the hair. You can obviously do it differently. Perhaps your shrunken head has hair draping across its face. Maybe he has a ponytail. Be creative :) <h4> Step 10: Let Dry </h4> Check your glue bottle. A few minutes should be good for most super glues. <h4> Step 11: Flip Hair </h4> Flip all the hairs above the line (pointing toward face), up and over the head. This gives the hair its poofy, volume look. <h4> Step 12: Snip Away any Ridiculously Long Hairs: </h4> There's always a couple oddballs. Just snip 'em off. If you need to do any additional snipping, keep in mind it looks better that the hairs are of varying length. <h4> Step 13: Admire </h4> Almost done! And I'm sure it's looking great. <h4> Step 14: Add Beads </h4> An optional step. But the Dre Head in Harry Potter has beads, so mine got beads. You can see two different heads in the example picture with two different bead layouts. I found gluing the bottom bead to the hair was the quickest way to do it. Remember, less can be more. <h4> Step 15: Display </h4> Hang this thing up and watch all the crazy reactions you get. <h3> Camera Credits: </h3> Special thanks to my mom for holding the camera when I needed two hands so you could get step by step instructions. <h3> Shout Out: </h3> We should all give a round of applause to companies/ people like Autodesk and SketchFab who provide free software like Meshmixer and SculptFab (respectively). They make it possible for those of us who can't justify/ afford buying the fancy stuff. <h3> Non-Commercial: </h3> I made the choice to mark this for non-commercial use. If you wish to use this for commercial use, please contact me and we can work something out.
With this file you will be able to print Shrunken Head with your 3D printer. Click on the button and save the file on your computer to work, edit or customize your design. You can also find more 3D designs for printers on Shrunken Head.