Sim City Capitol Ambient-Light
thingiverse
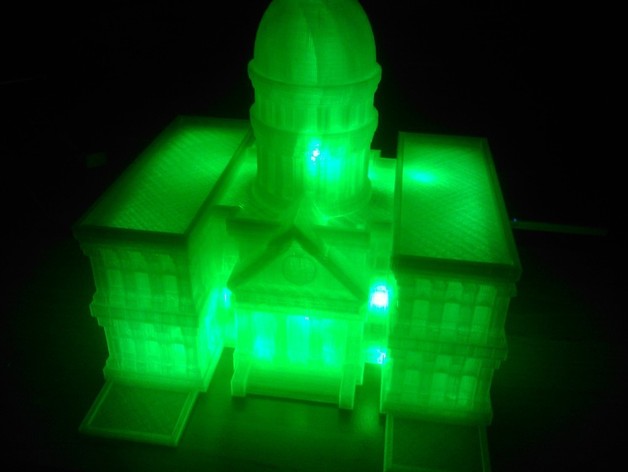
This thing is a derivate from the great Sim City 200 Tabletop Play Set by Skimbal. It uses the capitol in a much larger scale filled with an RGB-Light, so the whole thing can be used as an ambient light. UPDATE 10.07.2012: I've added the floor, which fits exactly into the mainpart and solves as a stand for the embedded LED-controller. I'll upload a picture of it as soon as possible (currently I'm printing the second house). I've also added a "Roof with dome", where both parts are combined and where the dome is hollow however. How I Designed This I simply took the capitol from his collection, scaled it up to 300%, printed it hollow and filled it with an LED-light-system. This thing describes how I achieved it. Instructions The three biggest problems I faced have been: getting such a big thing printed without any displacement print it with as little filament as possible print it hollow, so that it can be filled with a lamp To solve problem 1 I first needed to find out that I have that problem. ;) I made some test prints to solve problems 2 and 3 and realized, that at some point I had misalignments (aka missing steps) which lead to a failed print. I never realized this before as I only printed parts that have been quite small (2 to 3 hours). I found out, that my printer (orca .4) seems to loose steps when the y-axis has to change direction very quickly. So I simply reduced the speed from 60 to 40mm/s which helped fixing this issue. Nevertheless I have to check why this happens, as the printer itself normaly is capable of going with 60-80mm/s without problems. Problems 2 and 3 have been quite interesting, too. At first I tried to print the capitol with 0 infill, 4 perimeters and support material. But I haven't been able to slice the whole thing with slic3er and so did it with skeinforge. But the support material needed has been very much - much more than the building itself would need. This is simply because the roof needs support from below. So I thought about slicing the building into pieces (mainpart, roof, dome) but didn' find a good way to do this and tried it with different CAD- and STL-tools. At the end the best way of doing this was to use Netfabb Basic (free!) to slice it at a specific layer and export the parts as stl again. Then I imported the mainpart in OpenSCAD and removed that much infill, that only the walls remained. That helped me printing it with very little filament and being hollow. Nevertheless, the mainpart, the roof and the dome took about 24 hours to print all together. And I didn't count those plenty test prints I've needed... Another interesting point I've learned during this project is how to stop and resume a print (if you need to leave or want to got to sleep). I learned about the command M114. If you hit "pause" in pronterface simply send this command to the printer beforce disconnecting. This gets you the current position of the printer, so you can get the current Z-height. Then you simply need to find the G-Code line where it says something like "G1 Z2.200", where "2.200" is the height you got from the command. Remove anything before that line (except your start-code). Also remove the G28 (home all axis) and instead insert the command "G92 Z2.000" just before the "G1"-line. Set this line to the value "current-layer-height - layer-thickness" (in my case the layer thickness has been 0.2mm). This makes the printer believe that it is at that height. If you resume a print and leave the axis as they currently are than this is logically true. But this process can be used to cutout pieces of your gcode and just print a part of it starting at a specific layer. For the lights I bought a RGB controller with RF remote, that is capable of controlling some LEDs on a RGB-LED-strip. I bought these from the german supplier Conrad:http://www.conrad.de/ce/de/product/190487/EFFEKTGENERATOR-FUeR-RGB-LED-LEISTEN-RF/SHOP_AREA_17357&promotionareaSearchDetail=005http://www.conrad.de/ce/de/product/182002/LED-STREIFEN-150LEDS-5M-12V-RGB-CA/SHOP_AREA_26449&promotionareaSearchDetail=005 The fading between the colors is fantastic and you can choose between different modes with the remote. I like it. ;) For the print itself I used the "Crystal clear"-filament from Faberdashery:http://www.faberdashery.co.uk/products-page/print-materials/crystal-clear/ They have very good PLA and sell by the meter! I hope I could give others some idea on what to do with their printer. If you have any question, simply ask and I'll see if I can answer it. ;)
With this file you will be able to print Sim City Capitol Ambient-Light with your 3D printer. Click on the button and save the file on your computer to work, edit or customize your design. You can also find more 3D designs for printers on Sim City Capitol Ambient-Light.