Simple 3D Printer Polycarbonate Enclosure Bracketry
prusaprinters
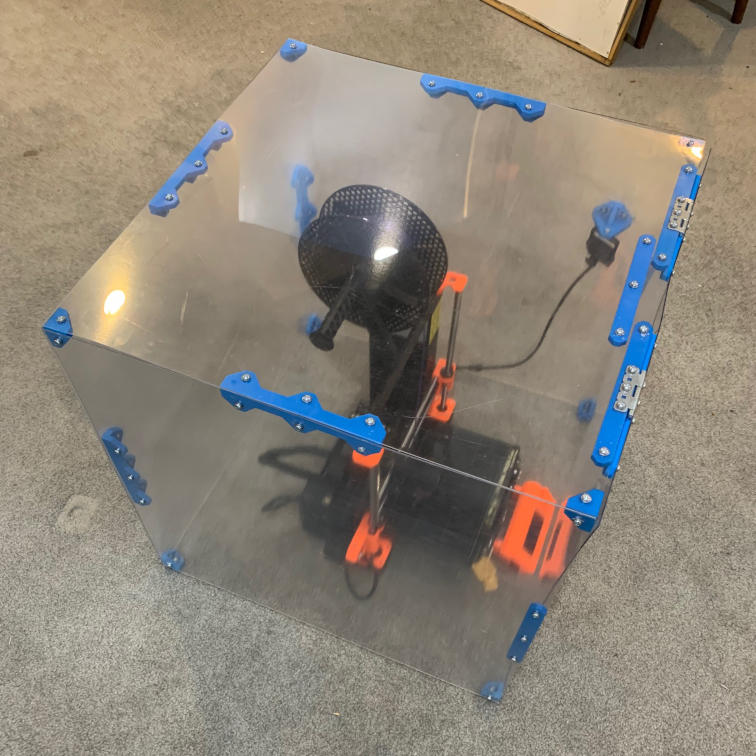
<p>This is my first attempt to build a 3D printer enclosure for my Prusa i3 MK3S. I used 0.060" (~1.5mm) 2'x2' (~610mm x 610mm) sheets of polycarbonate since I already had them from another project, but the polycarbonate is definitely not thick enough to support itself without a lot of stiffening brackets. I'd recommend 3mm or thicker if you replicate this.</p><p>To build a complete box, you need a minimum of 8 corner brackets and 4 hinge brackets for two hinges, along with 5 panels of polycarbonate. Depending on how rigid your plastic is, you can add side brackets to the center of each side segment (5 possible locations for these), and stiffeners to stiffen a local area (I used 3, but you might not need any if you use thicker plastic). You can also optionally use 4x of the feet (the 3MF/GCode includes 4x of them in one) if you like them. I used them to raise the box a bit to allow for cable entry under the box, but you could also use them to hold rubber feet so the box doesn't slide around on your table.</p><p>I've included all of the files in the FreeCAD original, AMF format, 3MF from PrusaSlicer with slicer settings, and exported GCode. I printed all of the parts with 0.3mm DRAFT profile as the base using PLA, since surface quality isn't very important as these parts are more structural than decorative. I printed without any support material, the parts are designed to have overhangs which the Prusa can handle, but a few of the nut pockets will cave in a tiny bit and the parts are designed to still function correctly despite that. All of the 3MF files show the orientation that I printed the part for best results without supports.</p><p>I designed the box using #8-32 UNF fasteners because that's what I had already, so you'd obviously have to adjust the hole and hexagon dimensions if you use metric fasteners, M5 is roughly equivalent but the nut pockets will be too large (should be 8mm + tolerance flat to flat, whereas #8 is 11 / 32" which is 8.73mm + tolerance).</p><p>The hinges I used are from <a href="https://www.vexrobotics.com/275-1272.html">Vex Robotics</a> since I already had them. They have 5x holes with a ½" spacing between them, and the brackets use 3 of the holes with a 1" spacing. You are of course free to modify the bracket to fit your own hinges.</p><p>The camera bracket holds a cheap PoE fish eye camera I got from Aliexpress, but anything with a bolt hole should work. You can print as many as you need to hold your cameras. </p><p><a href="https://www.apalrd.net/projects/2021/3d_printer_box/">Read my blog for the full process of going from a foam tile box to this.</a></p>
With this file you will be able to print Simple 3D Printer Polycarbonate Enclosure Bracketry with your 3D printer. Click on the button and save the file on your computer to work, edit or customize your design. You can also find more 3D designs for printers on Simple 3D Printer Polycarbonate Enclosure Bracketry.