Simple Machines Education Kit
thingiverse
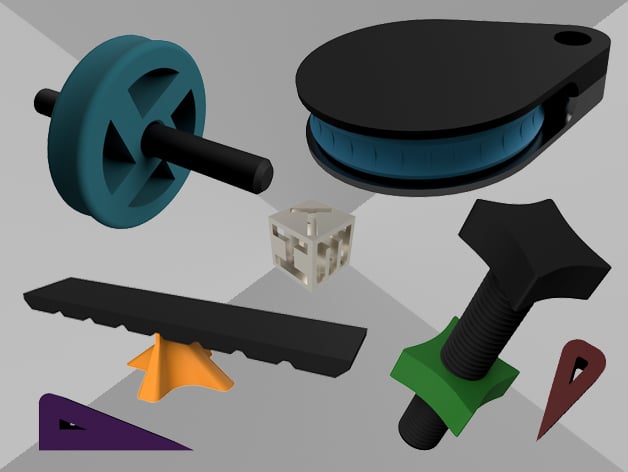
The Simple Machines Education Kit takes very little assembly, and can be done by any age group. Print out some or all of the machines to demonstrate to students just how cool 3D printing is. Learn about how forces can be transferred using these machines that we all see in our everyday lives. The kit includes: Inclined Plane + Wedge Lever and Stand Pulley Nut and Bolt Wheel and Axle Take a look at the (very few) instructions for assembly. Print Settings Printer Brand: Printrbot Printer: Simple Black Rafts: Doesn't Matter Supports: No Notes: Print the axle with a brim. Post-Printing Assembly of Pulley Needs: Pulley Mount 1 + 2 Pulley Wheel Some sort of glue (I like superglue for PLA) Hands Take Pulley Mount 1 and place the pulley in the rotation joint. Place some glue on the tip of the rotation joint on Pulley Mount 2, as well as the flat area where the mounts will press together. Put the two pieces together and let harden. All set! Assembly of Wheel Needs: Wheel Axle Elastic Band(s) Put the elastic band(s) in the groove on the wheel. Put the axle through the wheel so it rests in the groove. Ready to roll! How I Designed This Design Tools Designed with Autodesk Fusion 360 Custom Section Project: Create a Rube Goldberg Machine Objectives: Learn about how forces are transferred using simple machines, and other creations.Audiences: Grade 3 - 10 Preparation: Print out a set of simple machines for each group to be manipulated while planning. Steps: Brainstorm how to move things using force transfer Draw it out Create it! Results: Have a plan for (or actually create) a Rube Goldberg machine!
With this file you will be able to print Simple Machines Education Kit with your 3D printer. Click on the button and save the file on your computer to work, edit or customize your design. You can also find more 3D designs for printers on Simple Machines Education Kit.