Simple nozzle cleaning station
thingiverse
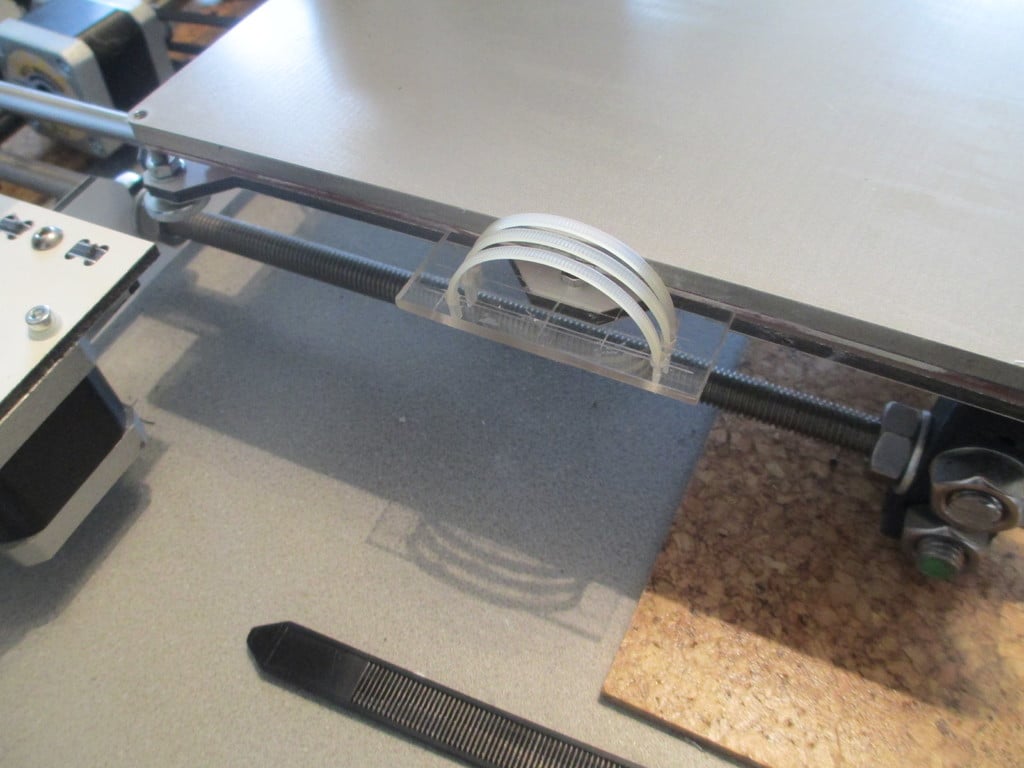
Just a concept, that I've been testing for several weeks now and it works great. Made it for my homemade Prusa i3. Mechanically should work for all Prusa i3 derivatives. This is an extremely easy nozzle cleaner to build. I used PVC clear and drilled and sawed it to my needs. Will upload a .stl file for those who cannot make something like this on their own. But it should be very easy without that, or you can do it much better. I've tested the concept and it works amazingly well. The idea is to run the nozzle over those 3 zippers before any print. The zippers are usually made of nylon, so they'll stand the heat, but still after dozens of uses will wear out. I have an Autobedleveling system, so some of the moves before printing can be a bit tricky to program. I wanted the nozzle to be clean BEFORE the ABL starts to avoid wrong results because of an oozing nozzle or remains of a previous print on the nozzle. The cleaning station uses three zippers which were cut and bent so they reach above Z=0. The side with the ripples was turned upside down, so the ripples/notches will scratch over the nozzle. That will help the cleaning. The process for the G-Code: Write a script that is being executed before each print (Repetier Host - Printer settings - Startcode). Turn on the extruder and make the printer wait until the temperature is reached. Execute a Z homing in order to find the right altitude. Let the printer pass the heated hotend over the zippers in a zigzag pattern. Home X and Y. Start the ABL routine, then the print job follows... Now this is MY G-code that I put in front of each print job. Yours may differ, depending on the coordinates of your cleaning station, temperature, etc. ------------------------------------------------------------------------------------------------------ ; Home X and Y G1 X0 F1500 G1 y0 F1500 M104 S230 ; set extruder temperature M109 S230 ; wait for temperature to be reached G28 ; home all axes ;Go to coordinates cleaning station G1 y125 F3000 G1 X215 F3000 ;Heating nozzle M190 S106 ; set bed temperature M109 S230 ; wait for temperature to be reached ; Cleaning G1 y60 F3000 G1 y110 F3000 G1 y60 F3000 G1 y110 F3000 G1 y60 F3000 G1 x214 F300 G1 y60 F3000 G1 y110 F3000 G1 y60 F3000 G1 y110 F3000 G1 y60 F3000 G1 X213 F3000 G1 y110 F3000 G1 y60 F3000 G1 y110 F3000 G1 y60 F3000 G1 y110 F3000 G1 y60 F3000 G1 x212 F3000 G1 y110 F3000 G1 y60 F3000 G1 y110 F3000 G1 y60 F3000 G1 y110 F3000 G1 y60 F3000 G1 X211 F3000 G1 y110 F3000 G1 y60 F3000 G1 y110 F3000 G1 y60 F3000 G1 y110 F3000 G1 y60 F3000 G1 x210 F3000 G1 y110 F3000 G1 y60 F3000 G1 y110 F3000 G1 y60 F3000 G1 y110 F3000 G1 y60 F3000 ; Go to a safe position before ABL G1 y0 F3000 G1 z20 ; raise Z axis 20 mm to avoid any possible collision ;Start Autobedleveling G28 ; Home all axes ------------------------------------------------------------------------------------------------------ Use an M3 screw and a nut to fasten the cleaning station on your Y carrier. Choose WATCH to follow the project evolve or simply follow me. Enjoy.
With this file you will be able to print Simple nozzle cleaning station with your 3D printer. Click on the button and save the file on your computer to work, edit or customize your design. You can also find more 3D designs for printers on Simple nozzle cleaning station.