Simple Sneaker
thingiverse
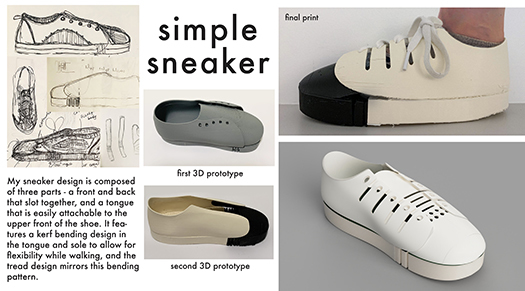
Materials needed: Prints of three files provided Shoelaces or a shoelace-length piece of ribbon, thread, or similar material Optional materials: Pliers Sandpaper Print sneakerback.stl oriented such that the sole is centered on the base of the printerbed. Print sneakerfront.stl so that the flat face at the front of the sole is face down on the center of the printerbed. Print sneakertongue.stl oriented using these rotate settings: X: -166 degrees, Y: 92 degrees, Z: 14 degrees Print all files with the following settings: Supports: On Infill: 20% Layer thickness: .2 mm Shell thickness: .8 mm After printing, remove supports (a pair of pliers makes this easier). Sand and paint as desired. Connect the front and back of the shoe by pressing the tab on the front sole into the slot on the back sole. Using thread, ribbon, or the shoelace you intend to use on this shoe, stitch together the 4 holes on the tongue to the 4 holes on the front half of the sneaker. Use the remaining length of the lacing material to lace up the holes on the back half of the sneaker.
With this file you will be able to print Simple Sneaker with your 3D printer. Click on the button and save the file on your computer to work, edit or customize your design. You can also find more 3D designs for printers on Simple Sneaker.