Simple Syringe Paste Extruder
thingiverse
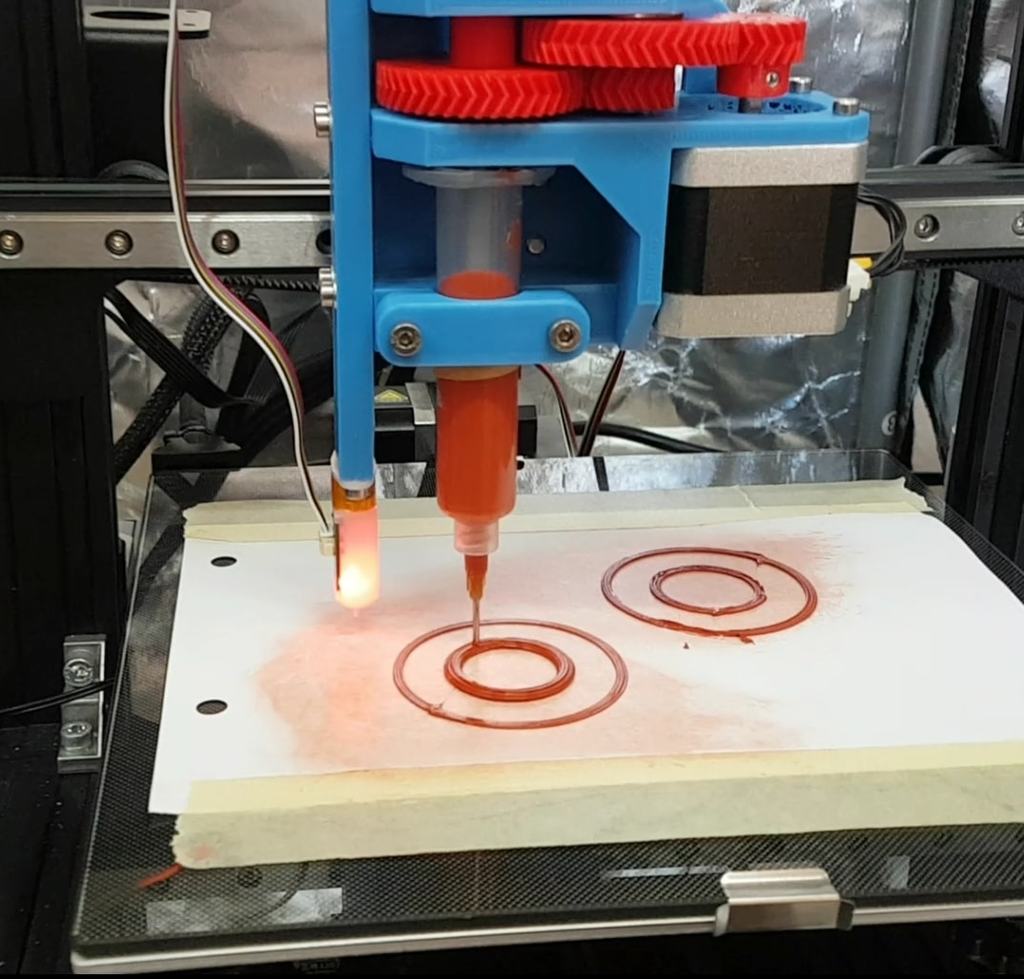
This is my first try realizing a syringe extruder. My first prototype worked surprisingly well but, this is still work in progress and more of quick and dirty rather than good engineering. I hope to make some updates/upgrades but I do not make any promises. I designed it to fit on my Ender 3V2 with linear rail and dual z-axis mod and I wanted it easily removable so I went for the nice quick tool changer from @properprinting. There are many other designs for syringe extruders available, some quite good, but I wanted to use not parts, that I didn't already have (syringes, screws and bearings) and fit easily to the printer and tool changer (e.g. I used three gears instead of one very big and one very small). I included all STEP files, so feel free to modify for your needs. Materials for printing: ================ I wanted to be able to print silicone for some uses at work and try some other things like chocolate (yet to come, including heating/cooling), but you can print many paste-like substances, preferably thixotropic, not too viscous but not too liquid either. Nutella would work good I think but unfortunately it does not solidify. I used RTV 159 silicone (thixotropic high temperature) for a kitchen sink gasket and it worked quite well. For 'runny' liquids you can use the extruder as a dispenser. Required settings: ============== E-steps/flow: ------------------- The gear ratio is 2x 1:2.5 so combined 1:6.25. The rotational to linear conversion is done by a standard M8 nut and M8 rod (with 1.25mm pitch). The force you need and the e-steps / flow is mainly dependent on the viscosity of your material and the size of your tip. I estimated that I needed cranking up my e-steps to 500 (from 93 with a stock Ender 3v2 or in my case 140 with dual gear extruder) and it worked pretty well, slight flow adjustments should be sufficient. Temperature: ----------------- I disabled the heated bed (0°C) and had to enable Cold Extrusion by using the M302 P1 command (and M500 for storing, remember to disable with M302 P0 afterwards). Print speed: ---------------- I used 20mm/s, worked very well, i guess you can go a lot faster, depending on the material you print. But mind not only the possible extrusion flow but also the weight of the extruder. Single-z-axis-motor systems like stock Ender 3 or 3v2 may have also issues with the weight. Retraction: -------------- I designed the mechanism incl. plunger fixation to make retraction possible. Especially for materials with low viscosity that's a must in my opinion. The value depends on the material and tip size. Just try. Z-seam: ----------- I had some inconsistencies at the z-seam, i guess you can improve a lot using combing. Bed type: --------- Dependent on your material. For silicone i taped a sheet of paper on the glass bed, worked good, especially after a failed print when you rub it off and print again. I thought (ptfe-coated) permanent baking paper would also be a good option. Nozzle position: ---------------------- The nozzle in this design is about 25mm to the left and 6mm to the front, compared to a generic Ender 3v2, but just for the nozzle. With the tool changer (and in my case the linear x-axis) it is some 20mm more in y direction, so I lose a little bit printing area. I like to address it if I have time, but for now the print area is more than sufficient. Parts needed: =========== I designed this extruder for parts i already had, so I didn't spent time on thinking where and what to get. You will need 1x M8 threaded rod. length dependent on your syringe, should be ~50mm longer. I used 180mm. 3x ball bearings 608zz (for the gears). I guess you could even use 3d printed bearings such as https://www.thingiverse.com/thing:4851975 4x M4x5 or M4x6 set screws (for the axle fixations) 1x M8x25, x30 or x35 (for the middle gear), you could also use a bit of M8 rod. 4x M5x10 (for the Quick Tool Adapter) 8x M3x10 or similar (for the motor and BLTouch mount) 4x big M3 washers (for the BLTouch mount) 3x M3x6 or similar (for the NORDSON plunger and BLTouch) For the motor you can use any standard NEMA17 motor, either the extruder motor from your printer (e.g. Ender 3) or a new one (like i did to reduce tool changing effort) NORDSON EFD 10ccm syringes/'barrels' (e.g. 7012007) , plungers/'pistons' (e.g. 701224) and nozzles/'tip' (e.g. 7018106) or compatible. You can get all 3D-models here: https://www.3dcontentcentral.com/parts/supplier/EFD,-Inc.aspx, I don't include them because I don't know the copyright situation. BLTouch: ------------ I added an adjustable BLTouch mount, for easy homing. No need to use it, but I like it very much. Notes on threads: ------------------------ I like printed threads, even in PLA. If your printer is tuned correctly and the treads are well designed (size and legth) printed threads should work fine for most applications. If you have print issues you can always use a tap cutter. For threads used very often you can modify it to use thread inserts or nuts. Notes on Quick Tool Changer: ---------------------------------------- Modified quick tool holder for this extruder: https://www.thingiverse.com/thing:4878149 @properprinting's Quick change tool system: https://www.thingiverse.com/thing:3369444 Known issues: =========== - I had some trouble that the syringe was pushed out because the grip wasn't good enough. So I put a small piece of sand paper in between. For V1.1. I added a holder (just turn the syringe 90°) so this shouldn't be an issue any more. - assembling/disassembling of the plunger is a bit tricky, I want to improve that, maybe using set screws and I want to add a variant for a rubber type plunger. Changes V1.1: -------------------- - added a missing hole - added a hole for the tool changer lever screw - added a holder to keep the syringe from being pushed out - added a hexagon to the plunger adapter for easier installation / removal - made the holes for the tool changer adapter slightly bigger
With this file you will be able to print Simple Syringe Paste Extruder with your 3D printer. Click on the button and save the file on your computer to work, edit or customize your design. You can also find more 3D designs for printers on Simple Syringe Paste Extruder.