Simple V-tail quad copter
thingiverse
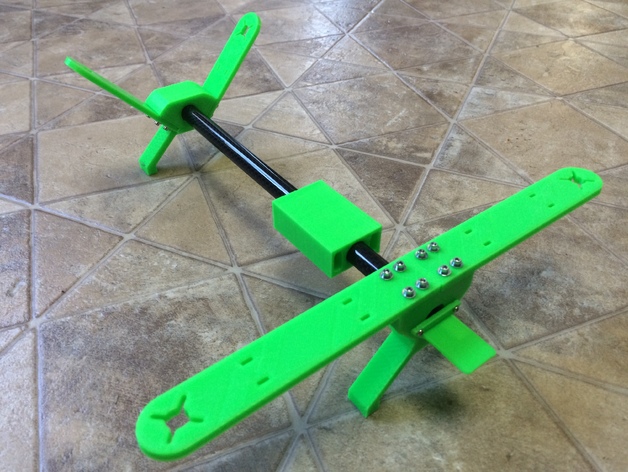
I've printed several Multicopters from Thingiverse with great success, so I decided it was time to design my own completely from scratch. My goal was to create a simple quadcopter with minimal parts that is sturdy and easy to maintain. I also wanted the ability to easily change the configuration from a V-tail to an H-quad. Using leftover 12mm carbon tube from a Tilt-Rotor project, I started designing my new quadcopter. The front, middle, and rear tube mounts slide onto the CF tube and can be screwed in place once the correct placement is found. The middle mount can be shifted back and forth to adjust the CG, and it has routing slots that keep the wiring organized. My quadcopter flies well as a V-tail, but I haven't tried the H configuration yet. There's also a camera mount for FPV flying. For those interested in experimenting with different lengths, I've included the Sketchup file for the front and rear arms. I uploaded a revised STL file for the V-tail arm to correct an error that needed about 1/16" trimmed from the bottom. The original arm didn't line up correctly with the pilot holes in the rear tube mount. This update ensures proper alignment, and I've also revised the Sketchup file. It's always frustrating to find mistakes after printing a part. On April 23rd, I added on-board flight video to showcase my quadcopter in action. I printed mine using a Solidoodle Workbench with the following settings: no rafts or supports, 0.3mm resolution, and 70%-100% infill. I used PLA for printing, but ABS may also work well, although the arms might be slightly more flexible. I designed this quadcopter using Sketchup, and the arms are secured with Dubro servo mount screws. My build features 1804 2300kv DYS motors, a KK2 mini control board, Favourite 6A 4-in-1 ESCs, a 6 channel micro receiver, and a Nano-tech 950mah 2S battery. The motors screw on with 2x8mm long bolts. I've had great success with the 4-in-1 ESCs, which fit neatly under the control board and reduce wiring clutter. FPV flying enthusiasts will appreciate the camera mount in front and the area on top of the rear mount for the FPV transmitter. The Carbon Fiber tube is 12mm in diameter, and the tube length is 248mm or 9.75 inches. I'd like to claim some scientific method behind this length, but it's actually a 19.5" Carbon tube cut in half. Please note that minor adjustments may be necessary for optimal CG location, as parts fit can vary depending on your 3D printer setup. A small amount of filing might be required on the tube mount holes for proper fit. I've included two variations of the rear tube mount: a single landing leg and dual landing legs. The dual provides extra stability, while the single allows for larger props if needed.
With this file you will be able to print Simple V-tail quad copter with your 3D printer. Click on the button and save the file on your computer to work, edit or customize your design. You can also find more 3D designs for printers on Simple V-tail quad copter.